System Settings
General Setting
- Setting up your school profile can be done through General Settings under System Settings.
- On General settings, you can see the option to add:
- School Logo: The school logo is an image or graphic representation that serves as a visual identifier for the school. It is often displayed on official documents, websites, and other materials.
- School Name: This is the official name of the school, which is used for identification and branding purposes.
- School Slogan: A school slogan is a short and memorable phrase that encapsulates the school's mission, values, or ethos.
- School Address: The physical location where the school is situated, including details such as street address, city, state, and postal code.
- Phone Number: The contact phone number for the school, which can be used by parents, students, and staff to get in touch.
- Email: The school's official email address, often used for communication and correspondence.
- Session: Academic Year Setup: This refers to defining the academic year or session duration, including start and end dates.
- Session Start Date: The specific date when the academic year or session begins.
- Attendance: The option to set up the attendance tracking system, which can be configured as either "Day wise" (daily attendance) or "Period wise" (attendance for specific class periods).
- Biometric Attendance: An option to enable or disable the use of biometric technology (such as fingerprint or facial recognition) for tracking attendance.
- Devices: This section may involve the management of hardware devices used for various purposes within the school, such as biometric scanners or ID card printers.
- Language: The choice of language for the school management system, allowing users to interact with the software in their preferred language, e.g., English or Nepali.
- Date Format: The format in which dates are displayed and recorded within the system, such as "dd/mm/yyyy" or "yyyy/mm/dd."
- Timezone: Configuring the timezone to ensure that dates and times in the system align with the local time of the school's location.
- Start of the Week: Setting the first day of the school week, which may vary from Sunday to Friday or Monday to Friday, depending on the school's schedule.
- Calendar: Choosing the type of calendar system to be used, such as the Gregorian calendar (English) or the Nepali calendar.
- Currency: Selecting the currency that the school uses for financial transactions and accounting purposes.
- Student Admission No. Auto Generation: Setting up the system to automatically generate unique admission numbers for new students.
- Staff ID Auto Generation: Configuring the system to automatically generate unique identification numbers for staff members.
- Miscellaneous: This section includes additional settings or options that don't fit into the categories above, allowing for customization of various system features such as setting up fees due date, Teacher restricted mode, Duplicate fees envoice, etc.
- Current Theme: Selecting the visual theme or design style for the school management system's user interface.
- Dashboard Design: Customizing the layout and content of the system's dashboard, which provides an overview of key information and functions for users.
 Image
Image
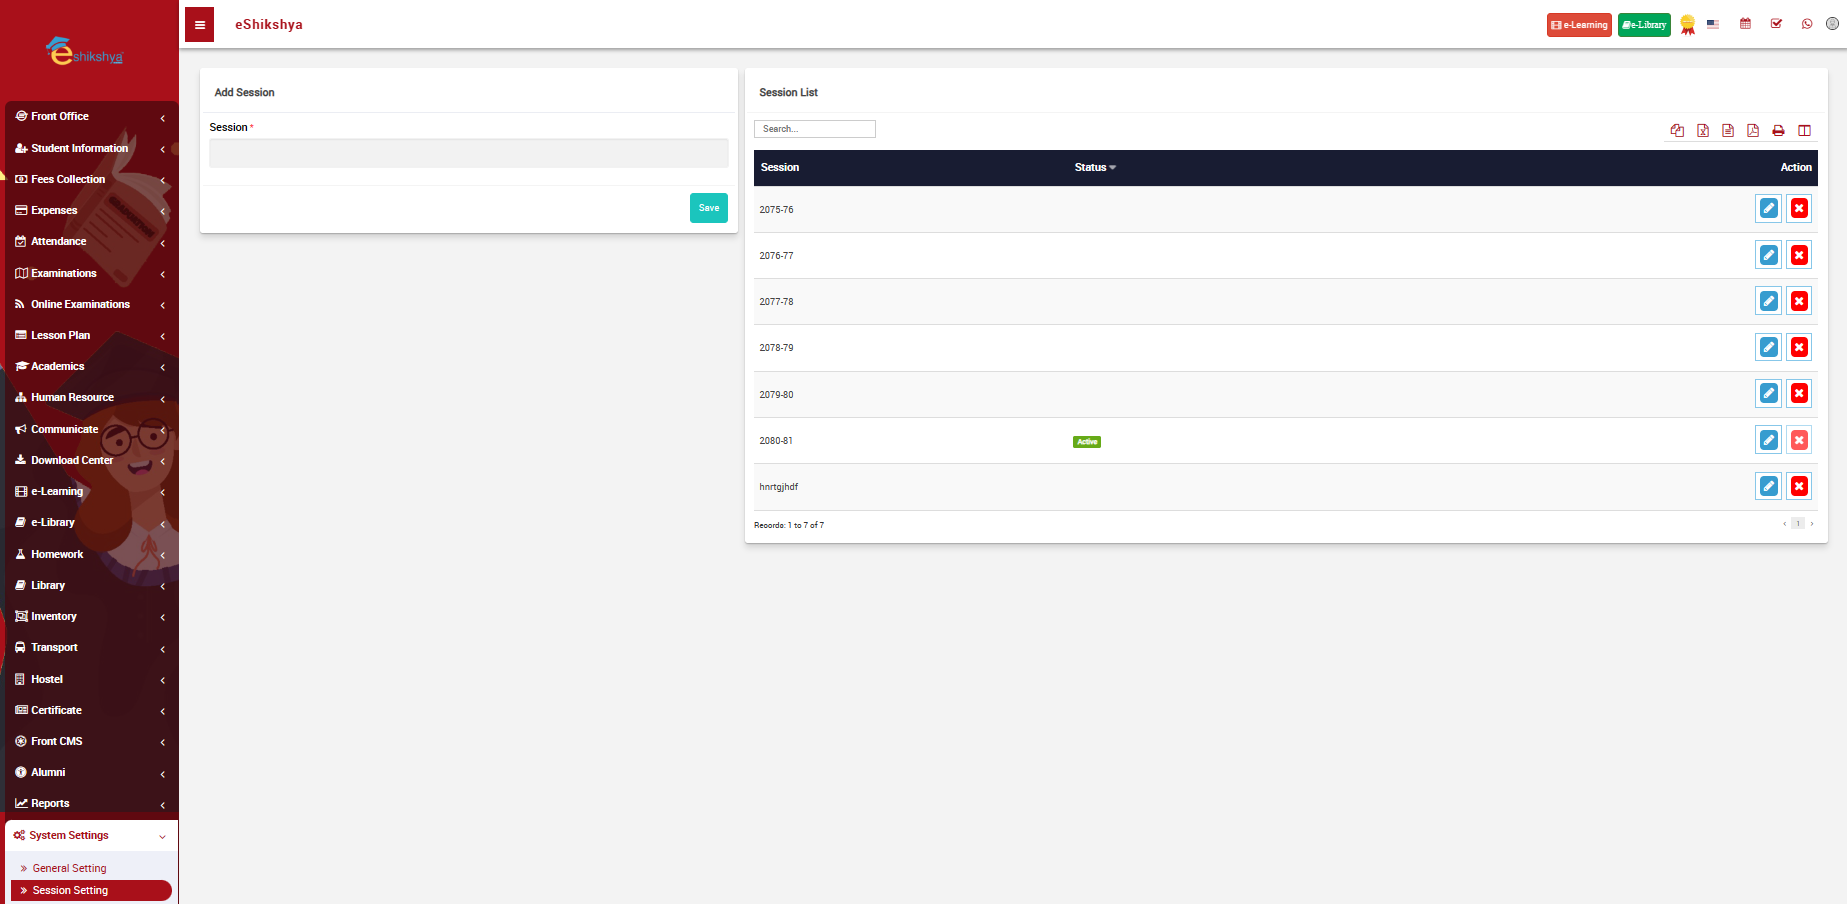
Session Setting
To setup the Academic year that is, was and is going to be in effect into the system. This setup session will be presented in the list selection in General settings.
- To add new session, go to Session Setting under System Settings, the following page should appear.
 Image
Image
- On the left side of the page, there is an option to add new academic year.
- Enter the year you want to add and click on save.
- The entered year should appear on the list on the right side of the page.
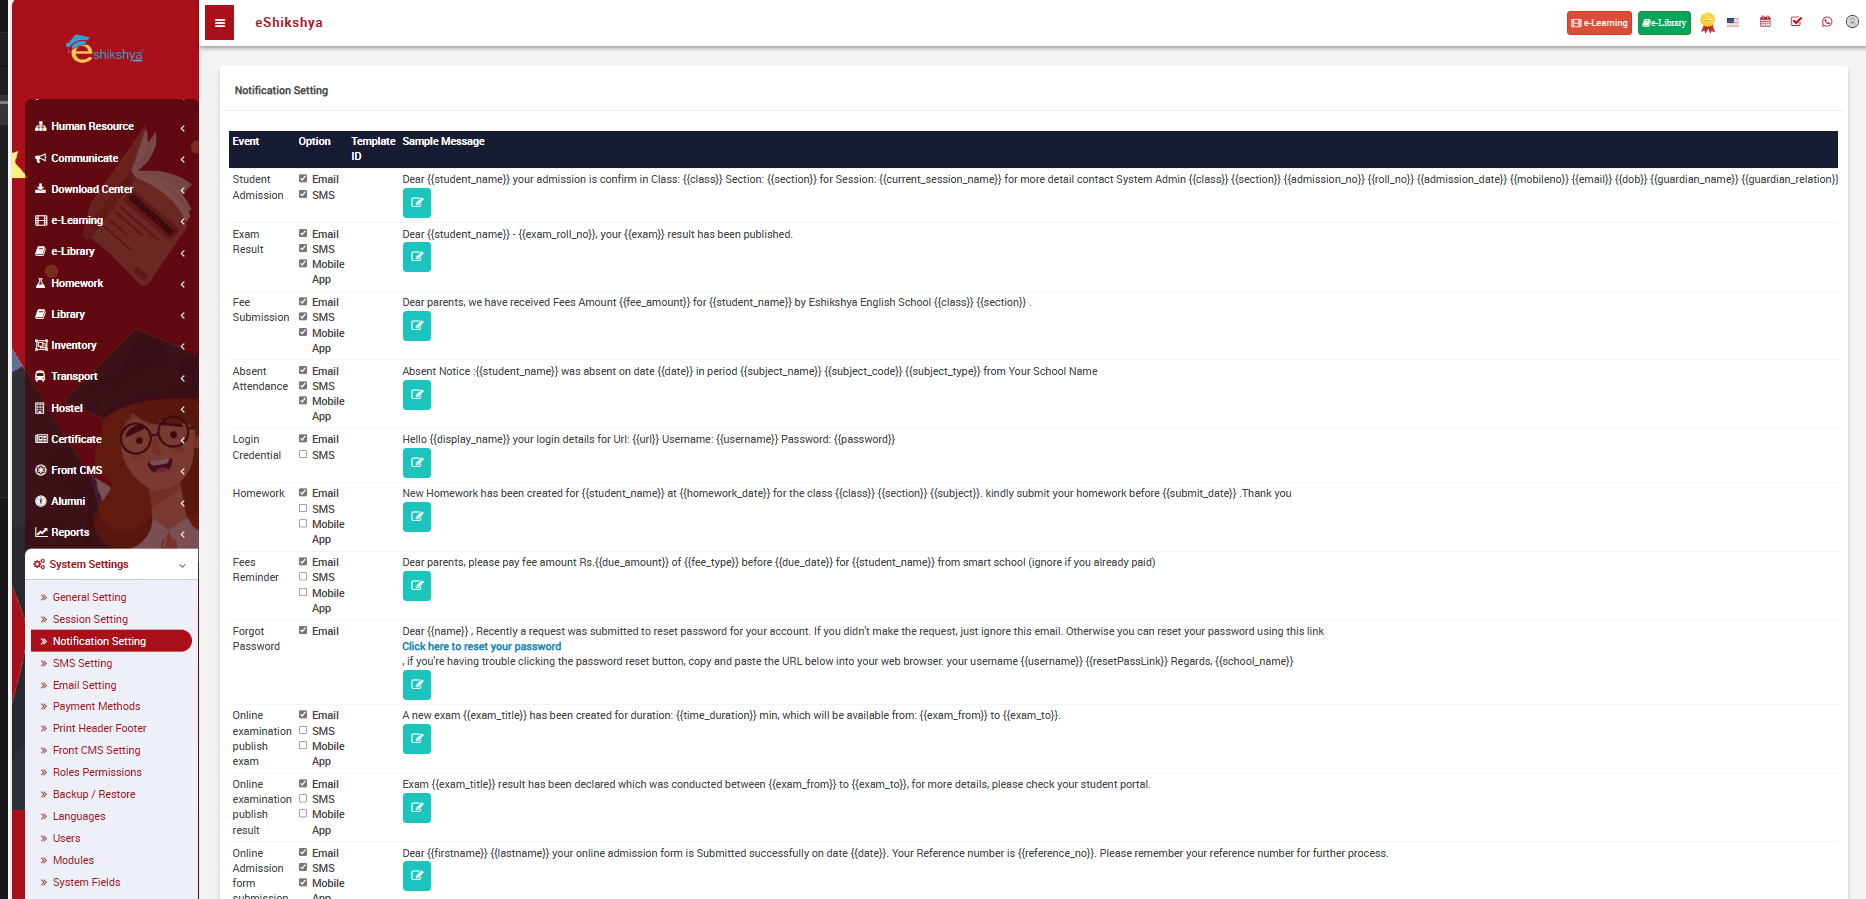
Notification Setting
- To setup Default notifications to promt the system to send notifications for different events, go to Notification settings. The following page should appear.
 Image
Image
- As you can see in the Image above, there is a sample message ready for different events such as Student Admission, Exam Result, Fee submission etc.
- In case of the sending notification of student admission, you can select the mode of sending the message from the options given e.g., Email, SMS, etc.
- Similarly, select the mode of sending notifications from the options for each of the events to set up your notification settings and click on save.
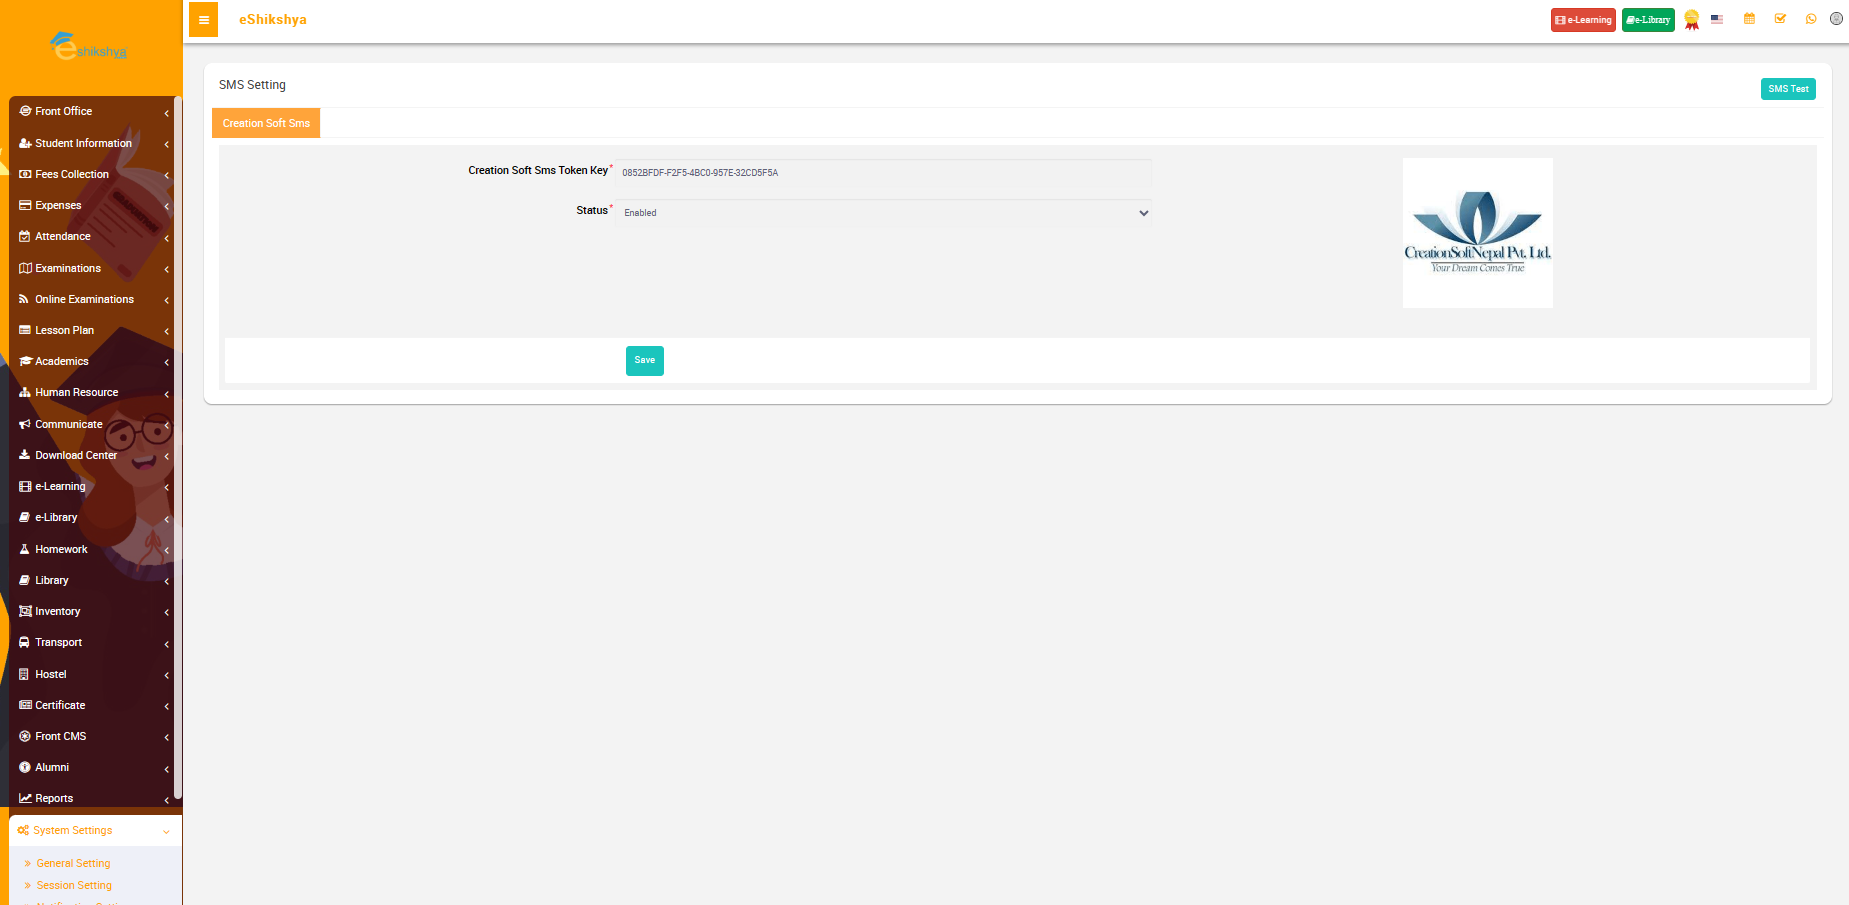
SMS Setting
You can setup your mode of sending SMS notification here.
- To send SMS notifications, you will need an API token from your chosen SMS service provider. If you haven't already, sign up for an SMS service provider and obtain an API token. This token is like a key that allows the school management system to send messages through the SMS service.
- To setup the SMS setting, go to SMS setting under System setting. The following page should appear.
 Image
Image
- In the SMS settings, locate the field labeled "API Token". Enter the API token you obtained from your SMS service provider into this field.
- In the SMS settings section, you should see an option to enable or disable SMS notifications. Set the status to "Enable" to activate SMS notifications and click on Save.
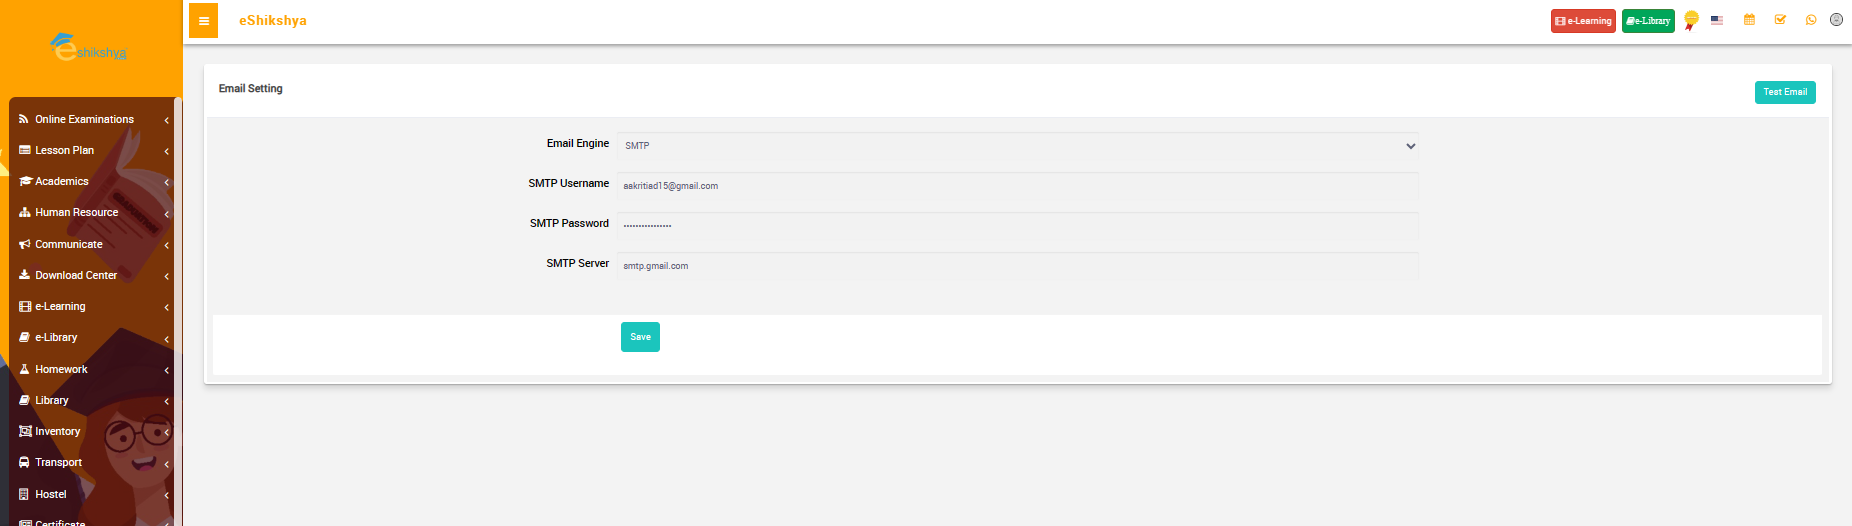
Email Setting
You can setup your mode of sending email notification here.
- To send Email notifications, you will need to set uo the Email engine, Username, Password and Server.
- Go to Email setting under System setting. The following page should appear.
 Image
Image
- In the Email Settings section, you will find a drop-down menu to select the email engine or service you want to use. Options include SMTP (Simple Mail Transfer Protocol) or an integrated email service like Gmail or Microsoft Outlook.
- If you choose SMTP as your email engine, you'll need to enter the following SMTP details:
- SMTP Username: This is the username or email address associated with the SMTP account you plan to use for sending emails.
- SMTP Password: Enter the password for the SMTP account.
- SMTP Server: Specify the SMTP server address, which is provided by your email service provider. This server is responsible for sending emails.
- Click on Save.
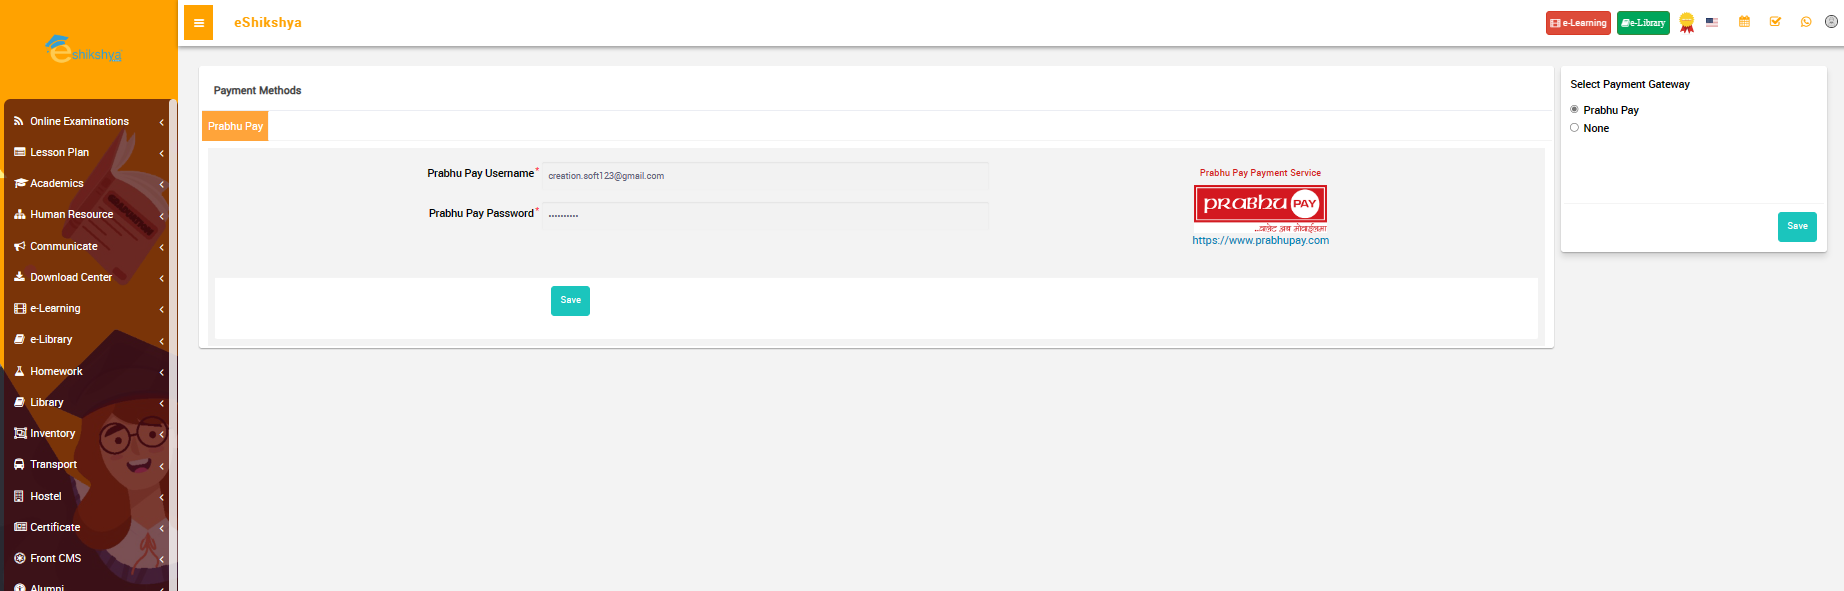
Payment Methods
You can setup the payment gateway and method here. This is where all your cumilative money for different payments like admission fees, school fees etc.
- You are required to select the payment gateway.
- Then you are rewuired to enter your wallet/ bank username & password and click on save.
 Image
Image
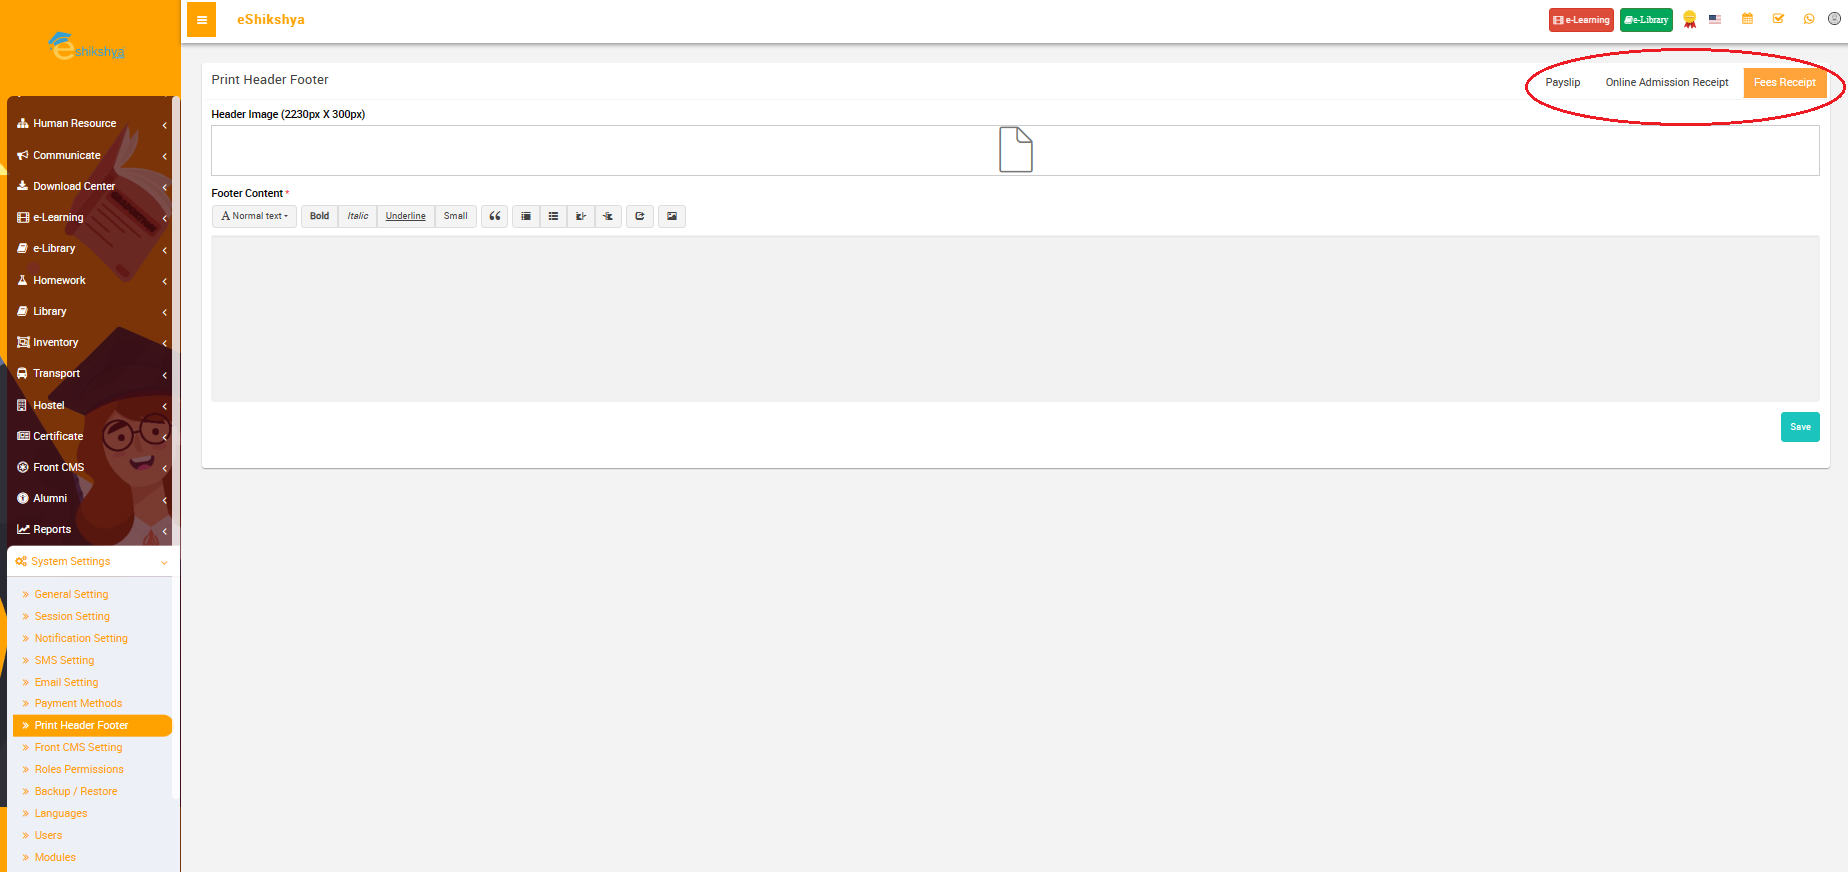
Print Header Footer
This features helps you design your payslip, admission receipt and fee receipt. You can manually upload the header and footer you want for each of them.
- Go to Print Header Footer under System settings. The following page should appear.
 Image
Image
- The red circled part on the image shows you the options to navigate through what you want to upload a header and footer to, i.e., Payslip, Admission receipt or Fee receipt.
- Select the option and upload the header in the given space as shown in the image.
Front CMS setting
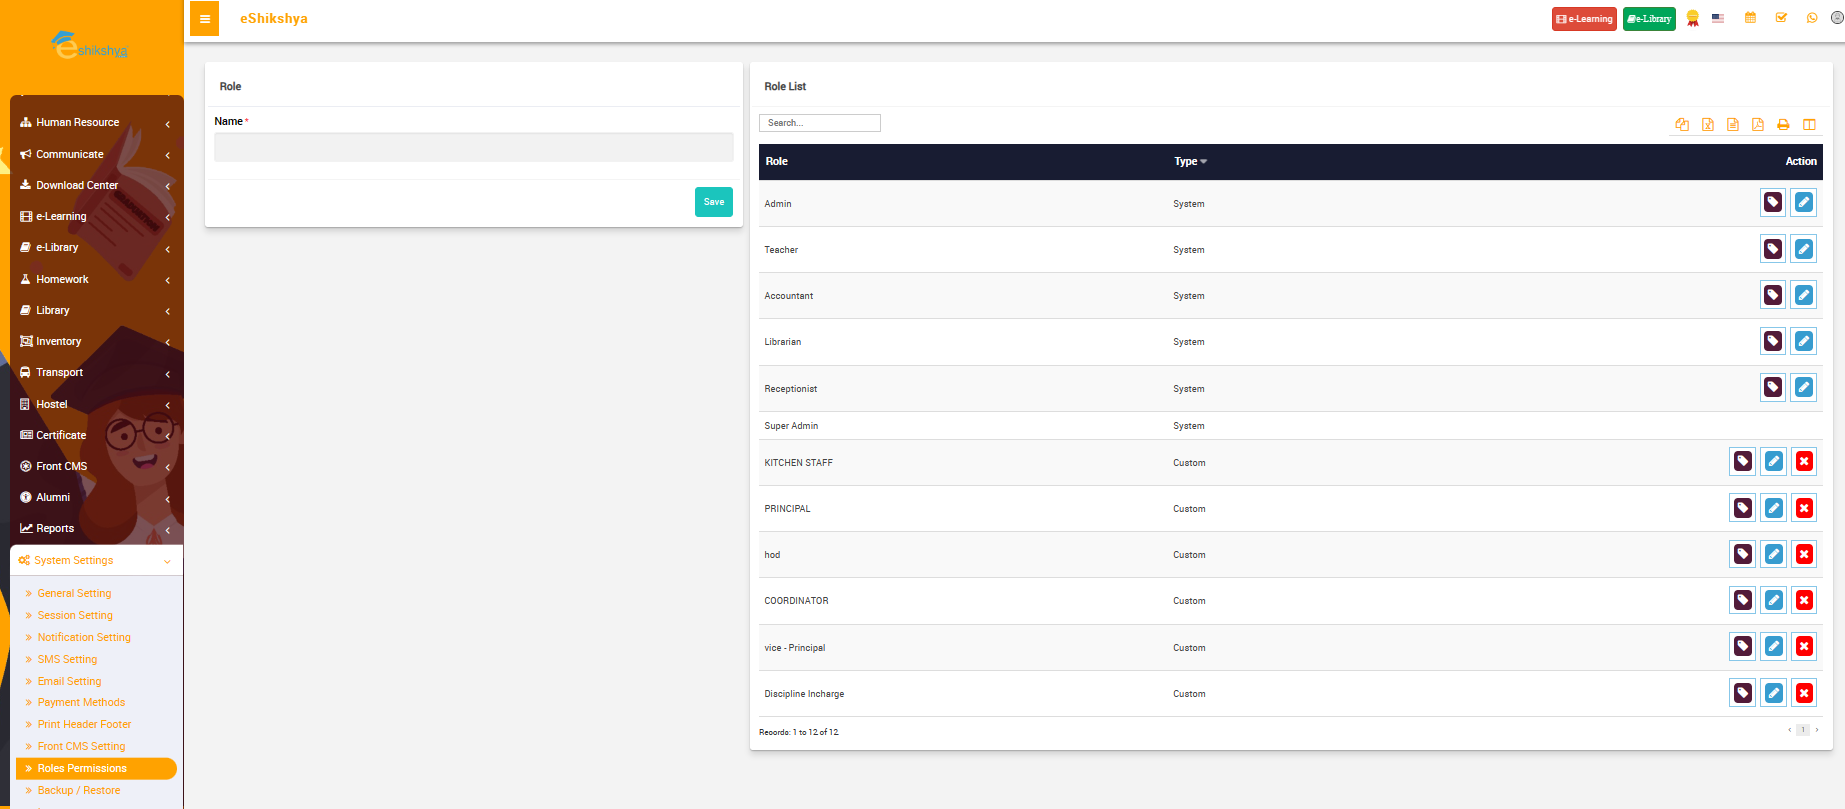
Roles and Permission
In order to manage user restrictions i.e., To allow or disallow access to the modules according to the roles assigned to the staffs.
 Image
Image
- As shown in the image above, To create a new role, type the role name in the given space and click on save.
- The created role should appear on the list on the right side of the page.
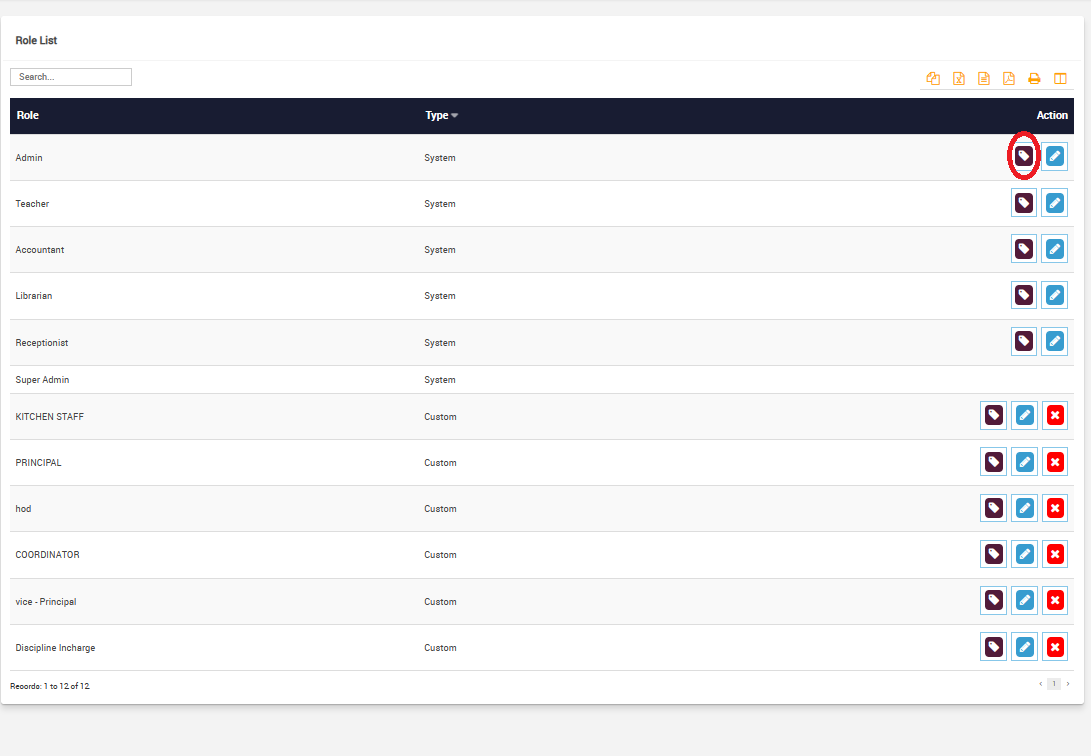 Image
Image
- The red circled action button on the image above is the "assign permission" button.
- Click on assign permission button next to the role you want to assign permission to. The following page should appear.
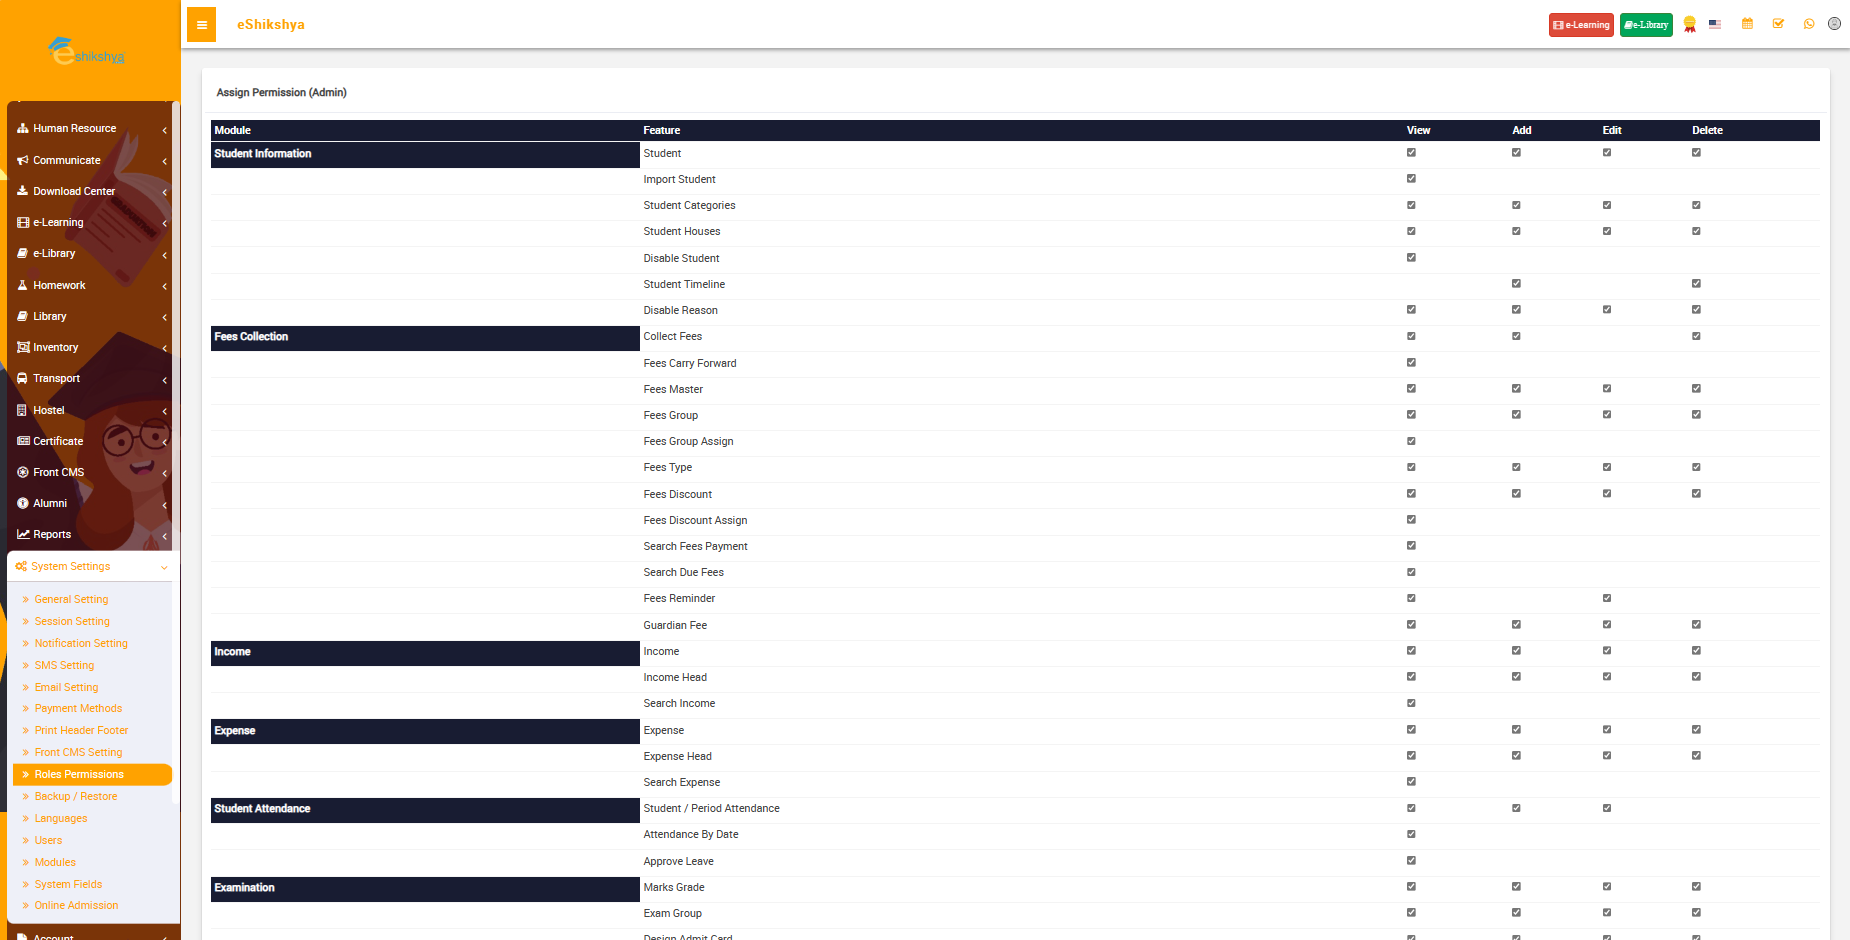 Image
Image
- There are check boxes under the permissions such as view, add, edit and delete. Tick the check boxes for the permissions you want to assign and click on save.
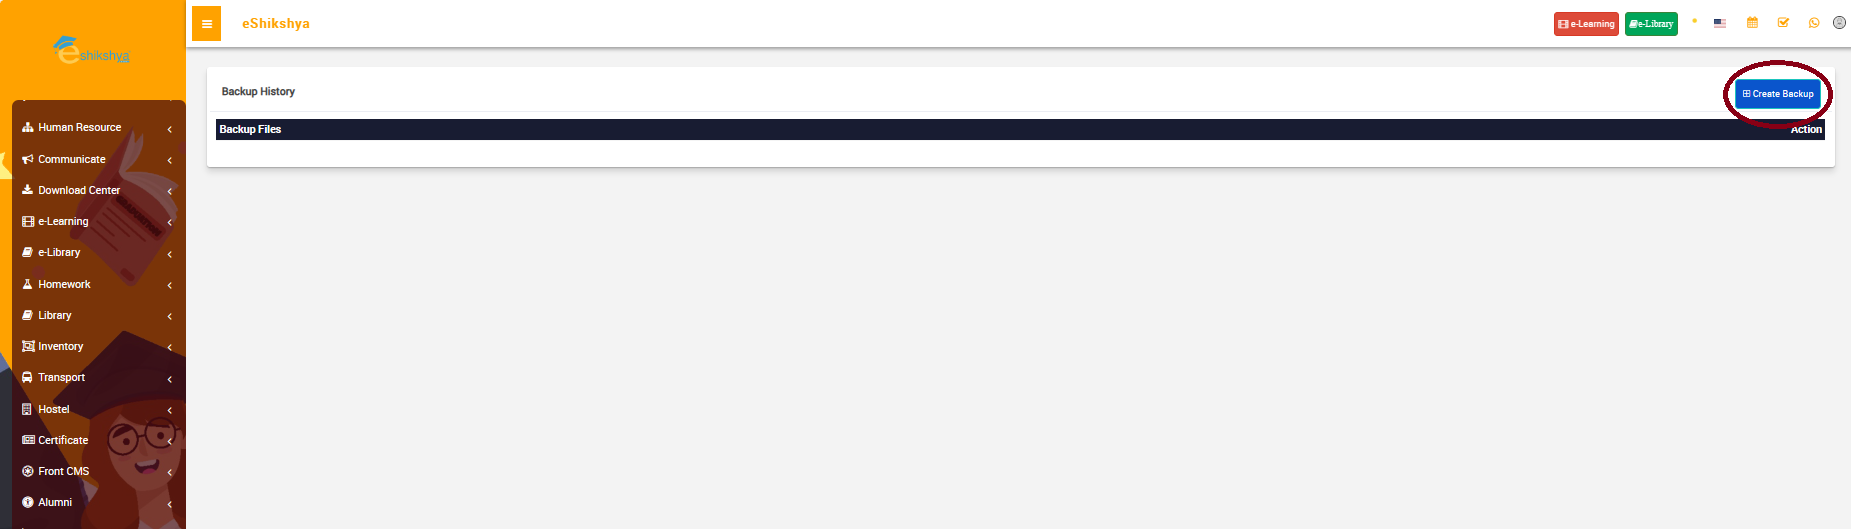
Backup / Restore
To create a backup of the system data, go to backup/ restore and click on the Create backup option as shown in the image below.
 Image
Image
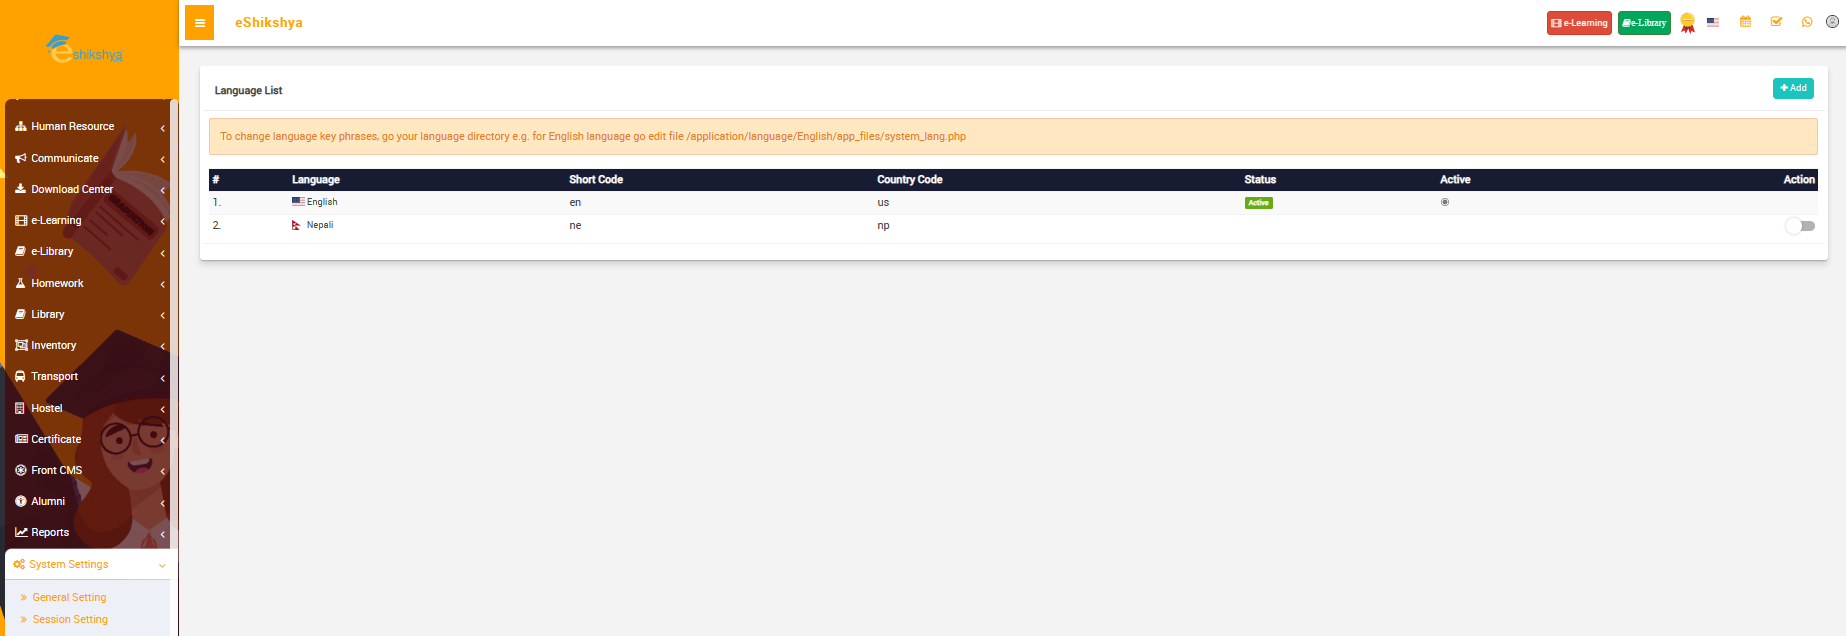
Language
This feature allows you to choose your mode of language.
 Image
Image
Users
Modules
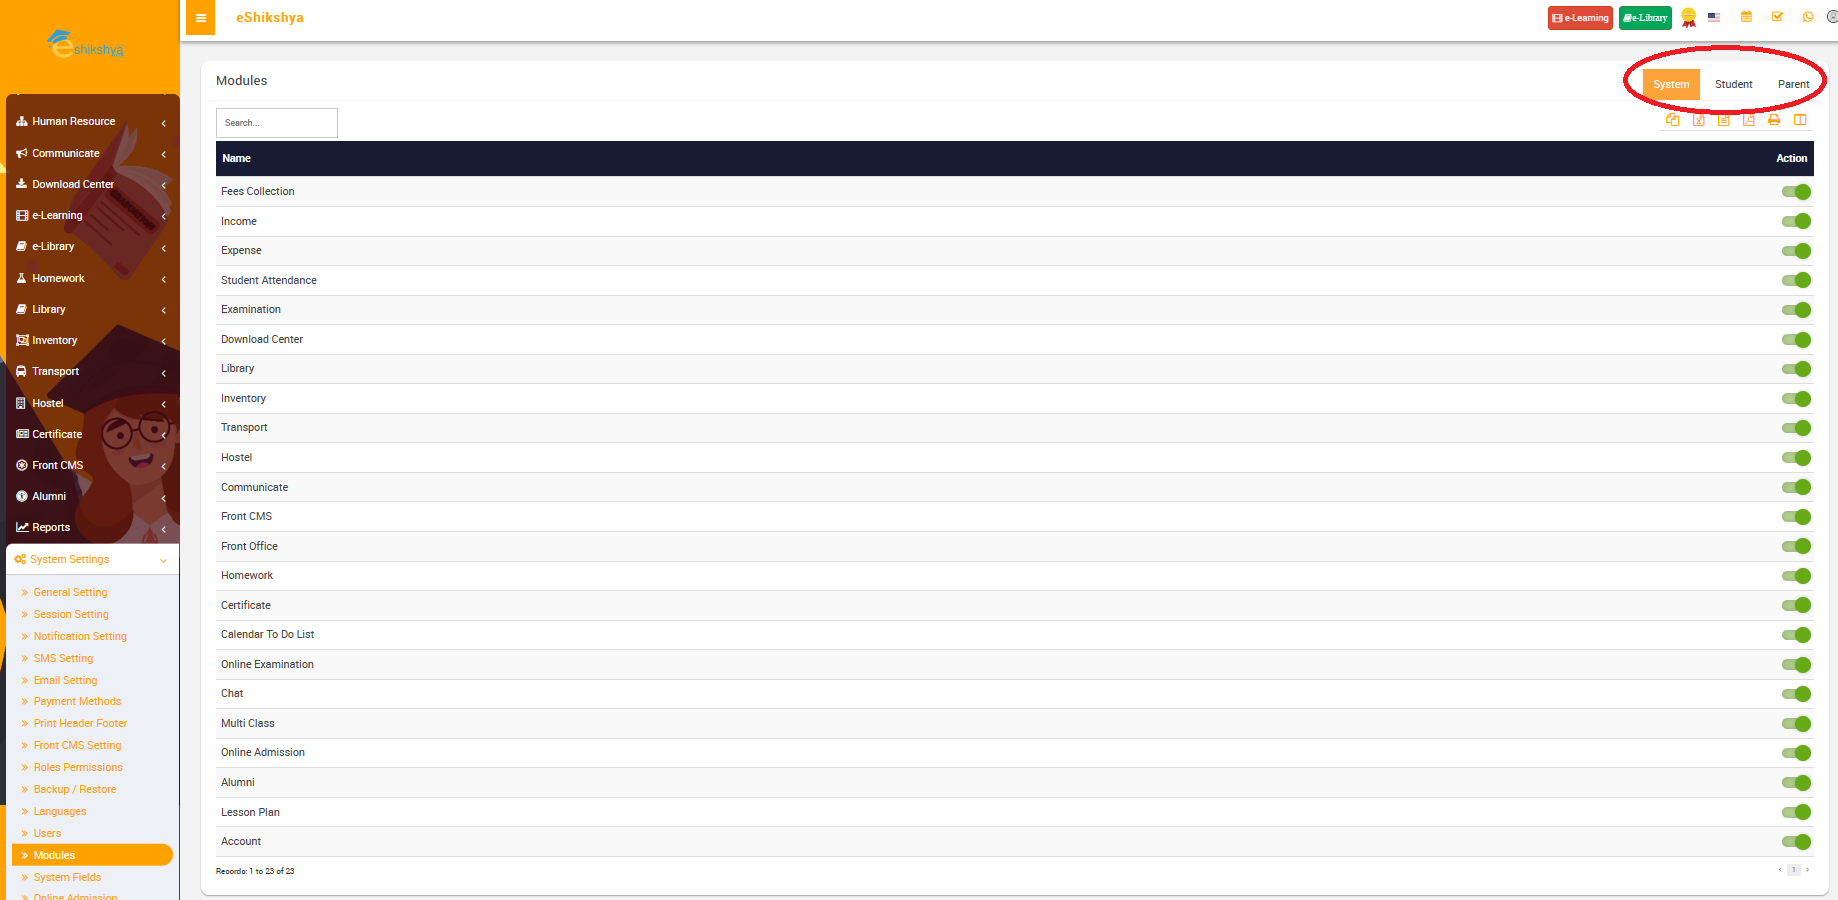
Modules is a component that empowers administrators to efficiently manage and customize the modules for the system, student or Parents offering flexibility and adaptability to meet the unique requirements of each account.
- Go to modules under system settings, the page shown in the emage below should appear.
- The red circled space the option which allows you to switch between System, Student and Parent.
- Select on student if you want to customize student modules and vice versa.
- On the list of modules you can see and action button to enable or disable the them.
- Enable/ Disable the modules as per your form requirements and click on save.
 Image
Image
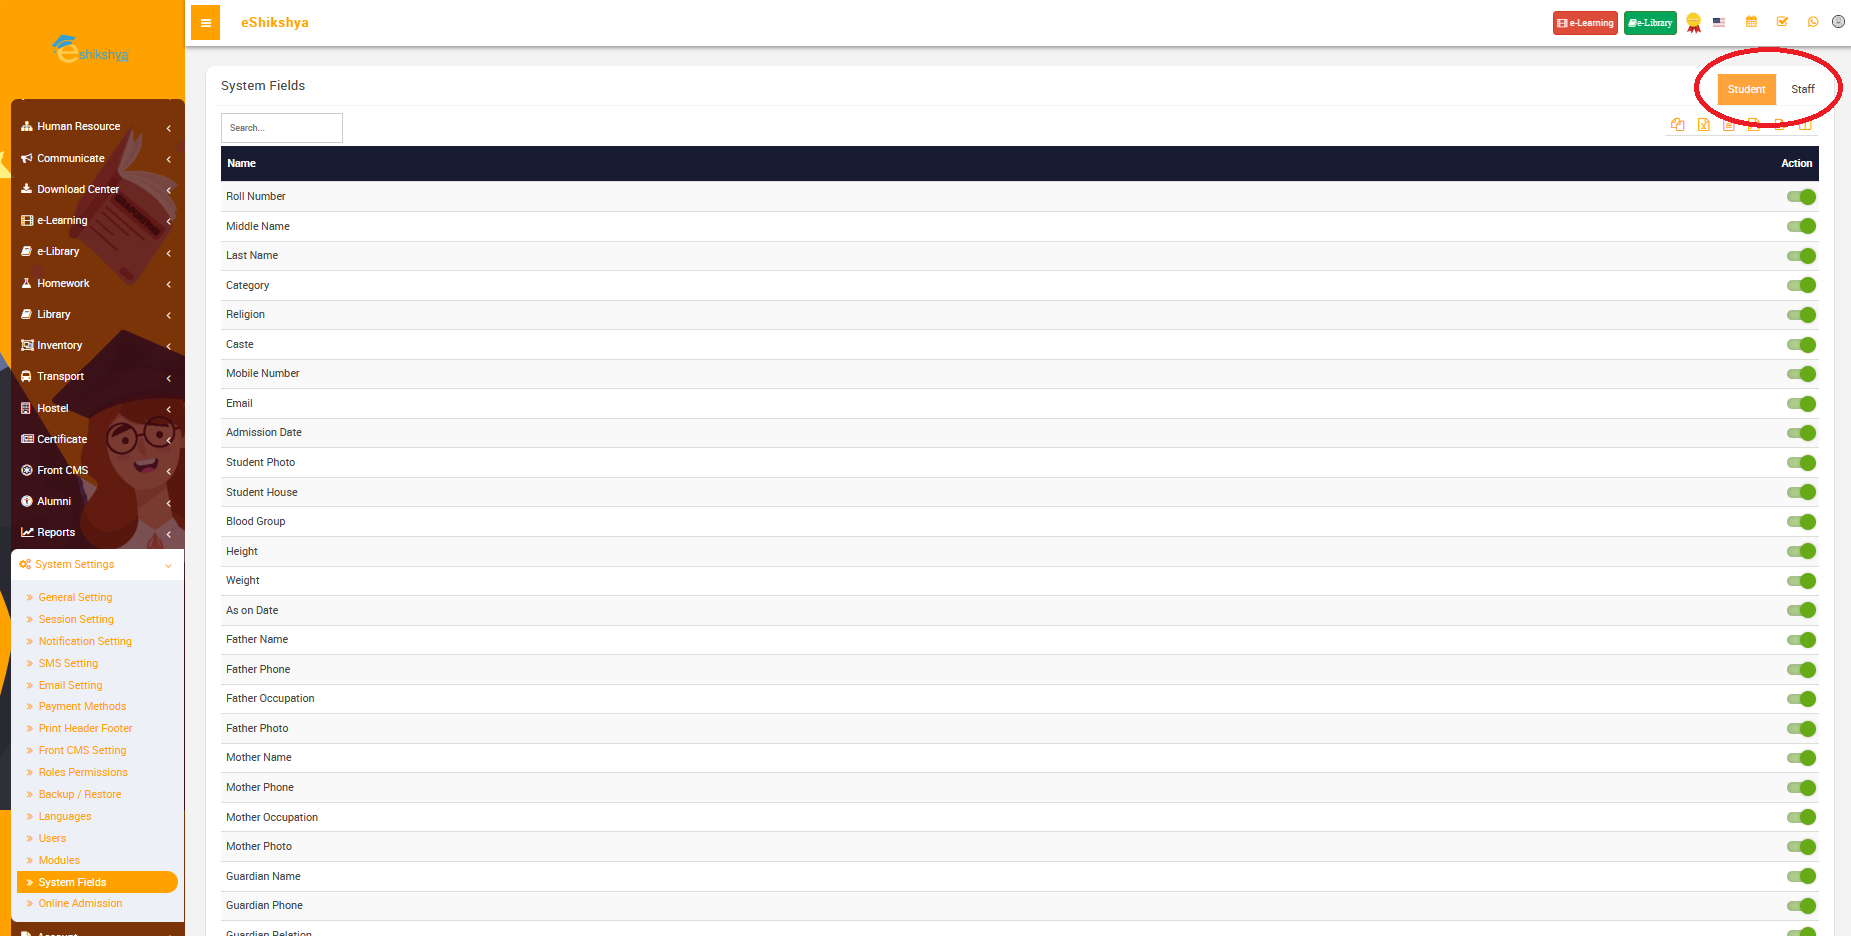
System Fields
System fields is a component that empowers administrators to efficiently manage and customize the forms for students or teacher details offering flexibility and adaptability to meet the unique requirements of each form.
- Go to system fields under system settings, the page shown in the emage below should appear.
- The red circled space the option which allows you to switch between Student and Staff.
- Select on student if you want to customize student form fields and vice versa.
- On the list of fields you can see and action button to enable or disable the fields.
- Enable/ Disable the fields as per your form requirements and click on save.
 Image
Image
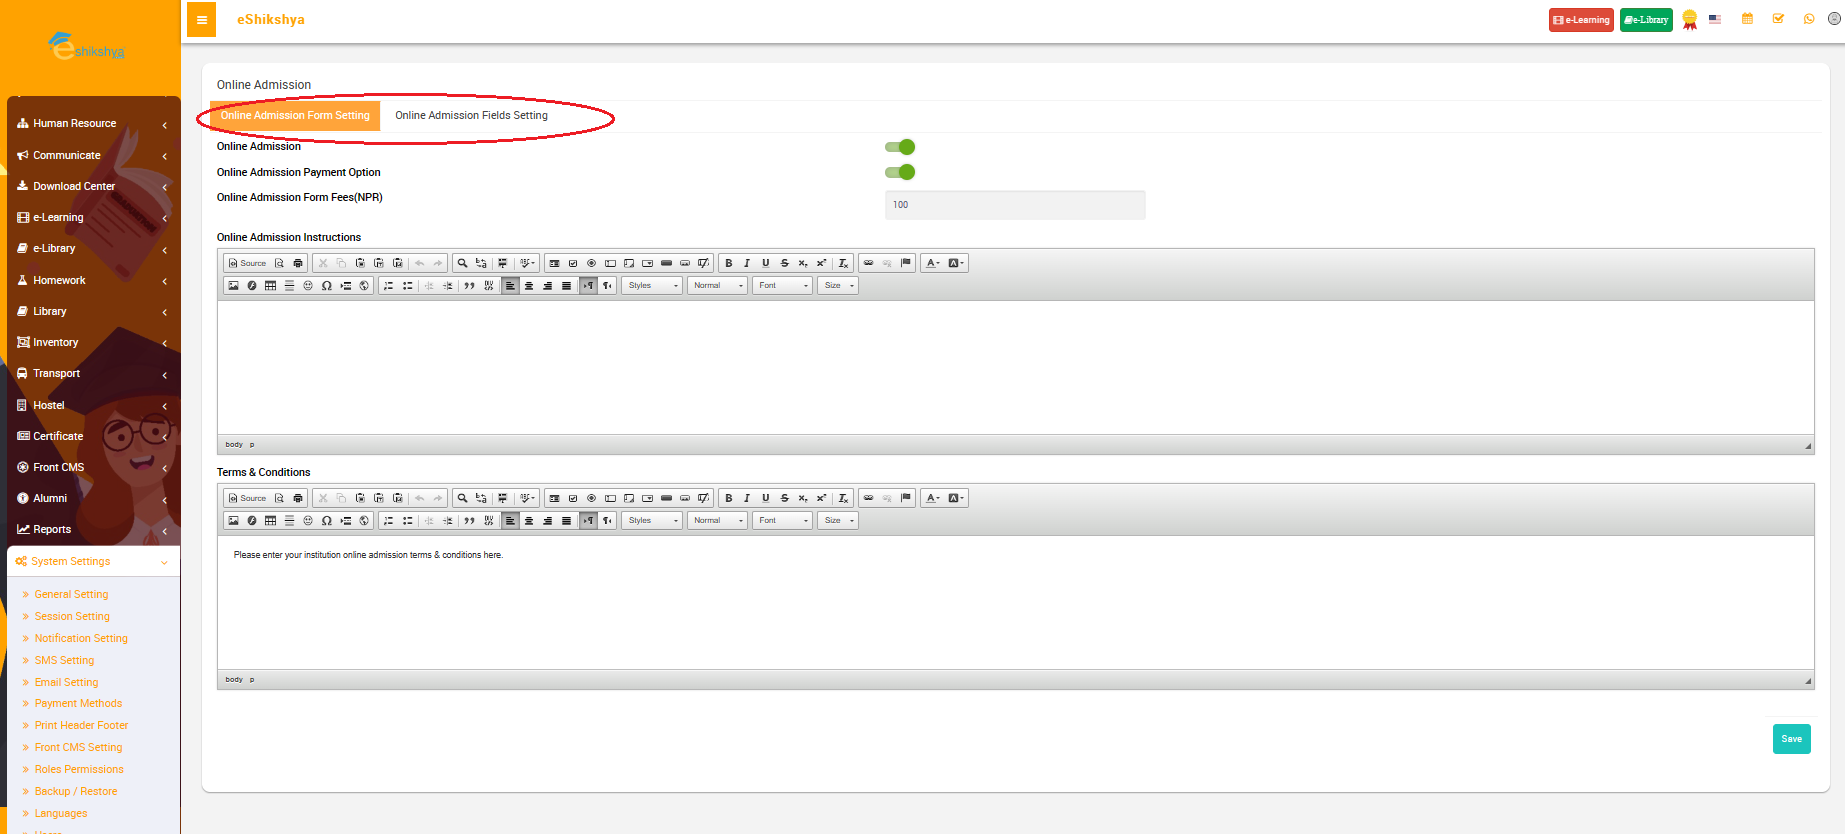
Online Admission
This feature allows you to custozime your online student admission form such as settimg up payment options, fees, Instructions, terms and conditions and customizing field requirements for the form.
Online Admission Form Setting
- When you click on online Admission, the following page should appear.
 Image
Image
- The circled part in the image is the option that allows you to toggle between Online Admission Form setting and Online Admission Fields setting.
- On the online Form Setting, you can Add Admission Payment option, Assign Admission fees.
- You are given an entry field to add the admission instructions and terms and conditions.
- After you've written both in the given fields, click on save to update your instructions.
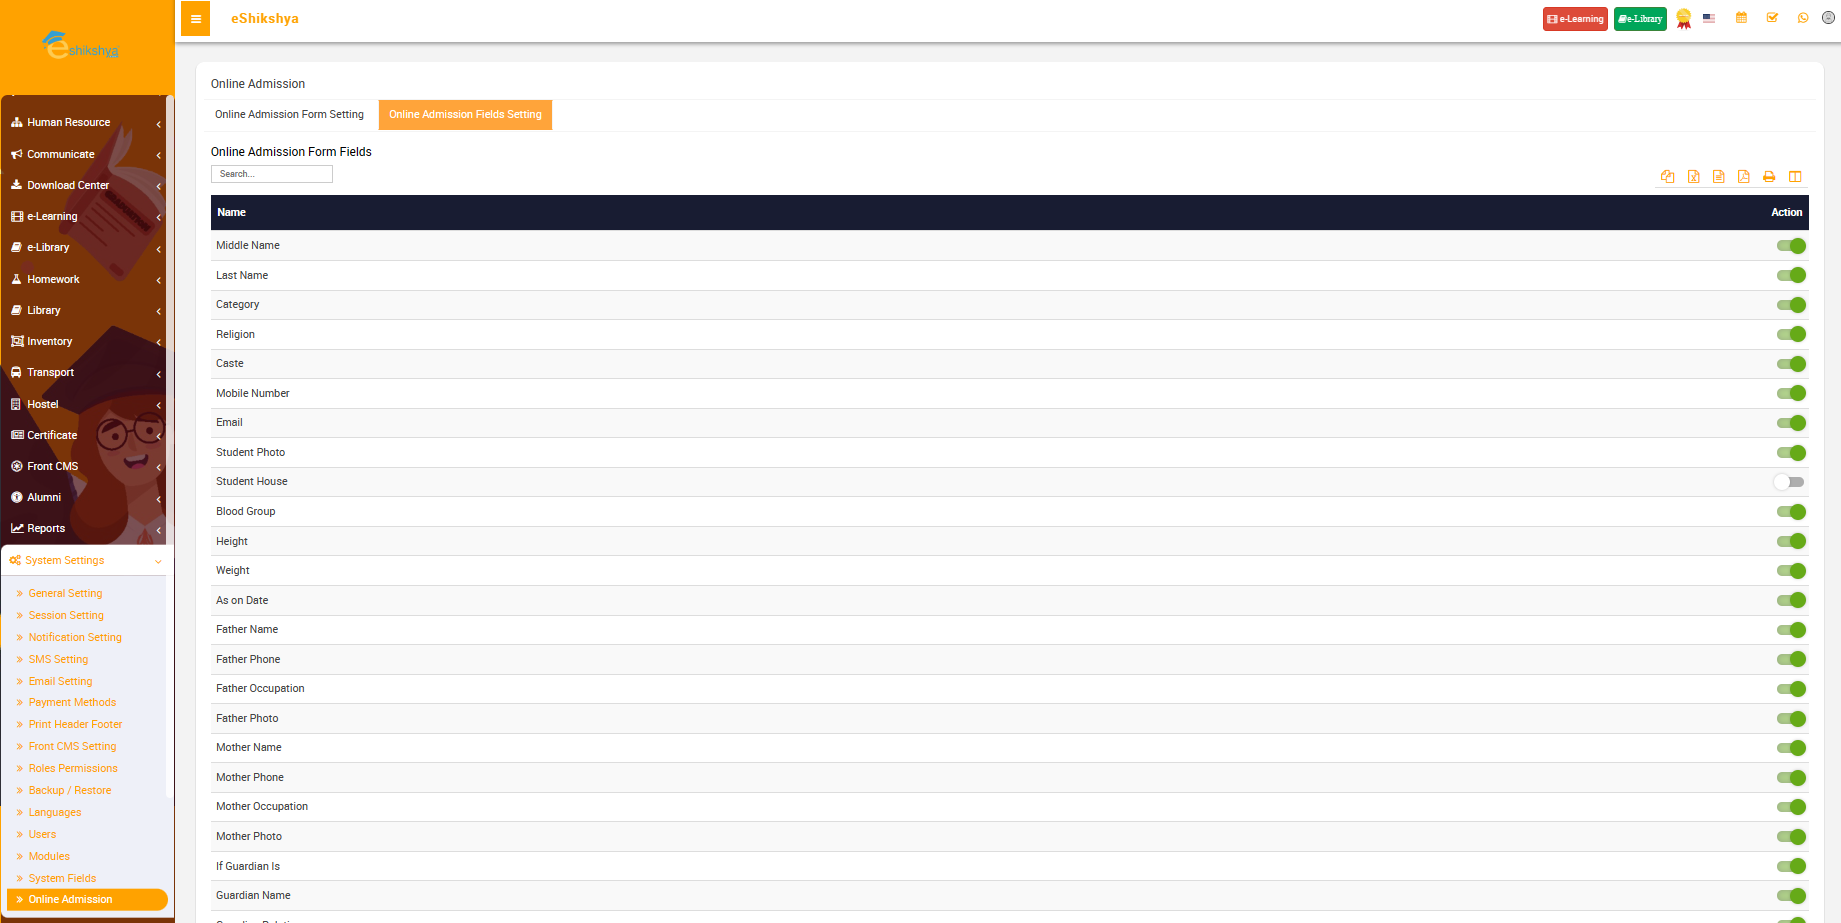
Online Admission Field Setting
- When you click on the online Admission Fields setting, the following page should appear.
 Image
Image
- The list of form entry detail requirements and Action button to enable or disable there details should appear.
- For e.g., If you enable "Middle Name" requirement, the online admission form will ask for middle name when in the form, however if you disable the requirement, the form will not ask you to fill up the Middle name.
- Use this feature tp customize the form requirement as per your need and click on save.
Front Desk
Admission Enquiry
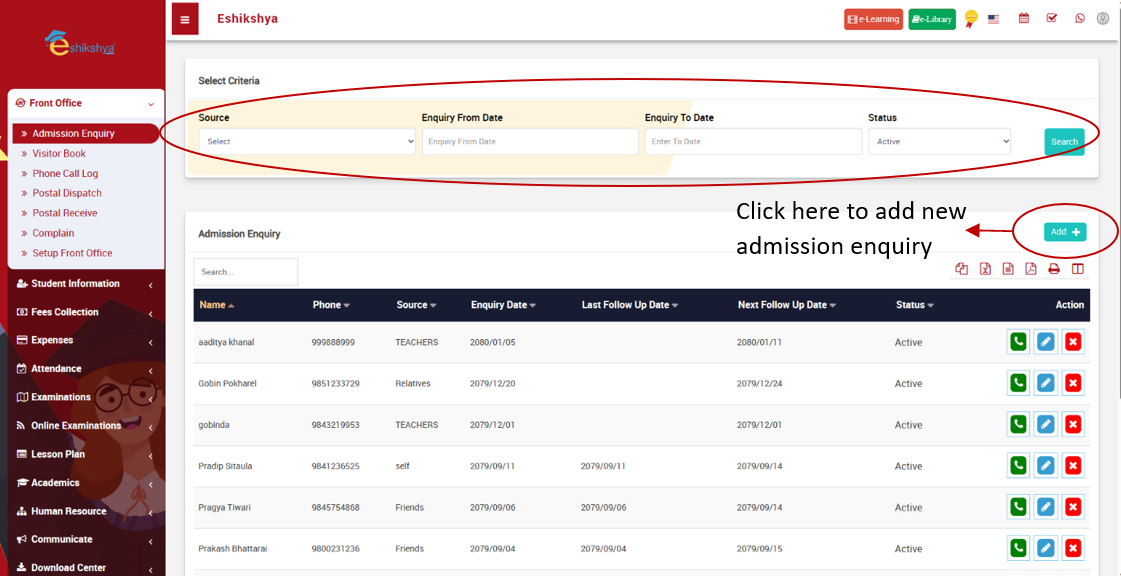 Image 5
Add admission enquiry form:
Fill the details and click on save. The saved details should appear on the List of Admission Enquiries Shown in Image 5.
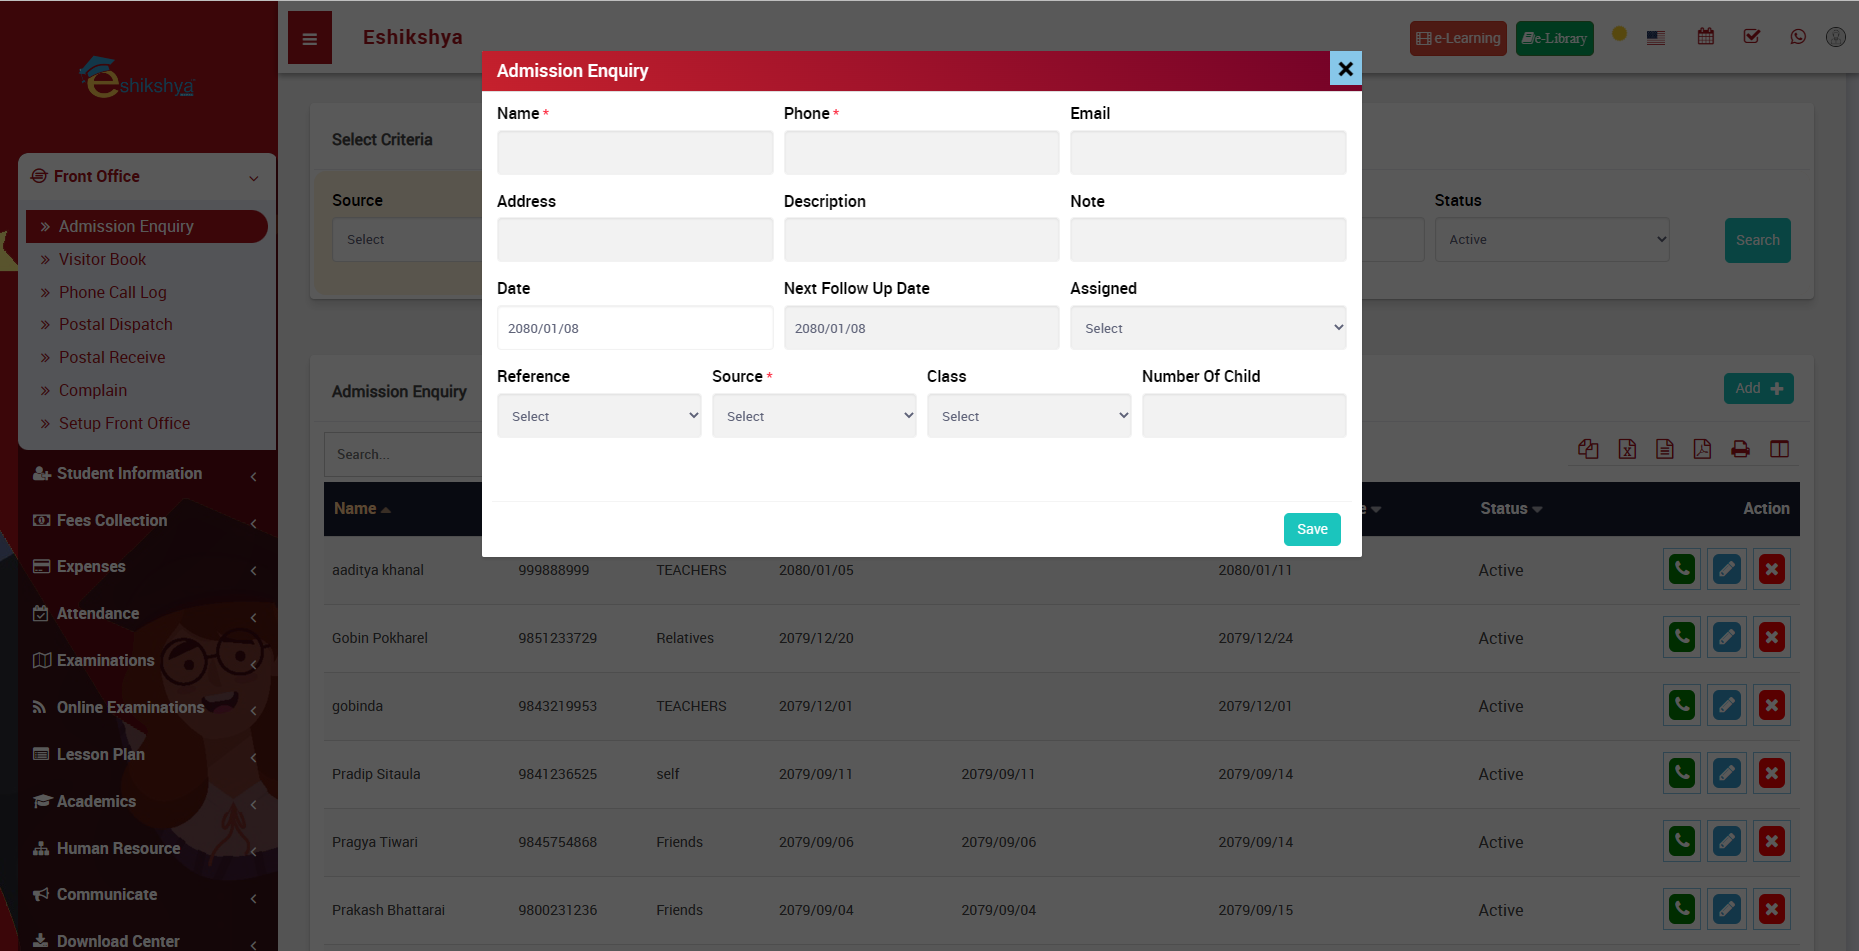 Image 6
Visitor Book
To check the Visitor List or Add new visitor, Go to Visitor book under Front Office.
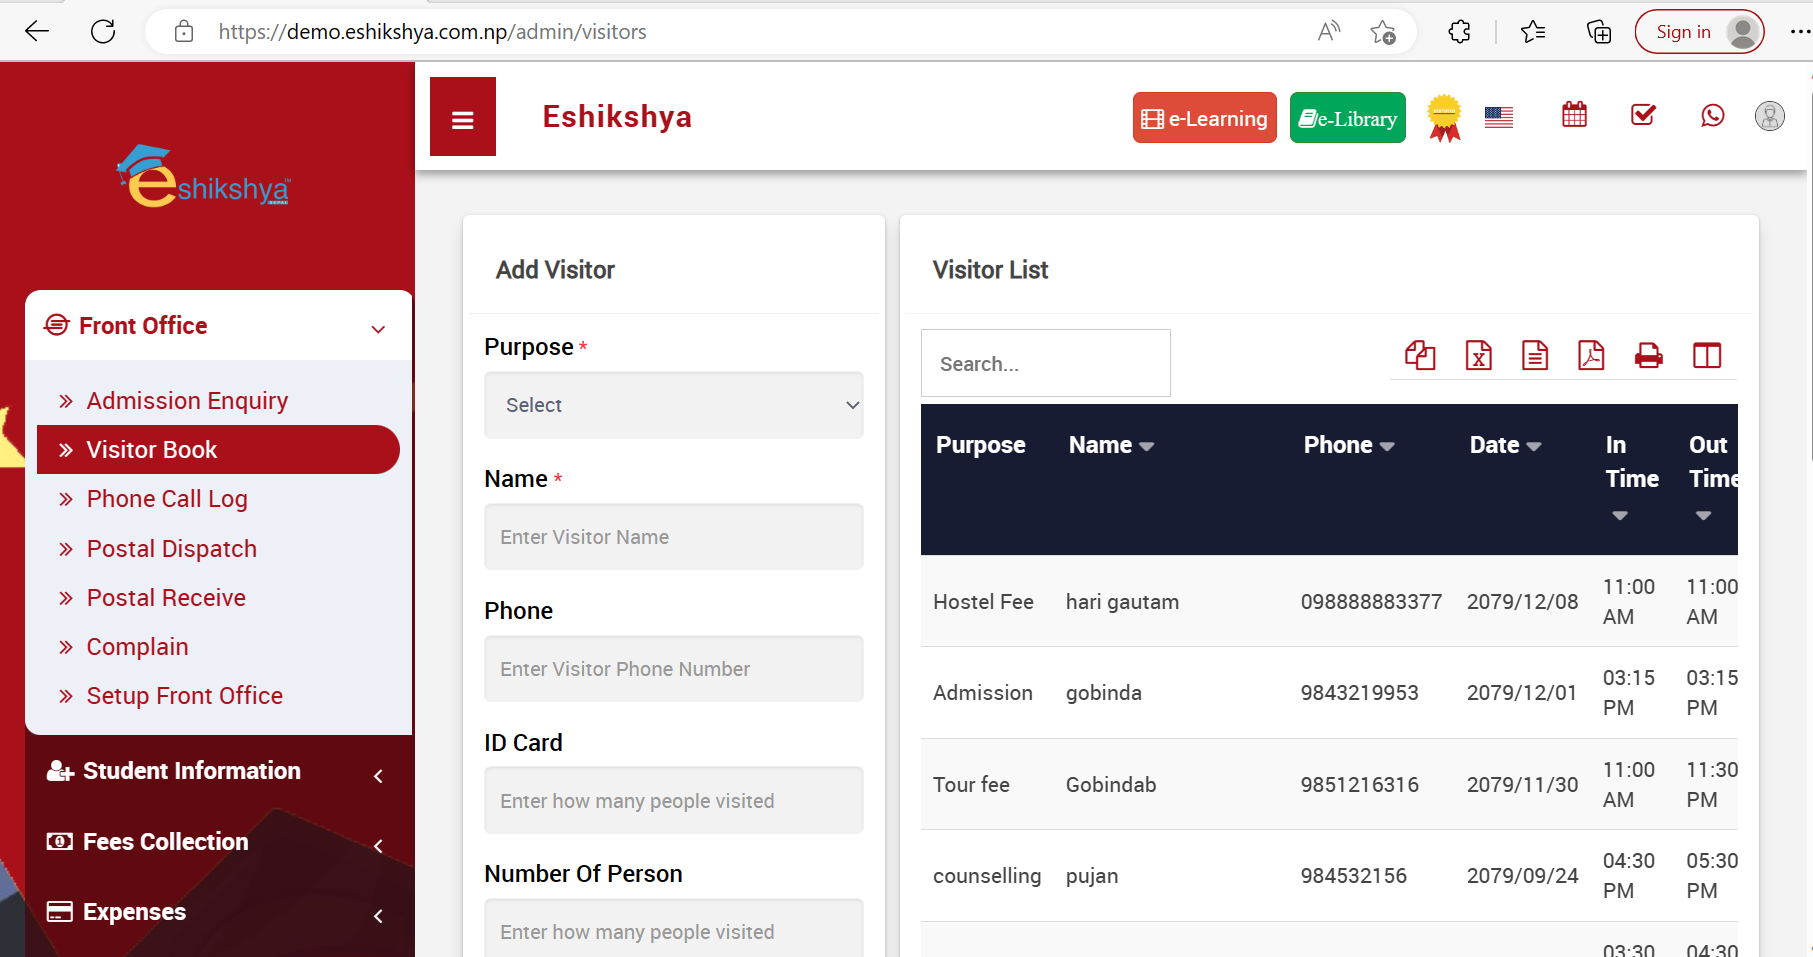 Image 7
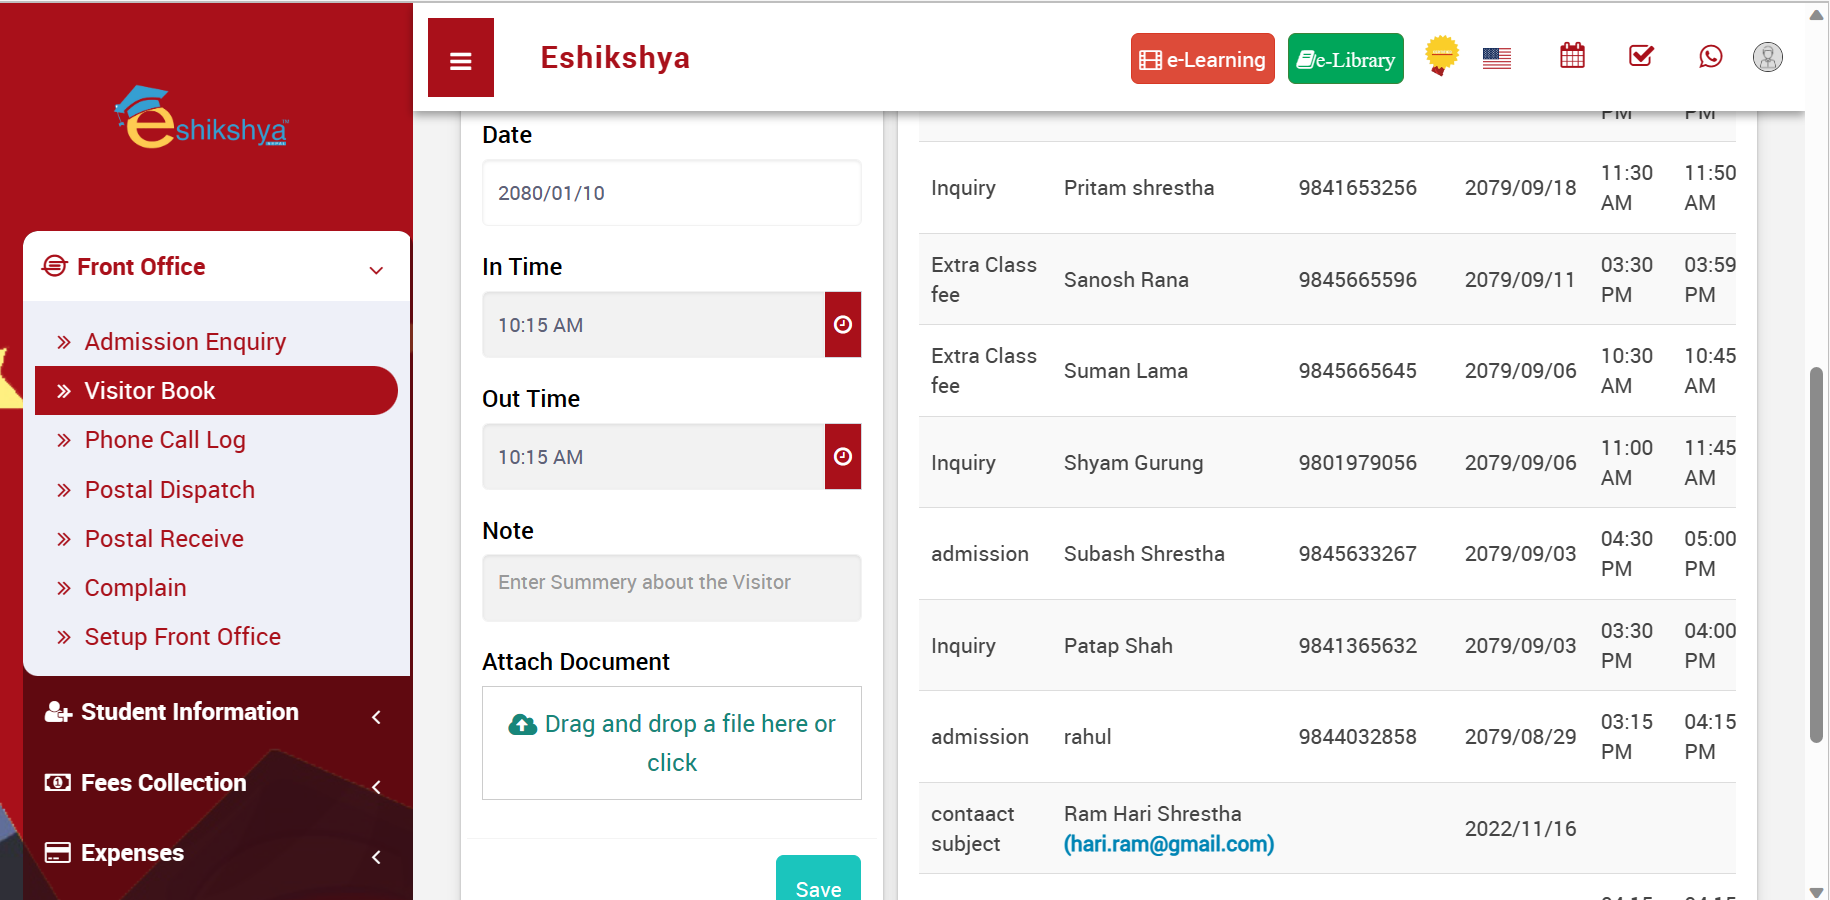 Image 8
Phone Call log
To check the Phone Call log or Add new Phone call log, Go to Phone Call Log under Front Office.
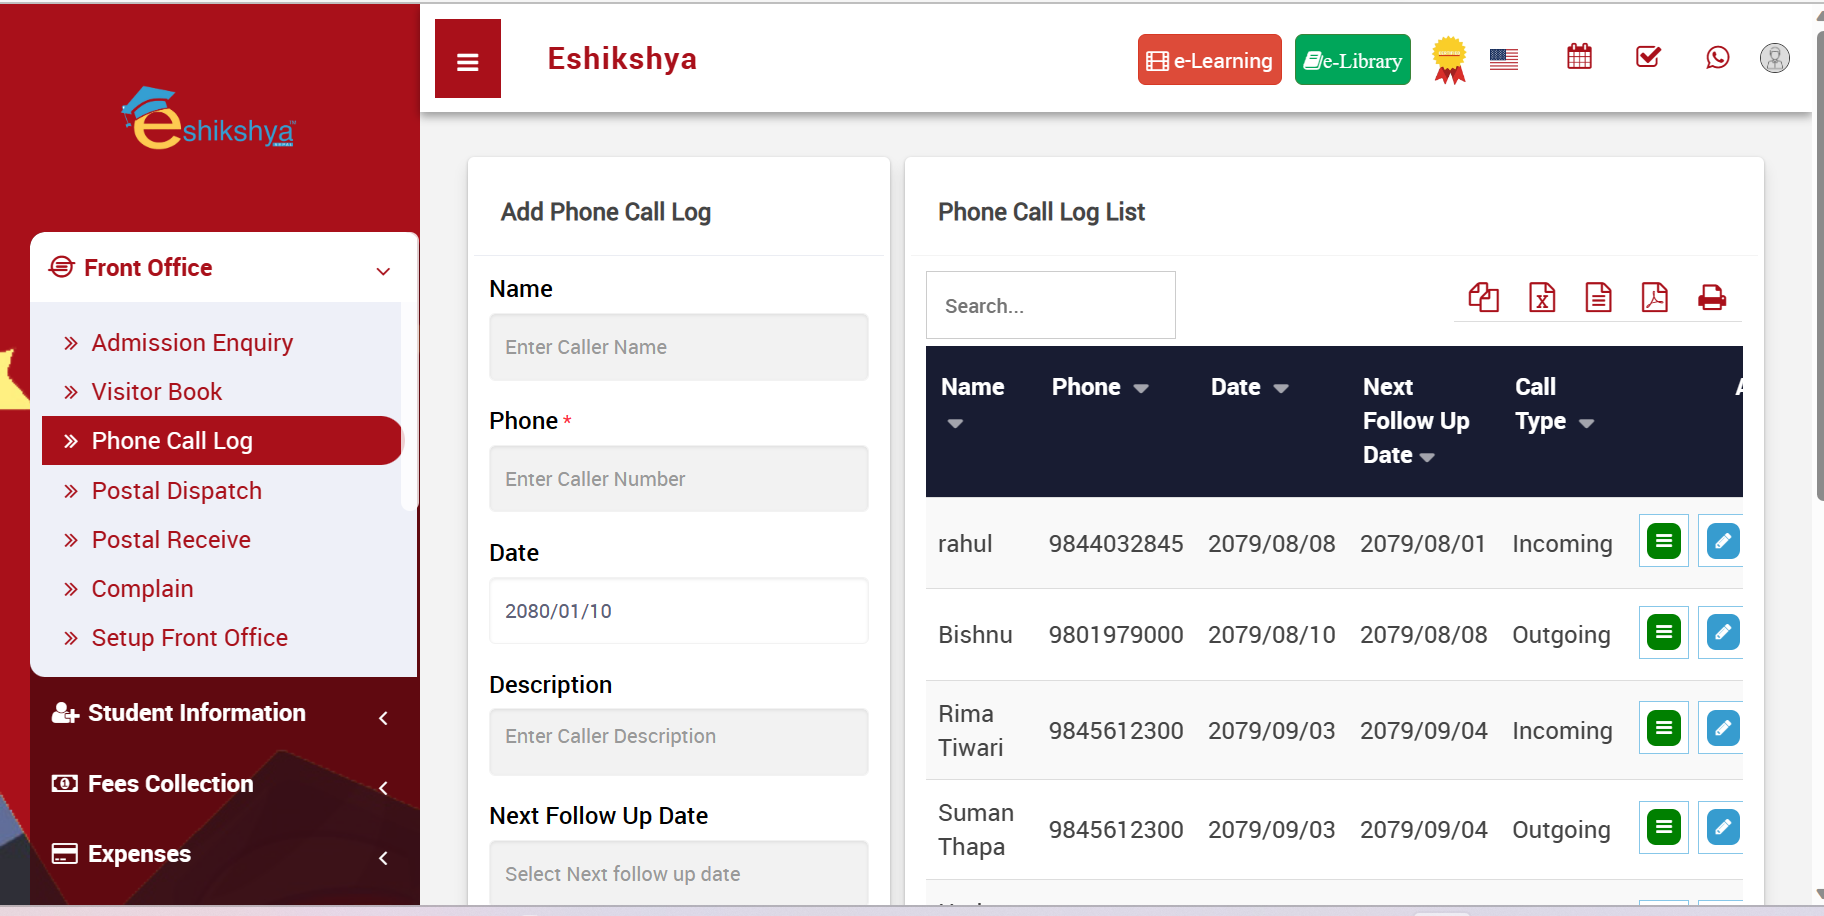 Image 9
 Image 10
Postal Dispatch
To check the Postal Dispatch history or Add new Postal Dispatch log, Go to Postal Dispatch under Front Office.
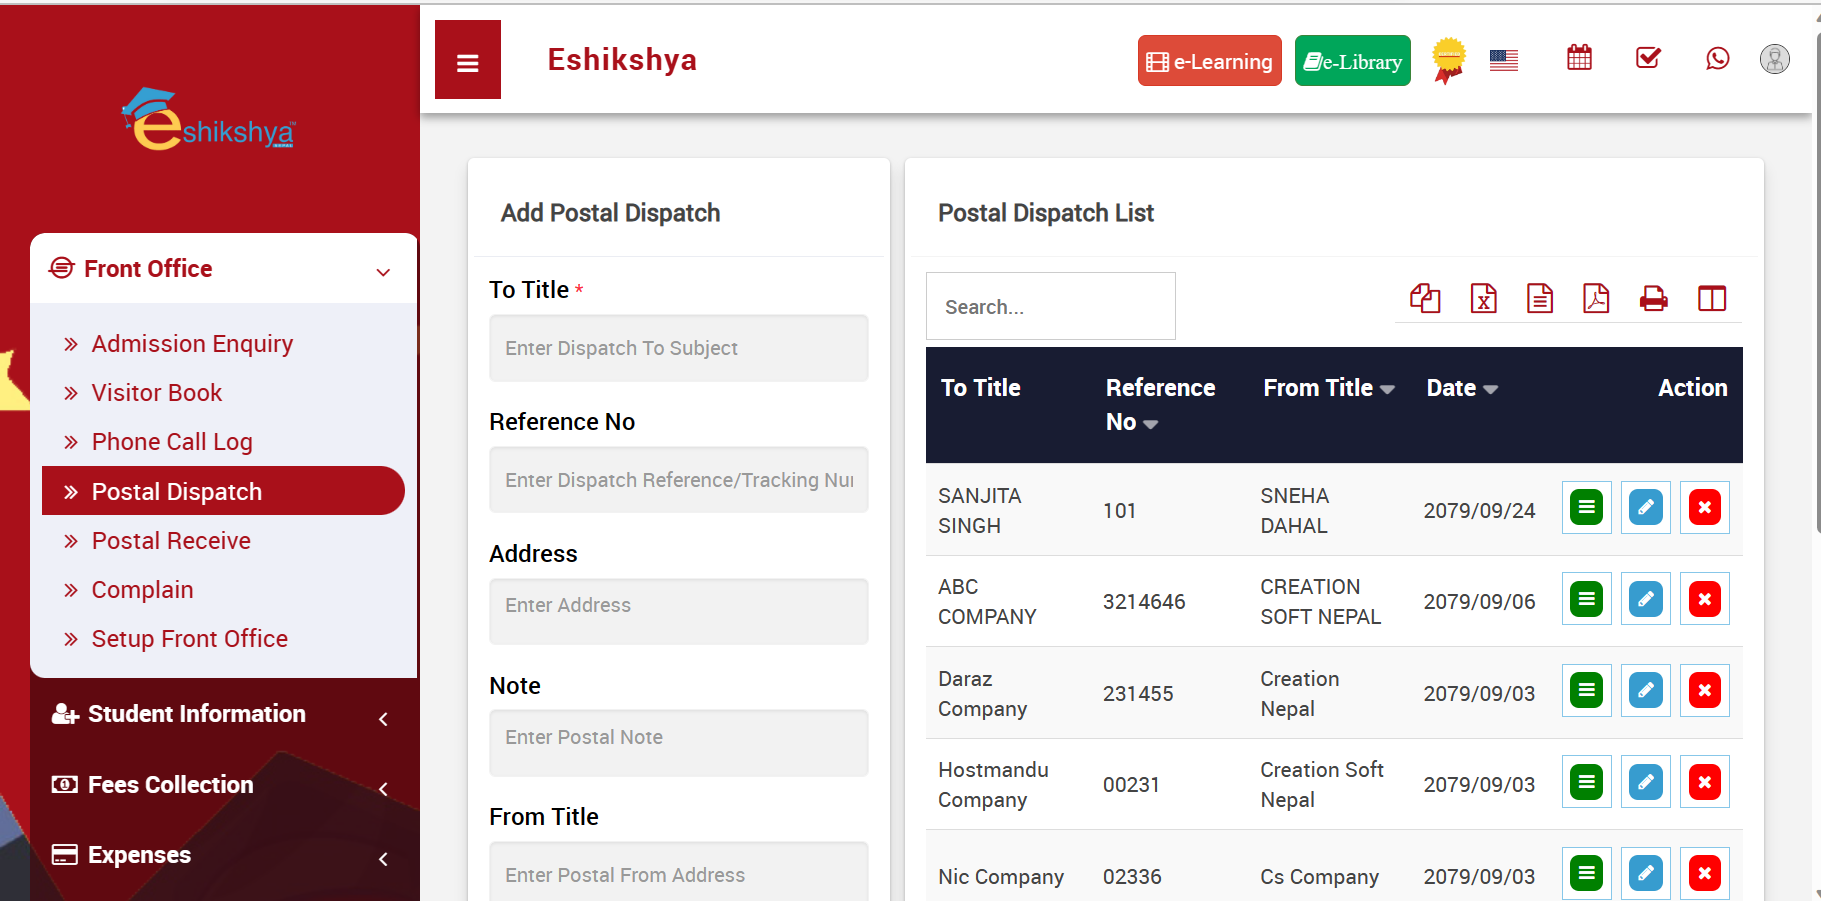 Image 11
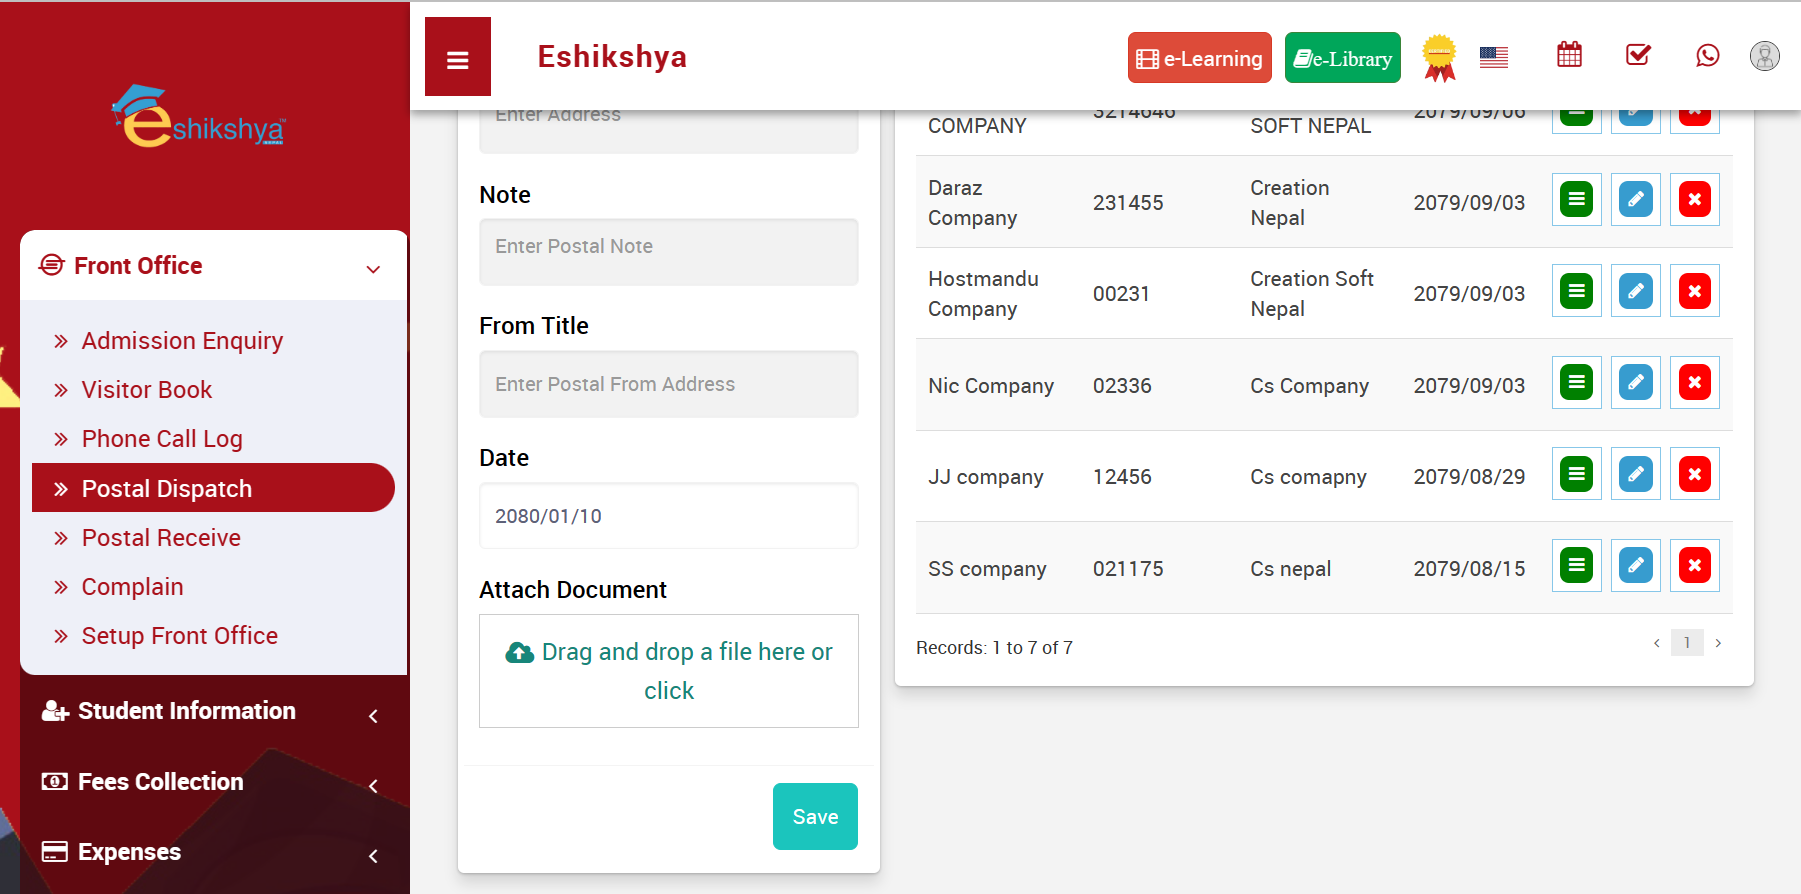 Image 12
Postal Receive
To check the Postal Received history or Add new Postal Receive log, Go to Postal Receive under Front Office.
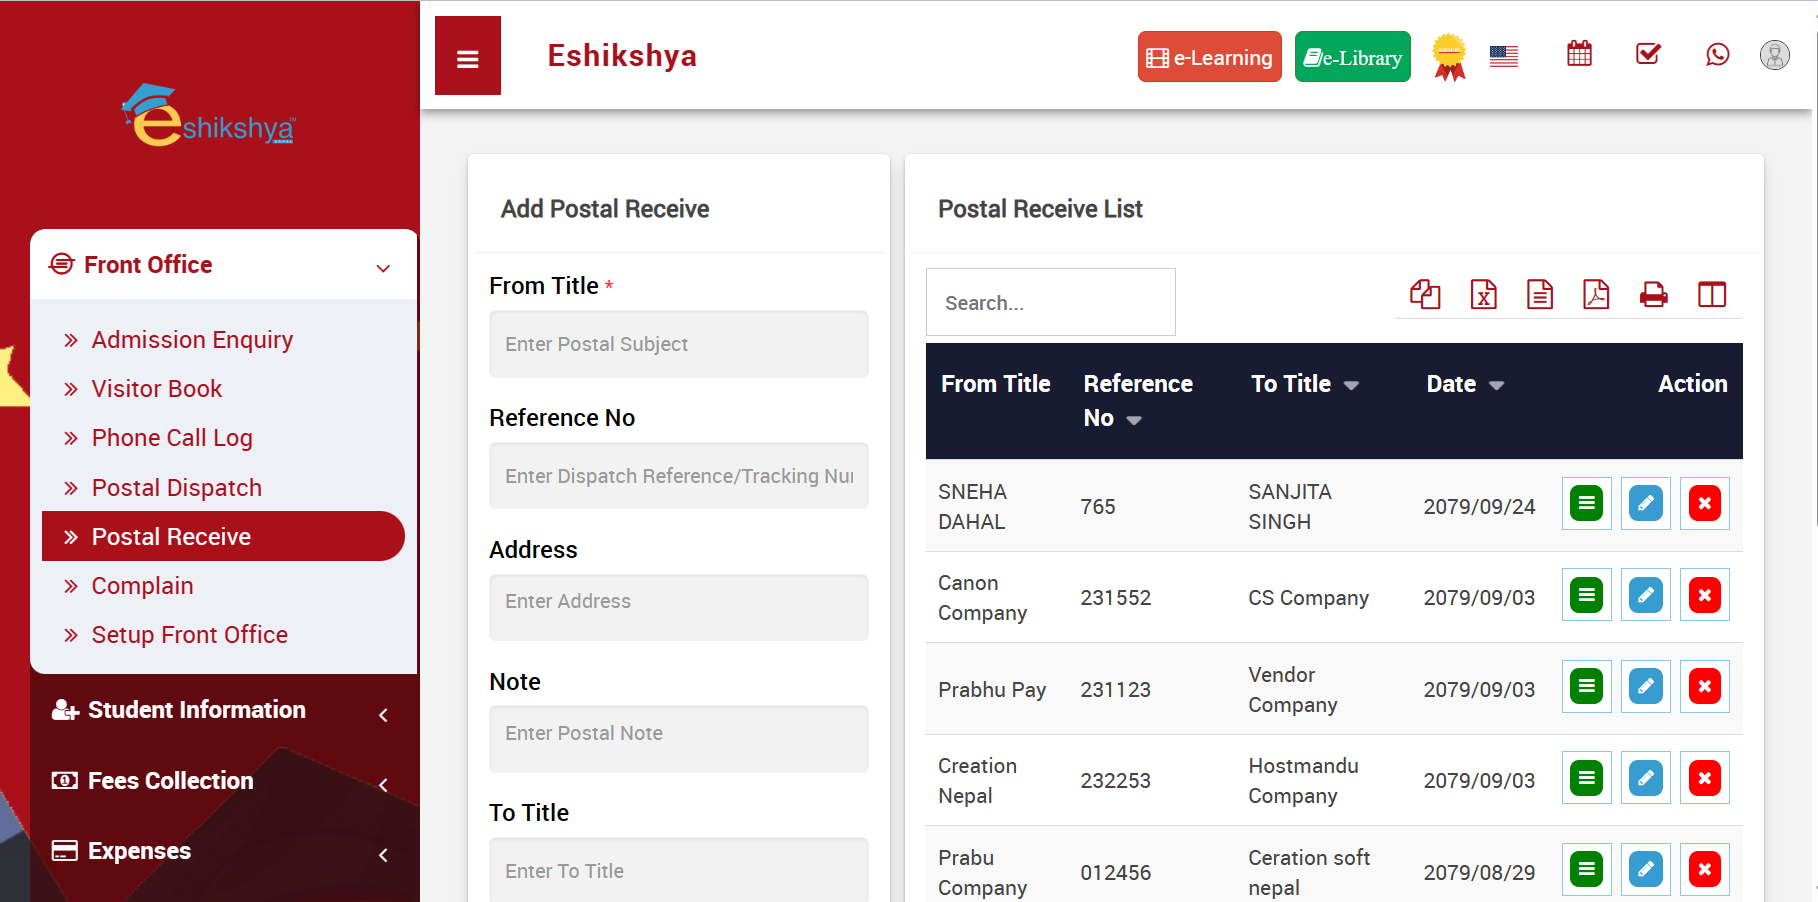 Image 13
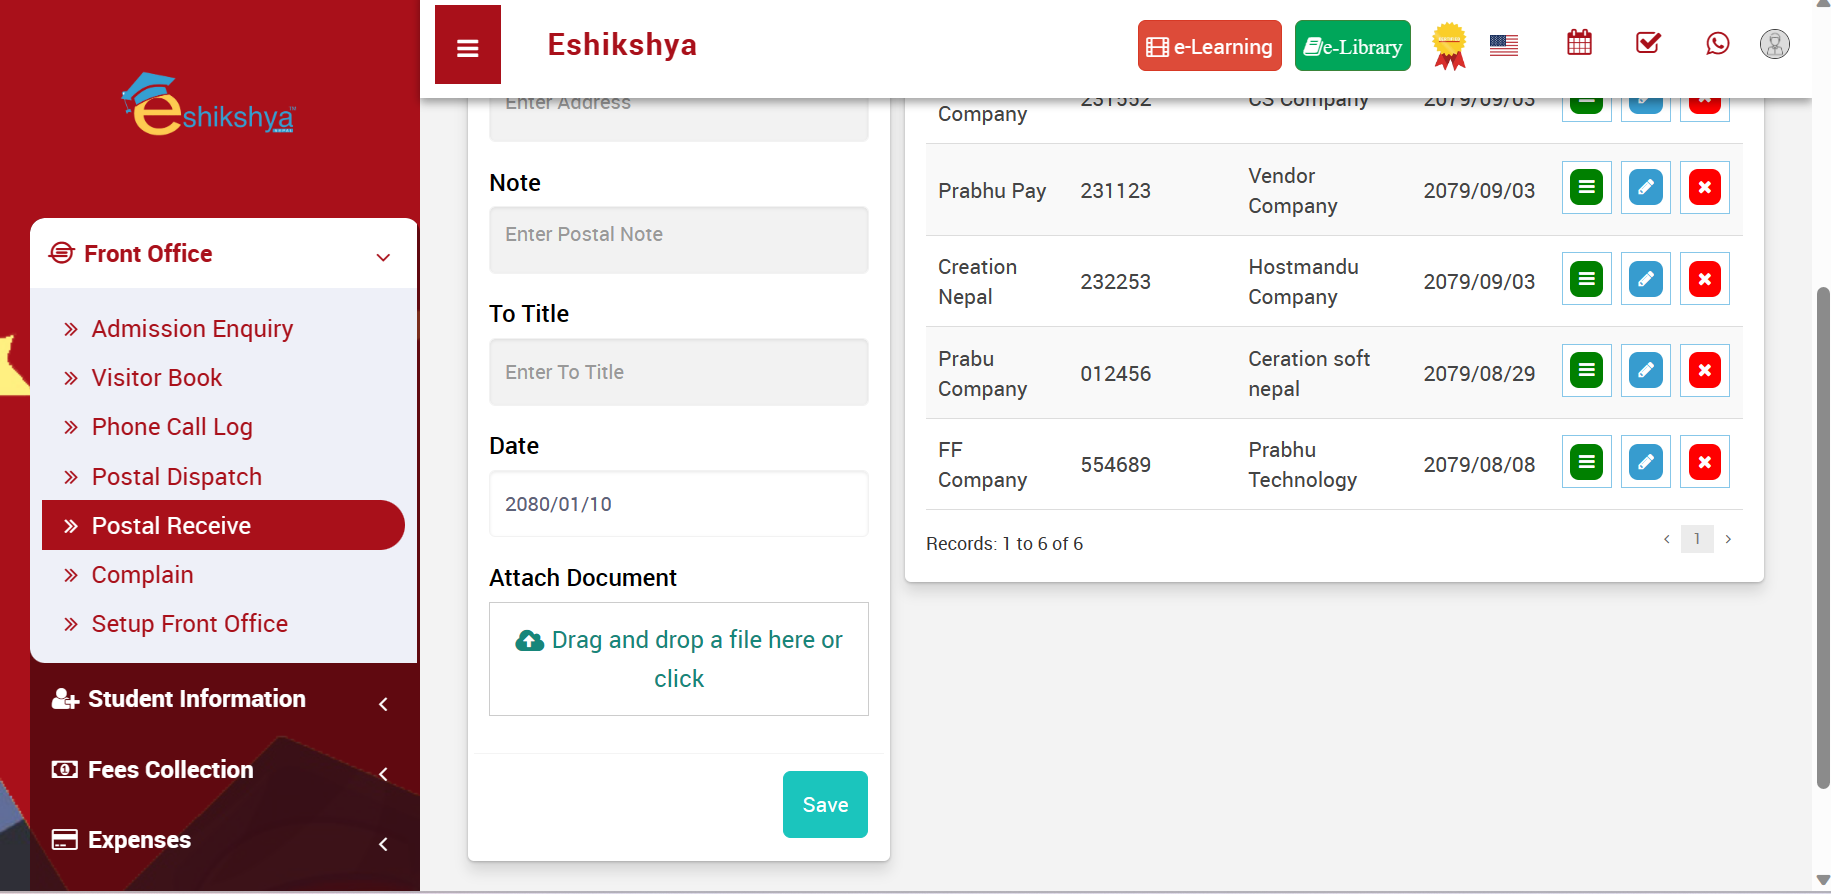 Image 14
Complain
To view the list of complaints or add new complaints, go to Complain under Front Desk.
 Image 15
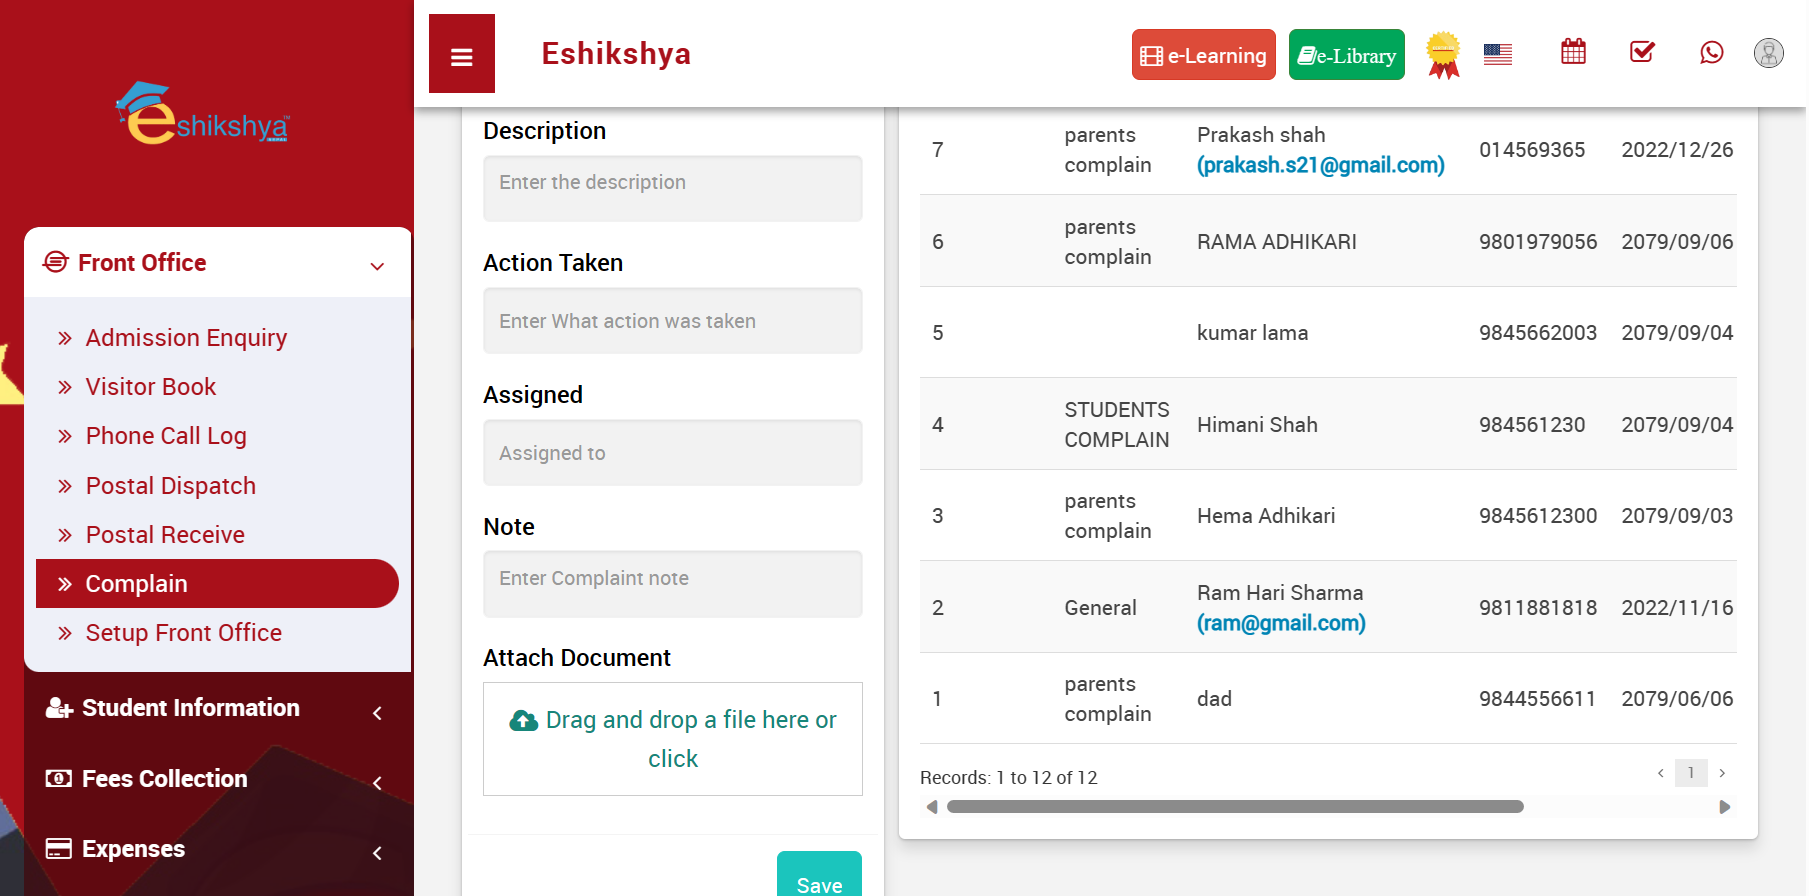 Image 16
Setup Front Office
All the list Selection Options in the Front Office field can be set up here. For example, in image 7, Purpose field is a list selection. The list options for Purpose can be set up here.
Same goes for Complain type, Source and Reference.
 Image 17
Student Information
Student Details
To narrow down the student searches, Search using filters e.g., Class, Section or Keyword.
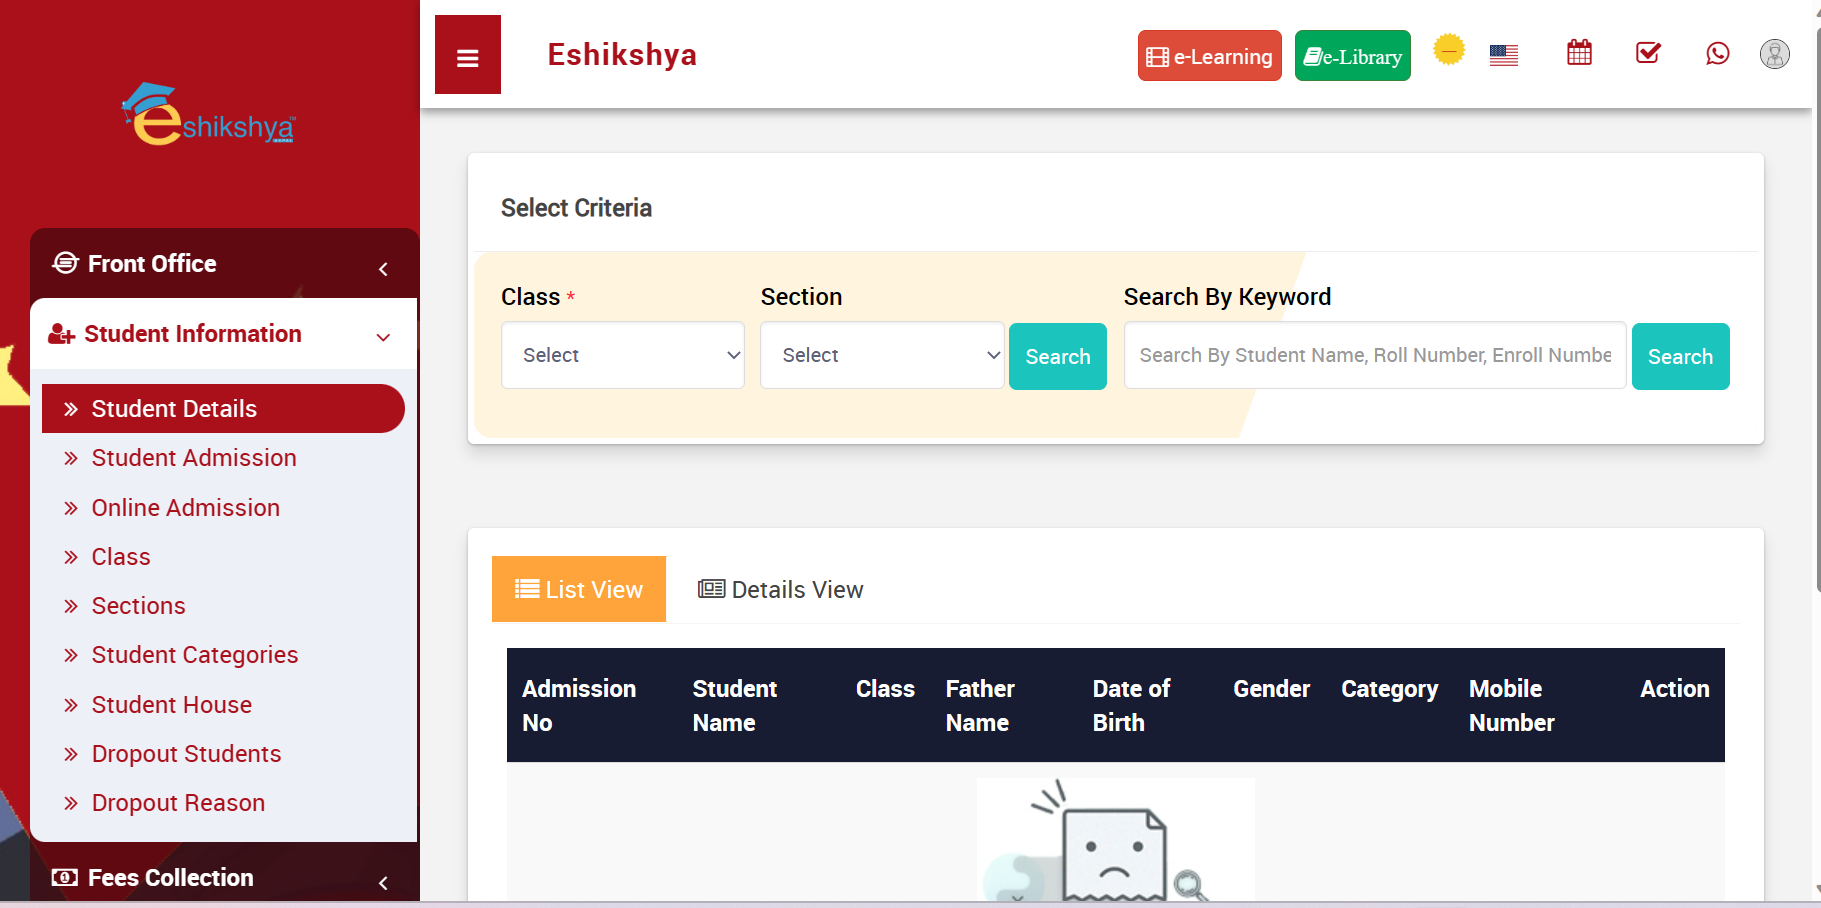 Image 18
Here, Choosing Class 2 to Search gives you the list of students in the 2nd Grade. If you want a Detailed Student Summary, click on Detail View.
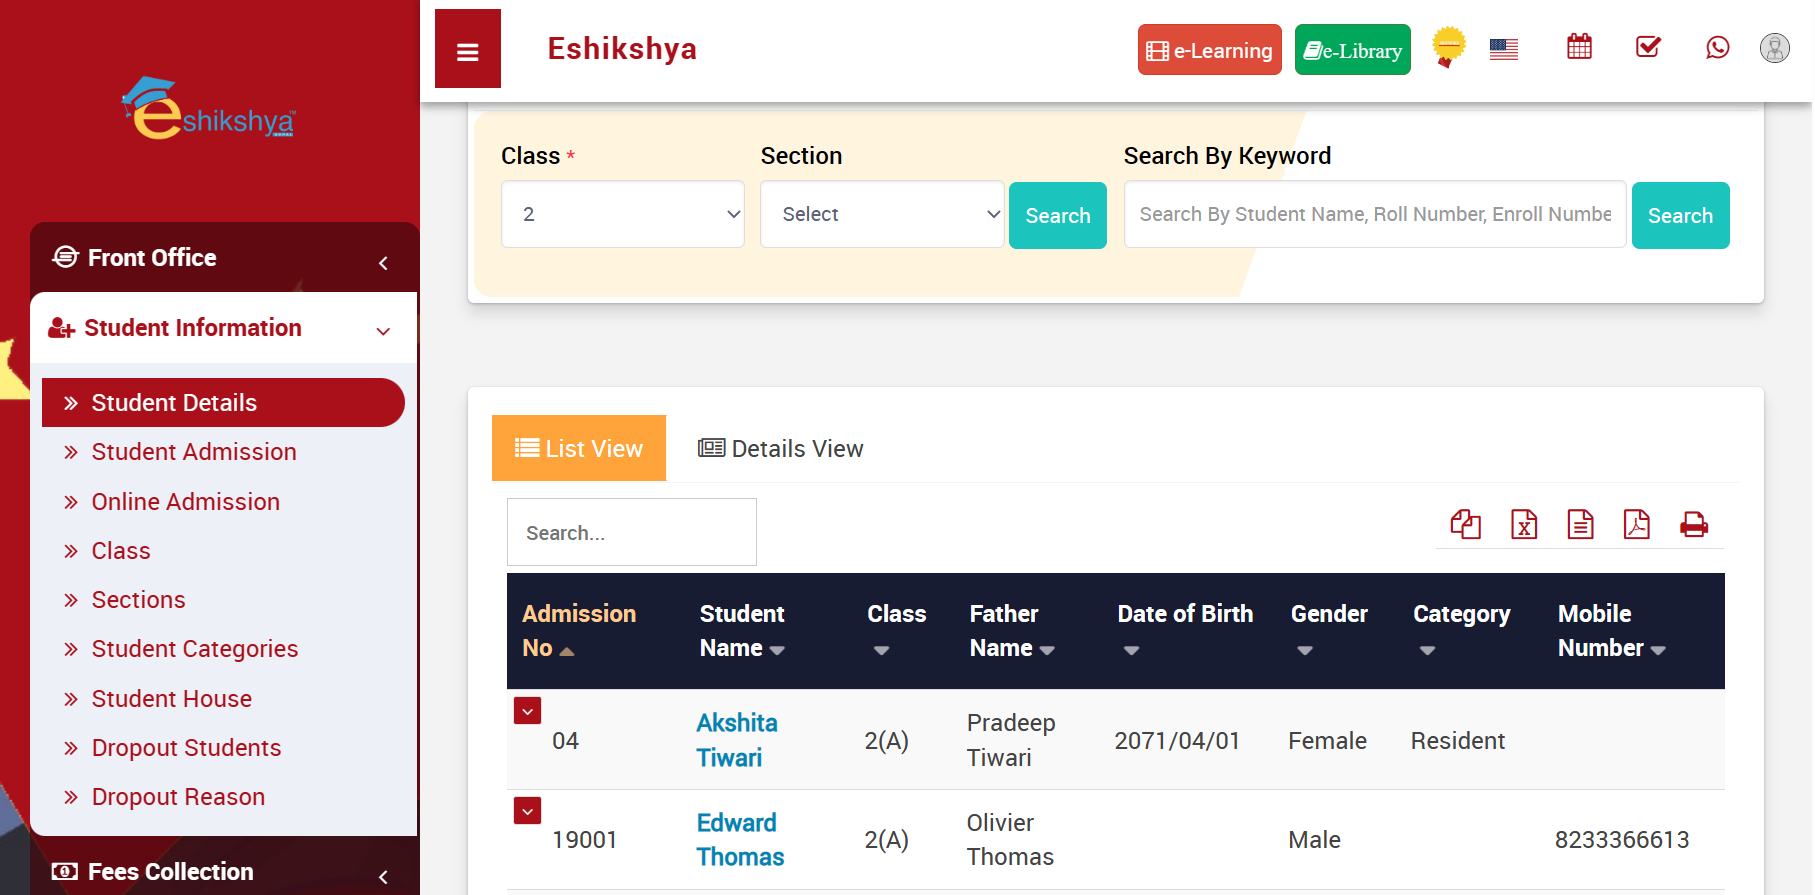 Image 19
When clicked on Detail view, it gives you the detail of the students studying in the specific grade, as shown in the screenshot below.
 Image 20
Student Admissions
In order to add new student admission data, Go to Student Admission under Student Information and Fill in the required Fields.
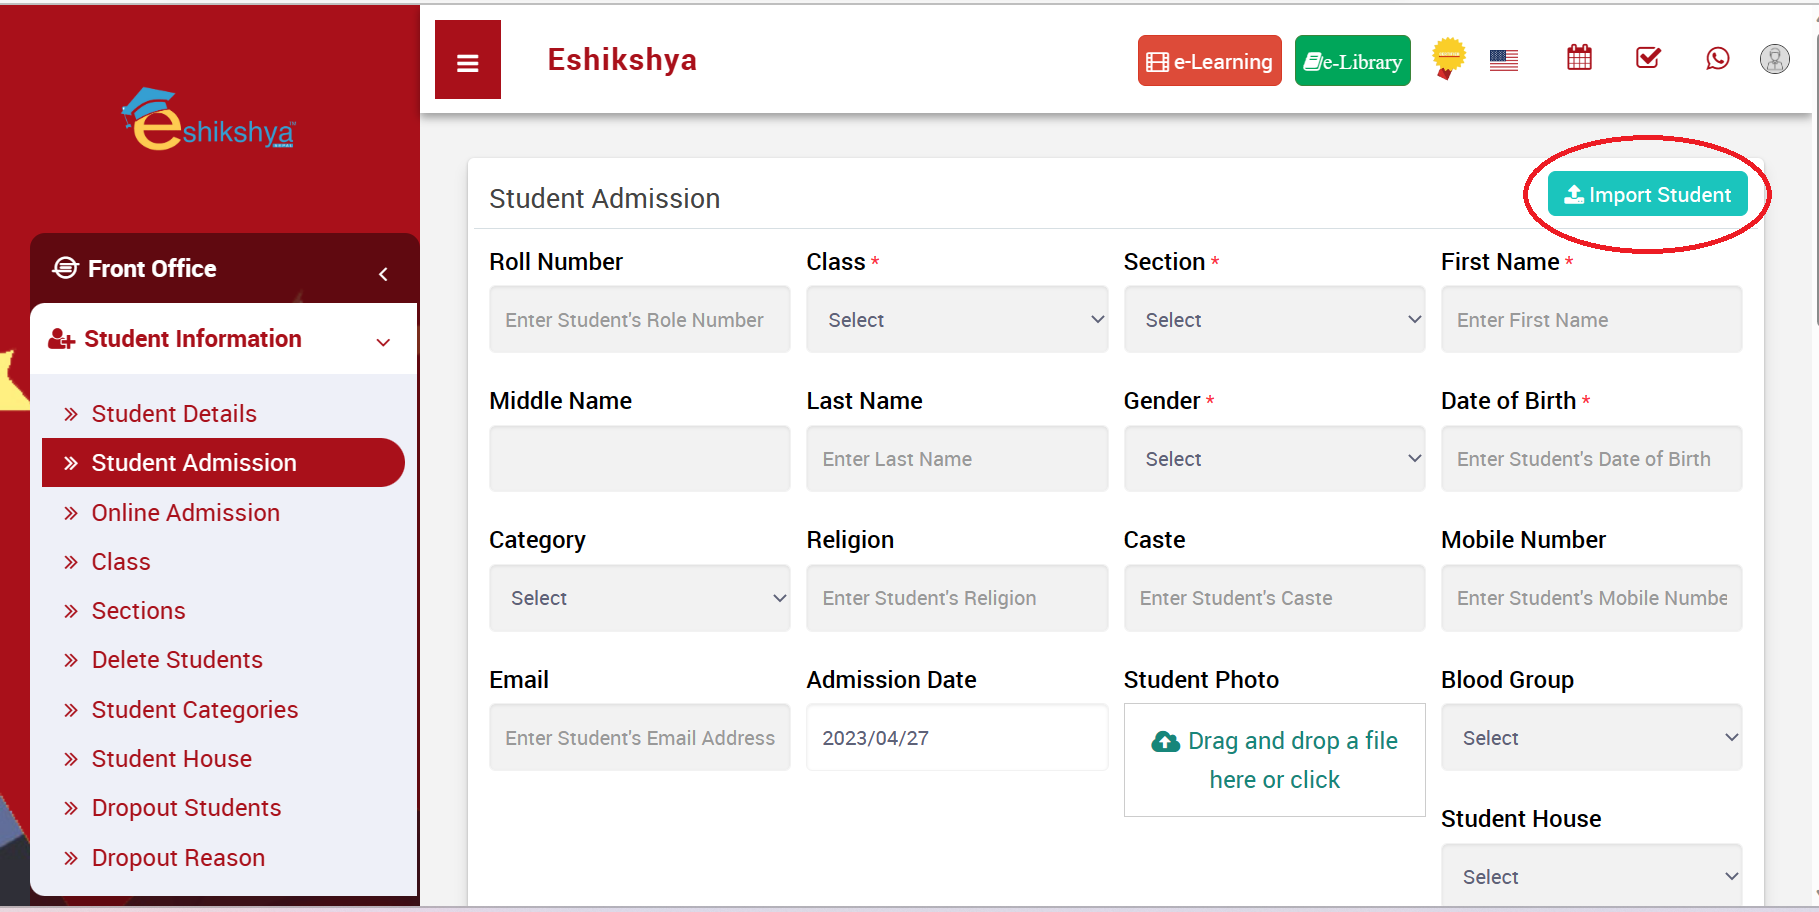 Image 21
This page should appear once you click on Import Student.
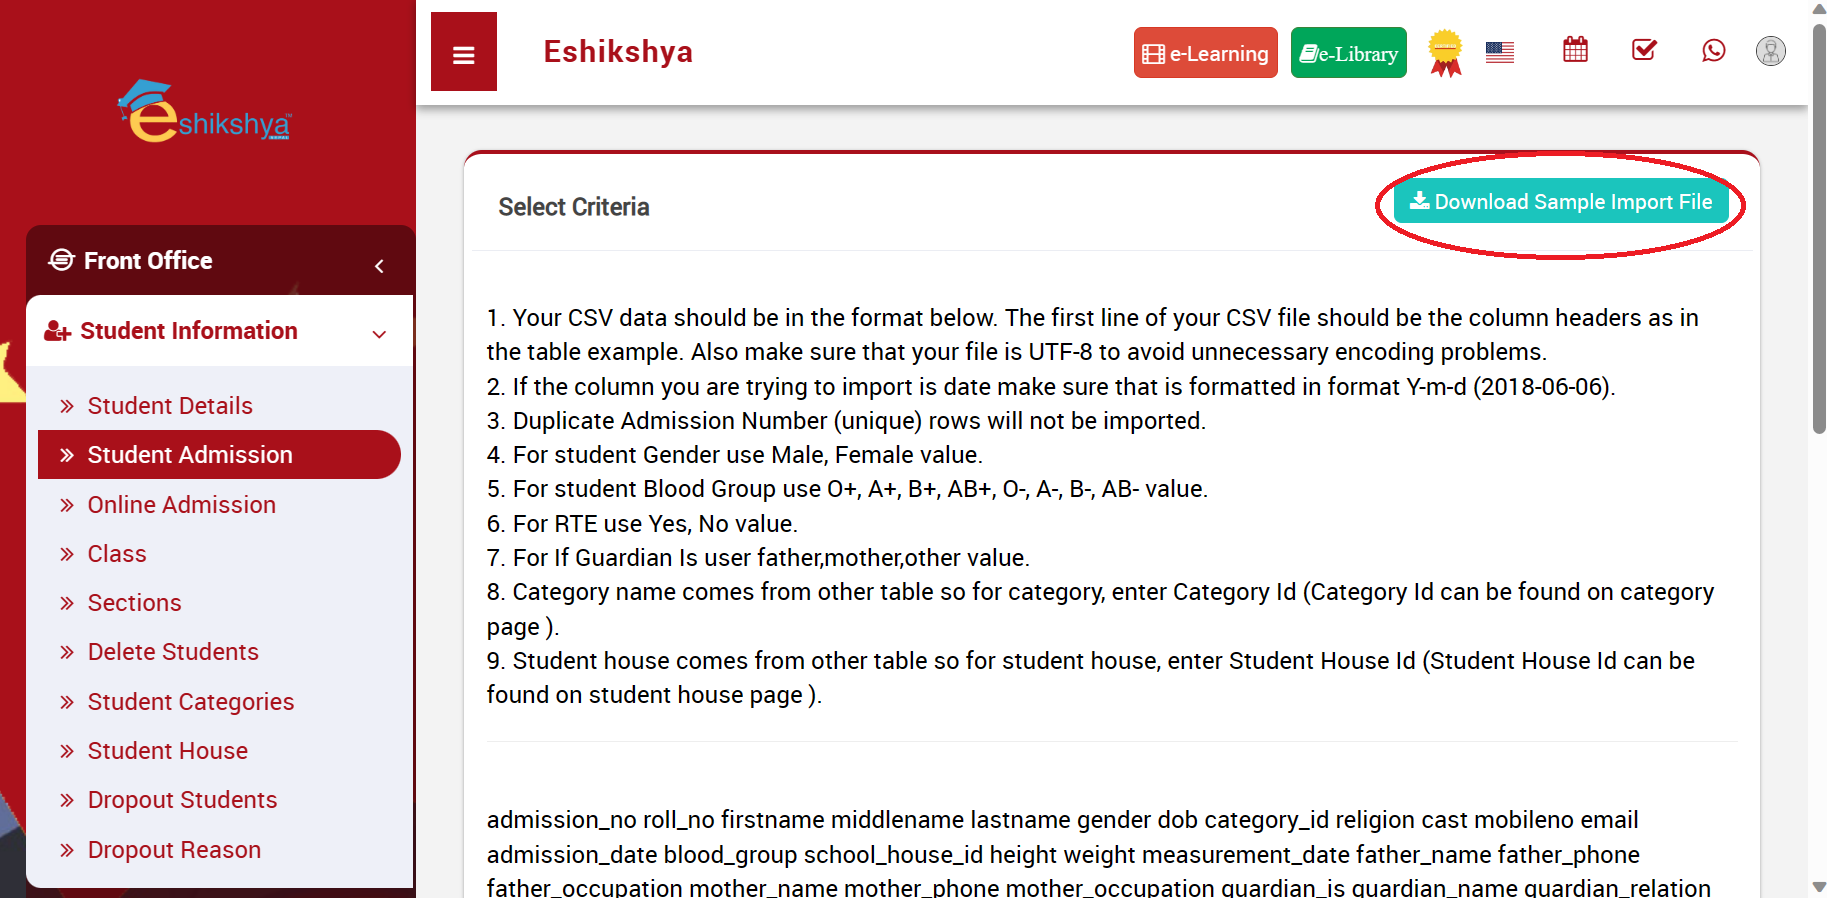 Image 22
When you scroll down you will find a space to Fill the Class, section field and upload the CSV file. Fill the class and section field, upload your file in the given space and click on Import Student. This will save your student detail file according to Class and section.
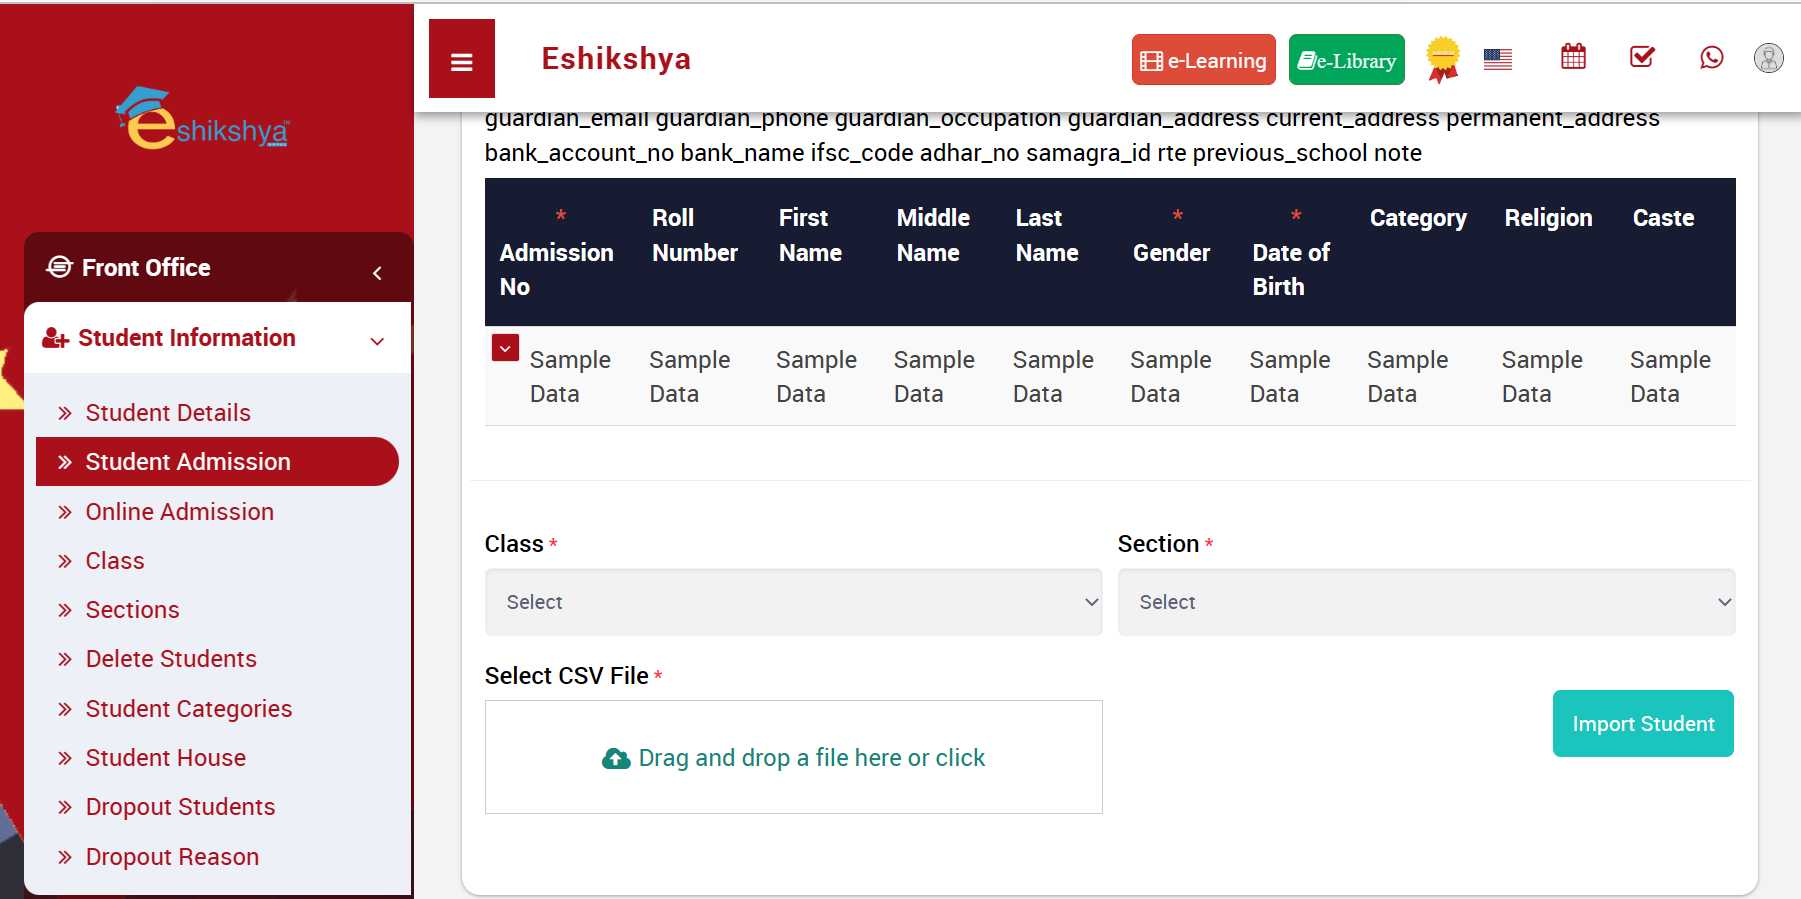 Image 23
Online Admission
Under Student Information, Click on Online Admission to view the list of Online Admission Requests, Student details and Admission fee payment status, Enrollment status.
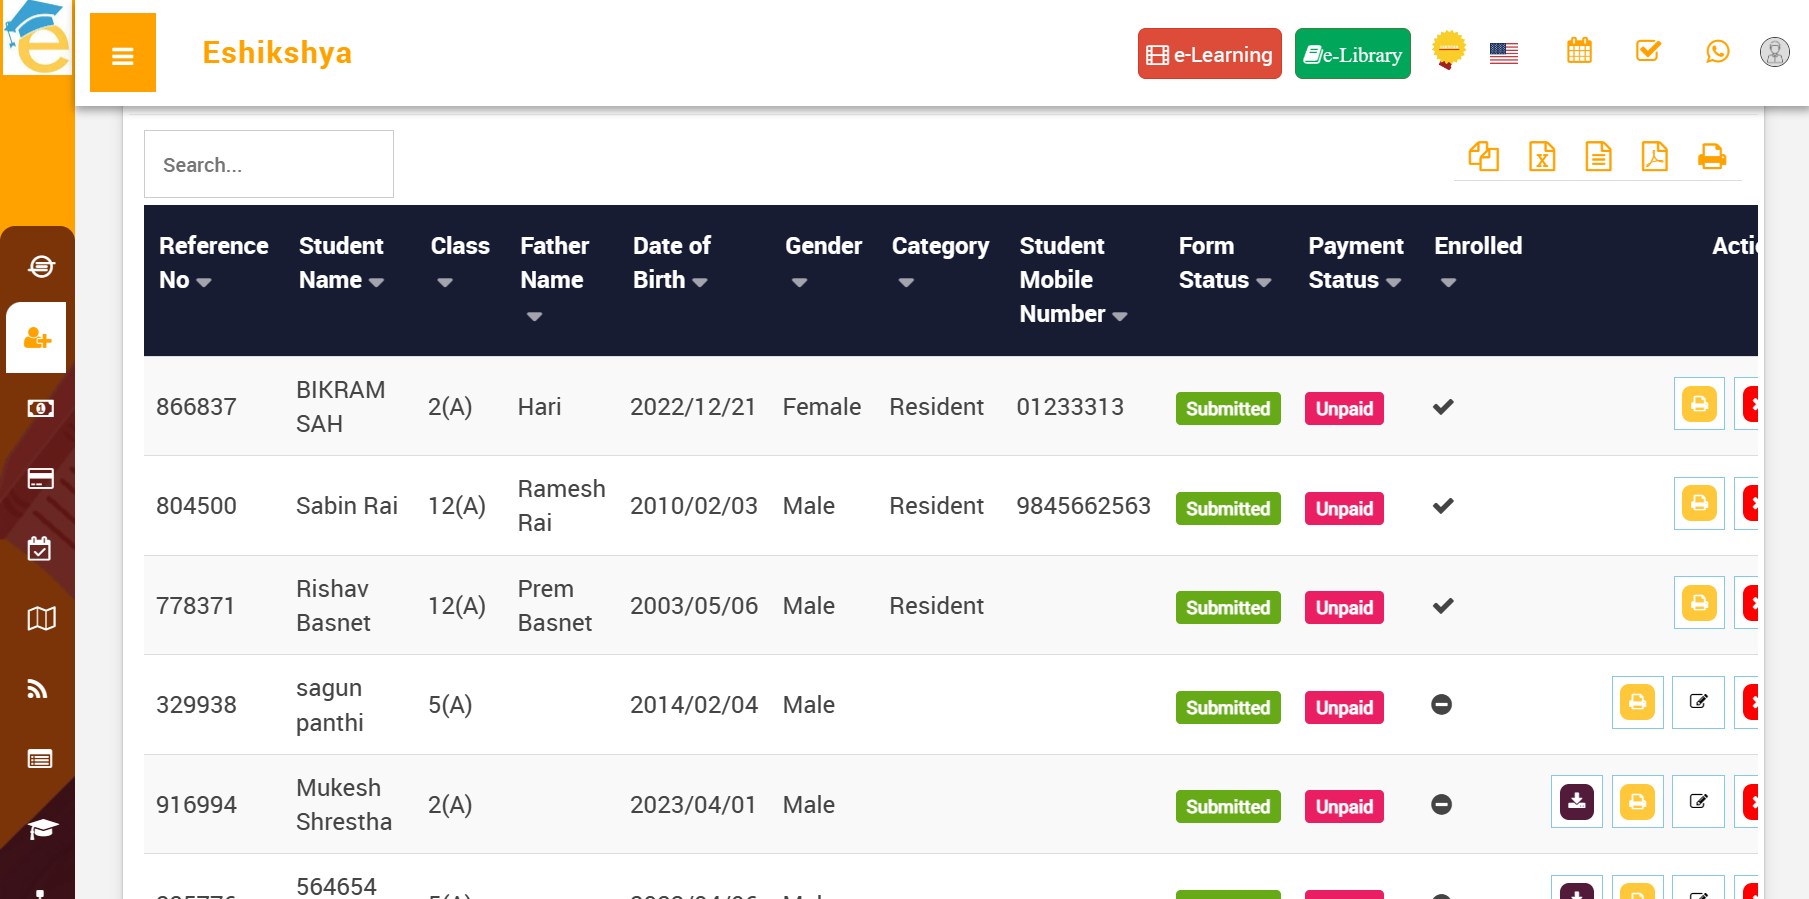 Image 24
Class
 Image 25
Section
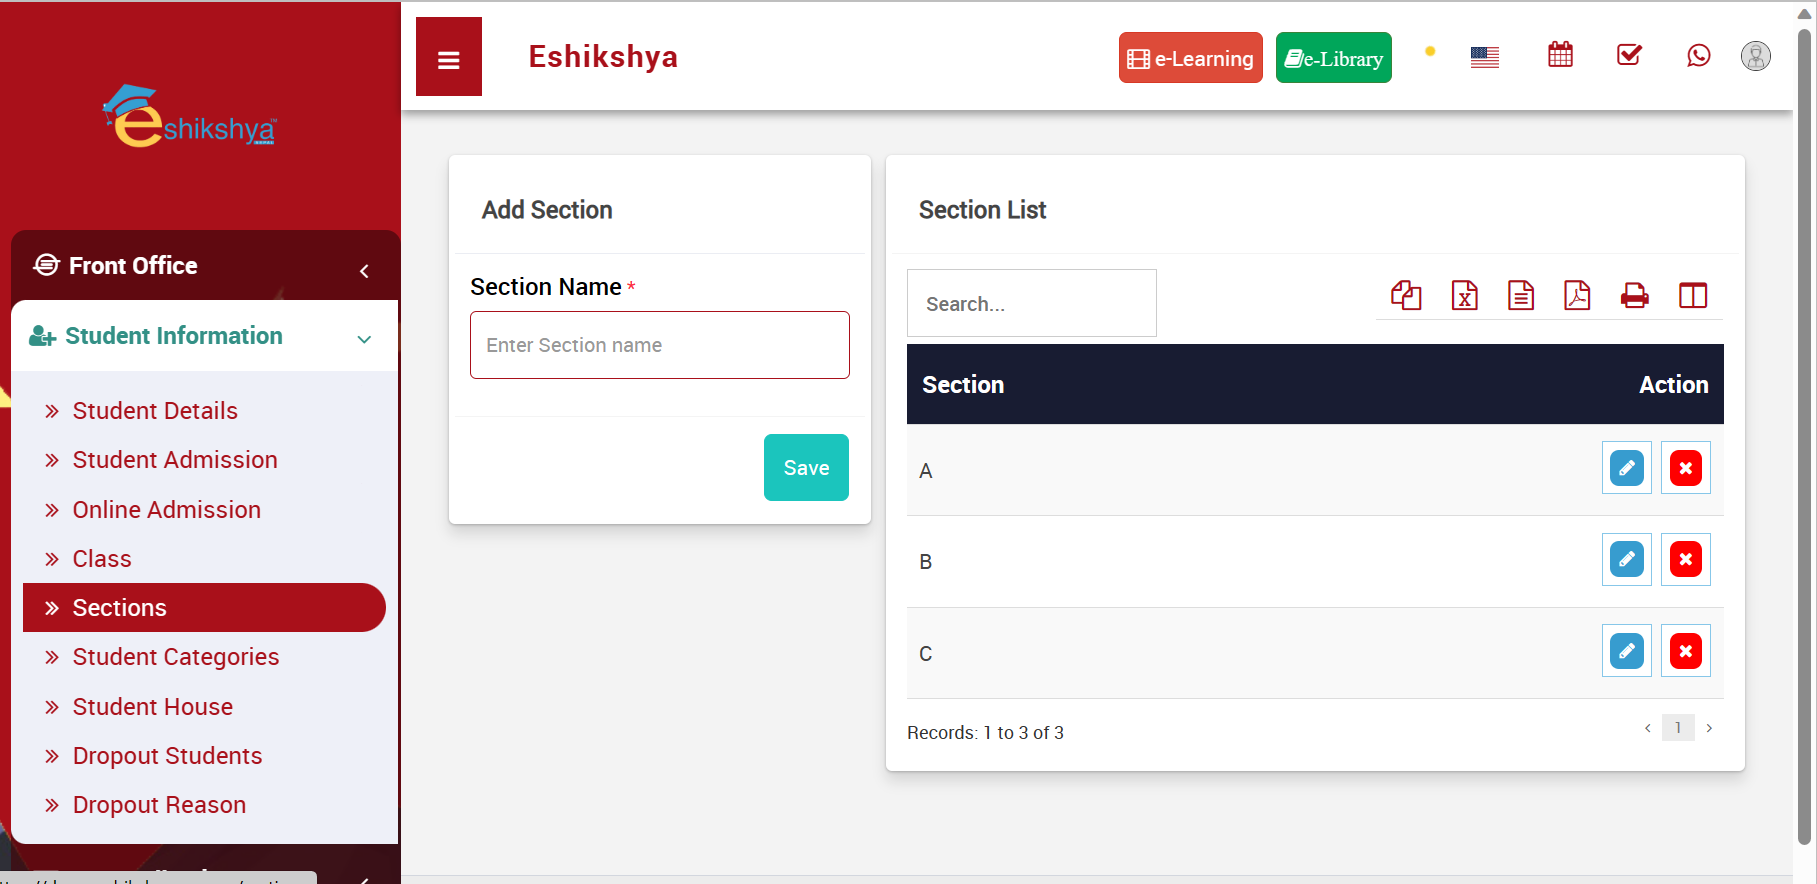 Image 27
Delete Students
Search the student you want to delete with the filter. Once you find the student, select and click on delete.
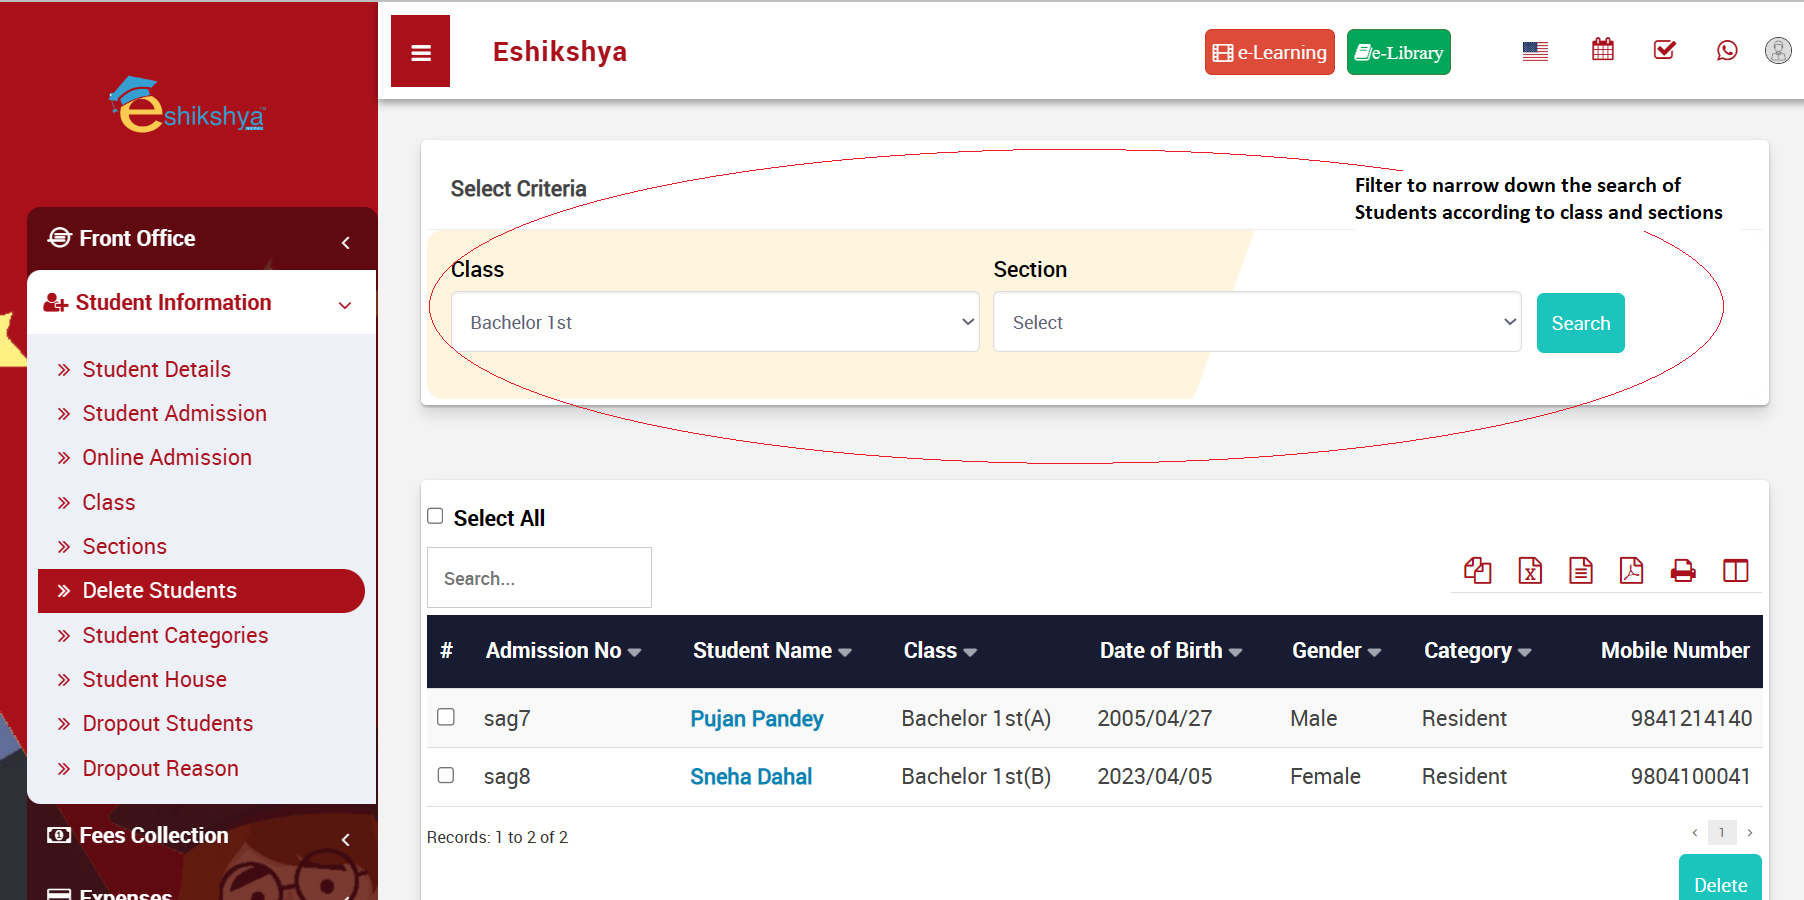 Image 28
Student Categories
 Image 28
Student House
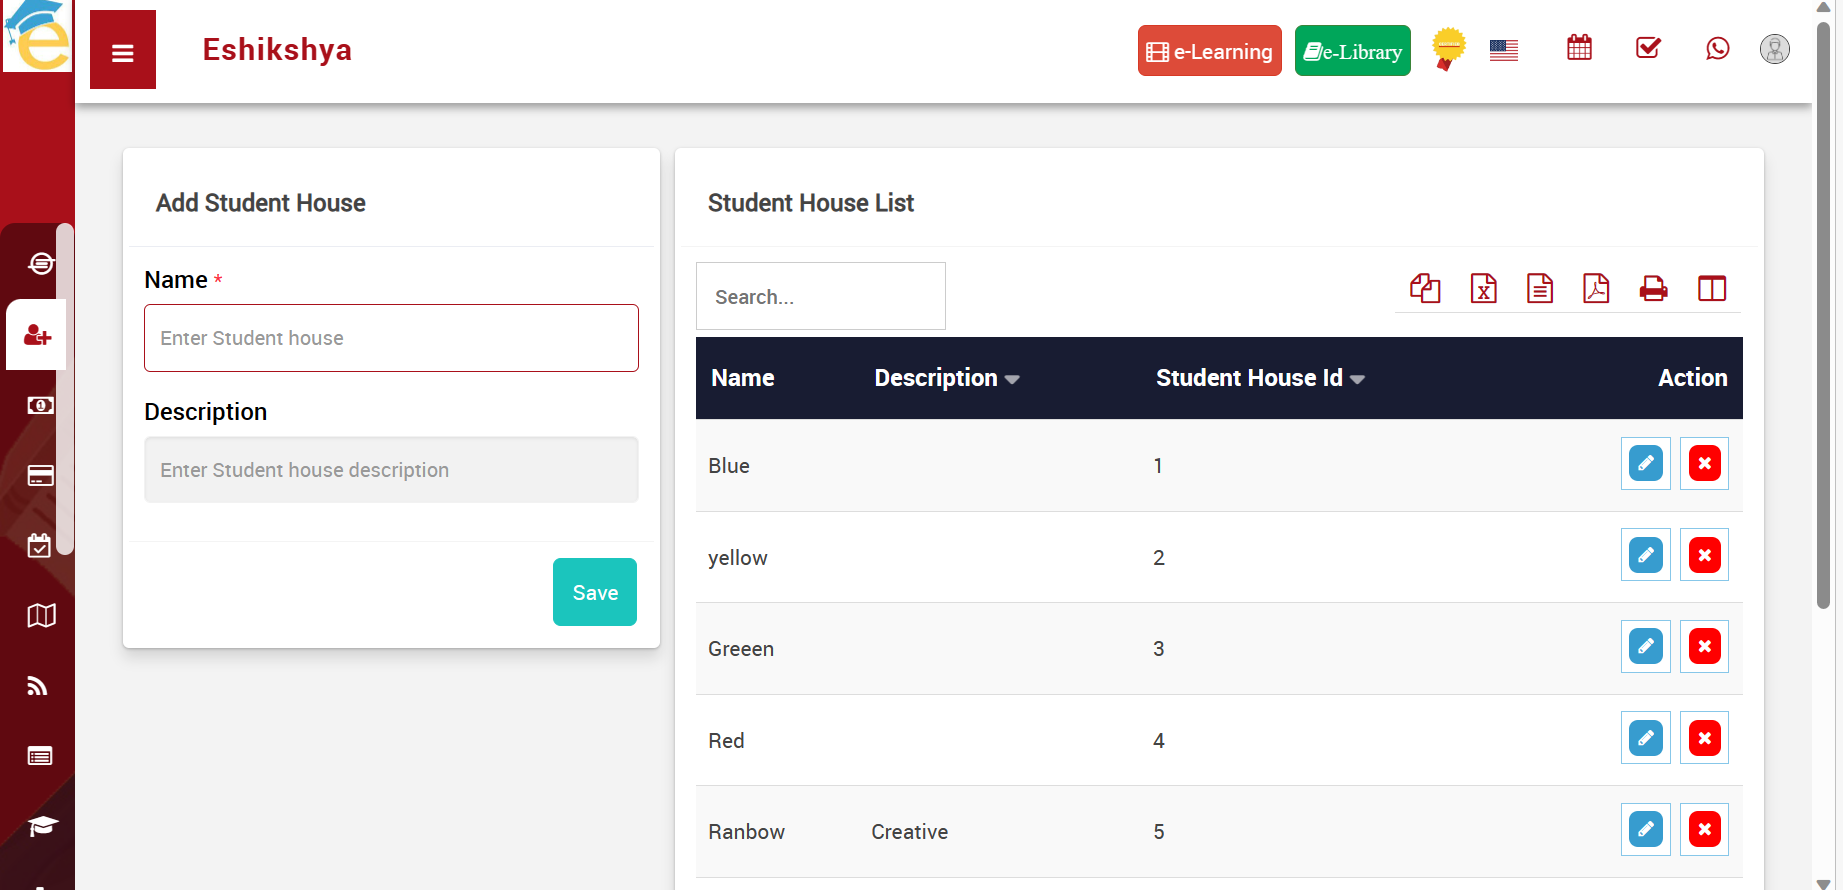 Image 29
Dropout Students
Dropout Reason
Fees Collection
Print Monthly Fees
To Generate monthly fees of students, Go to Print Monthly Fee under Fees Collection.
Click on the check box next to Admission No. to select all students or Select the check box next to the Admission No. of the Student you want to choose.
Then click on Generate.
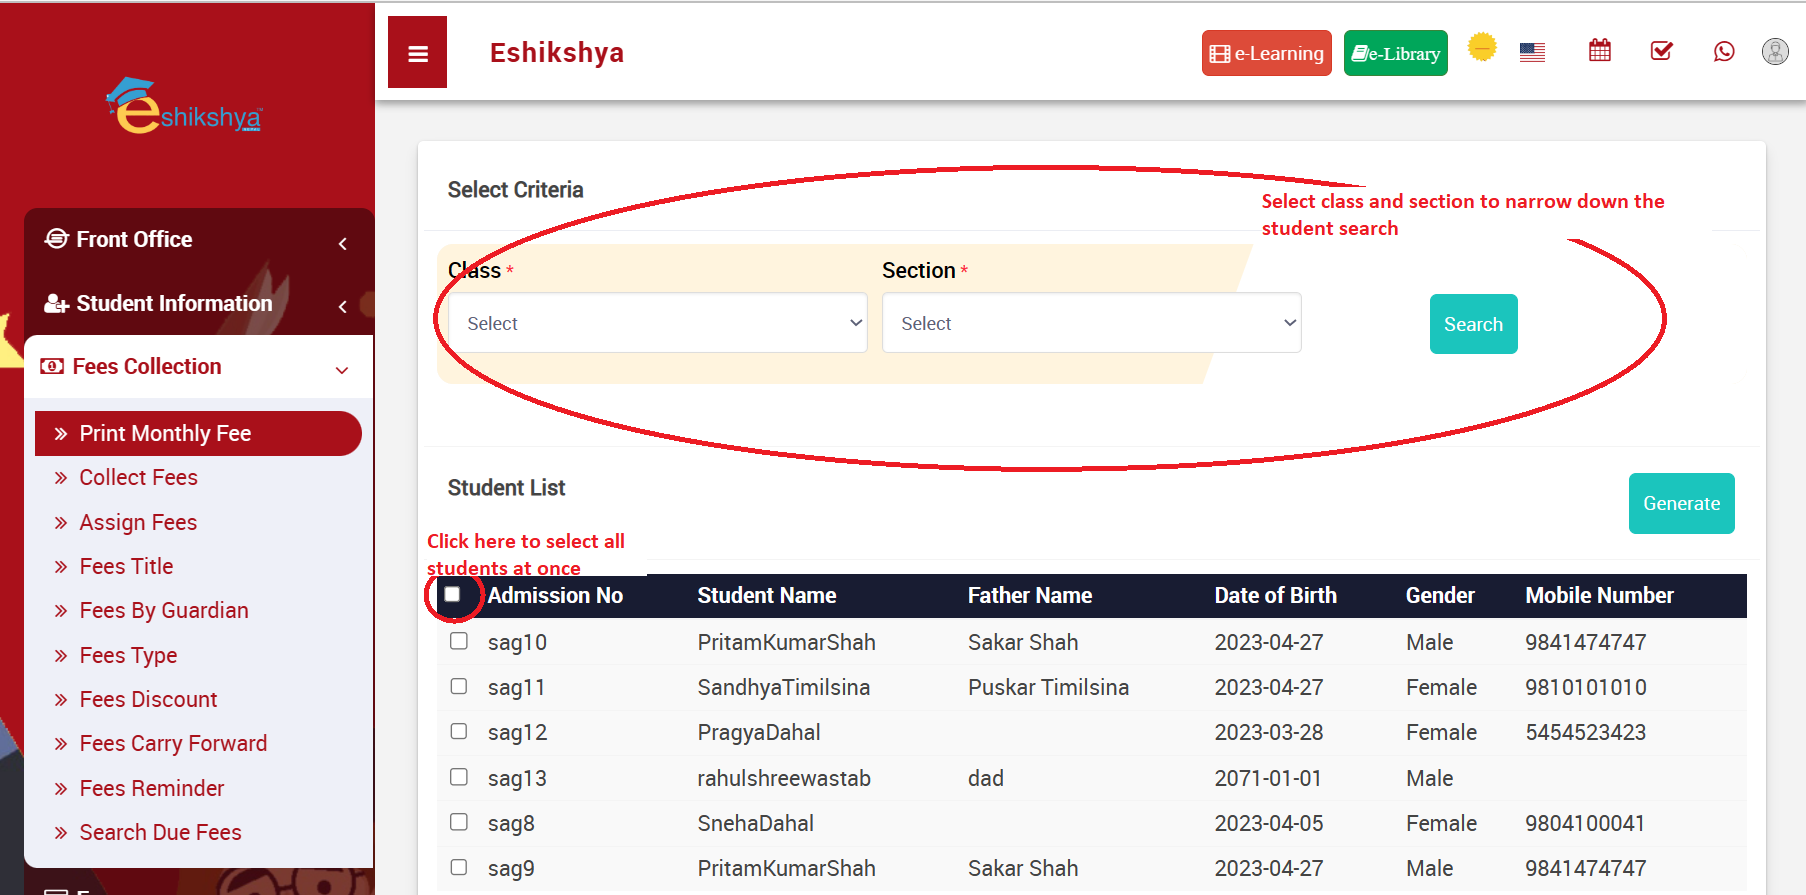 Image 30
The Following Page should appear once you click on Generate. Click on Print if you want to Print the Fees.
 Image 31
Collect Fees
To update fee collection; Go to Collect Fees under Fees collection.
Search according to class/ section.
Select the student From the list shown and click on Collect Fees.
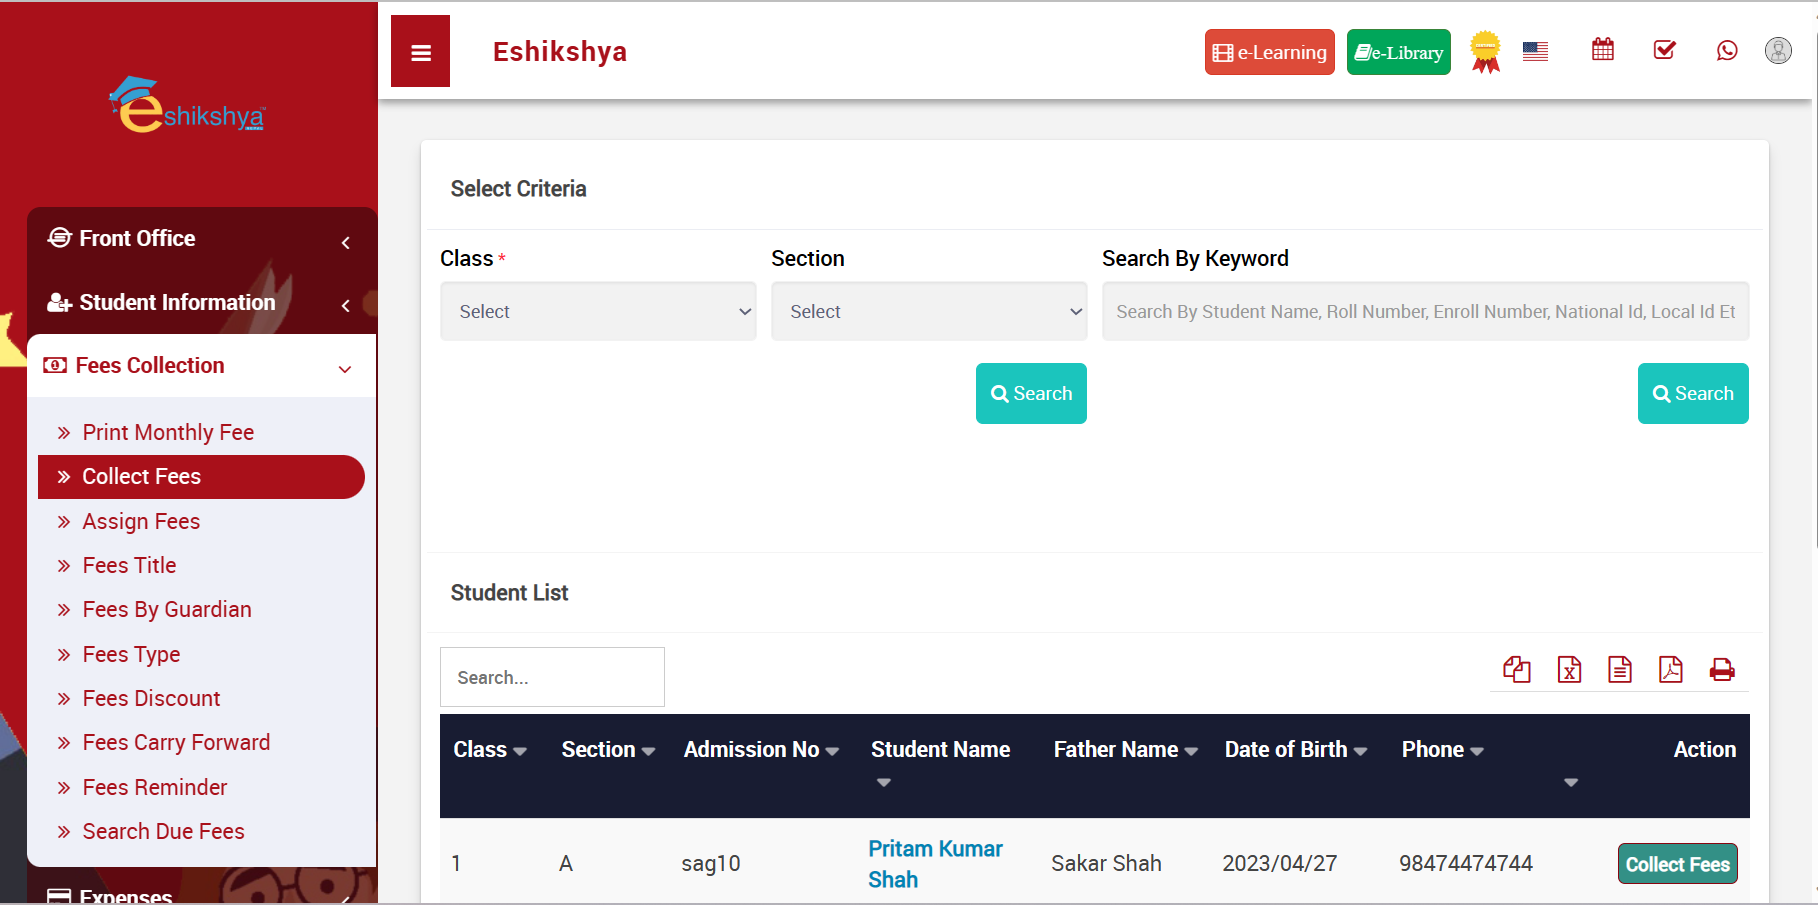 Image 32
Click on Show All to view the Fee history.
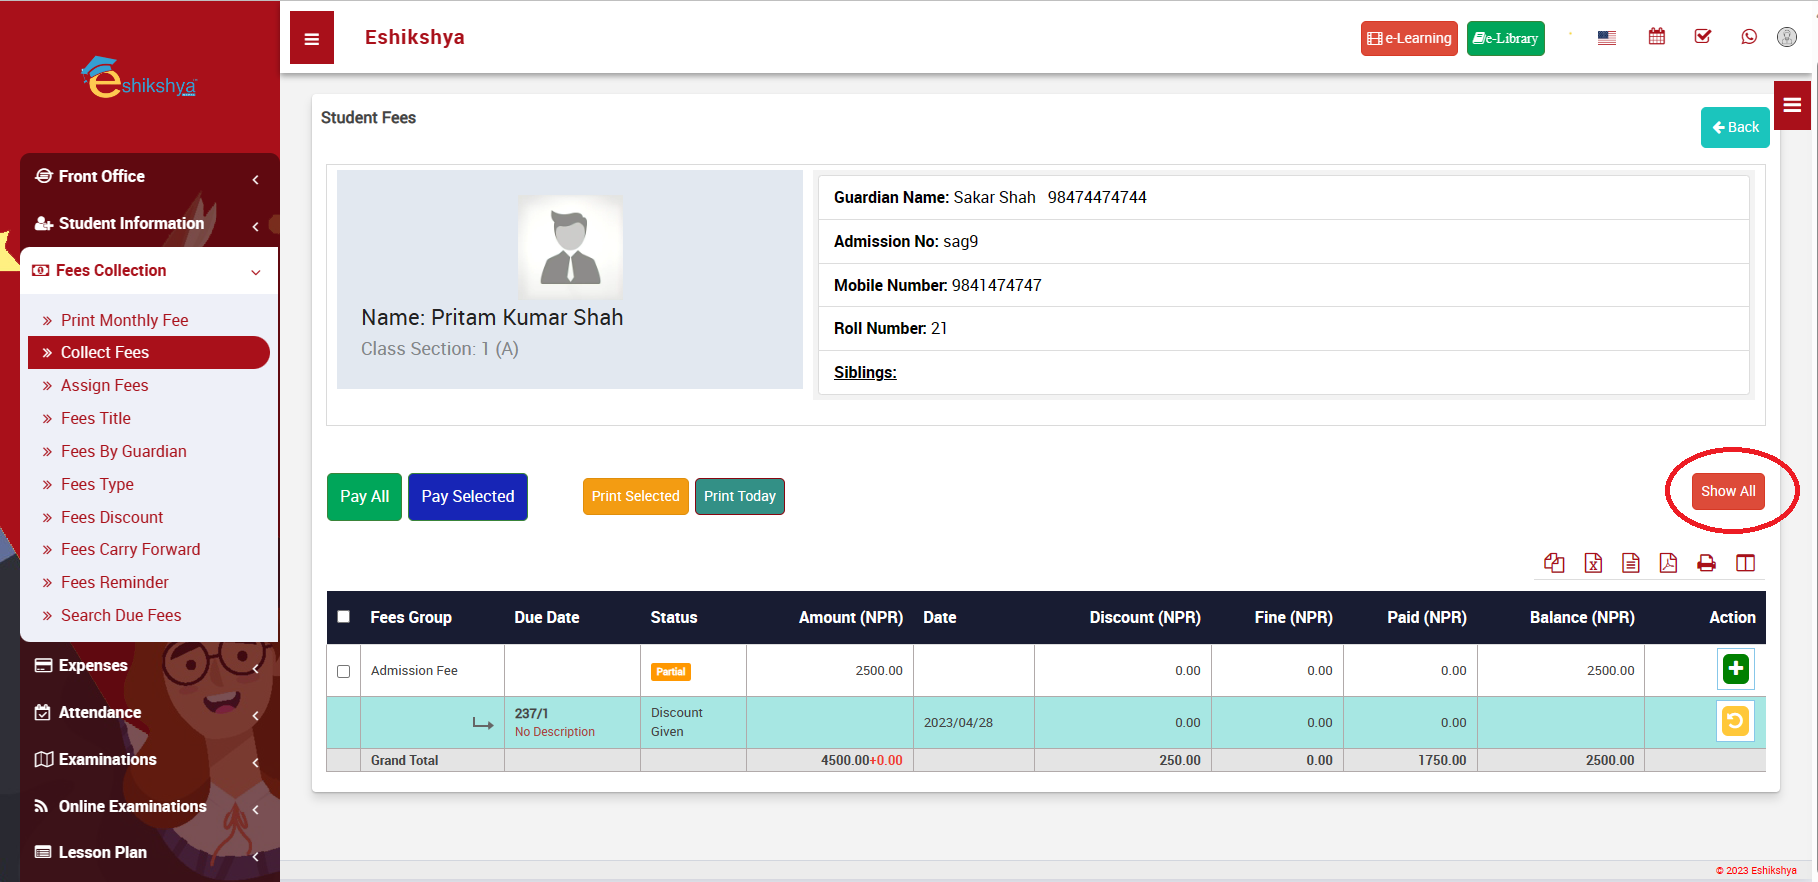 Image 33
This page should appear once you click on Show All.
It shows all the fees history including paid/due/partially paid.
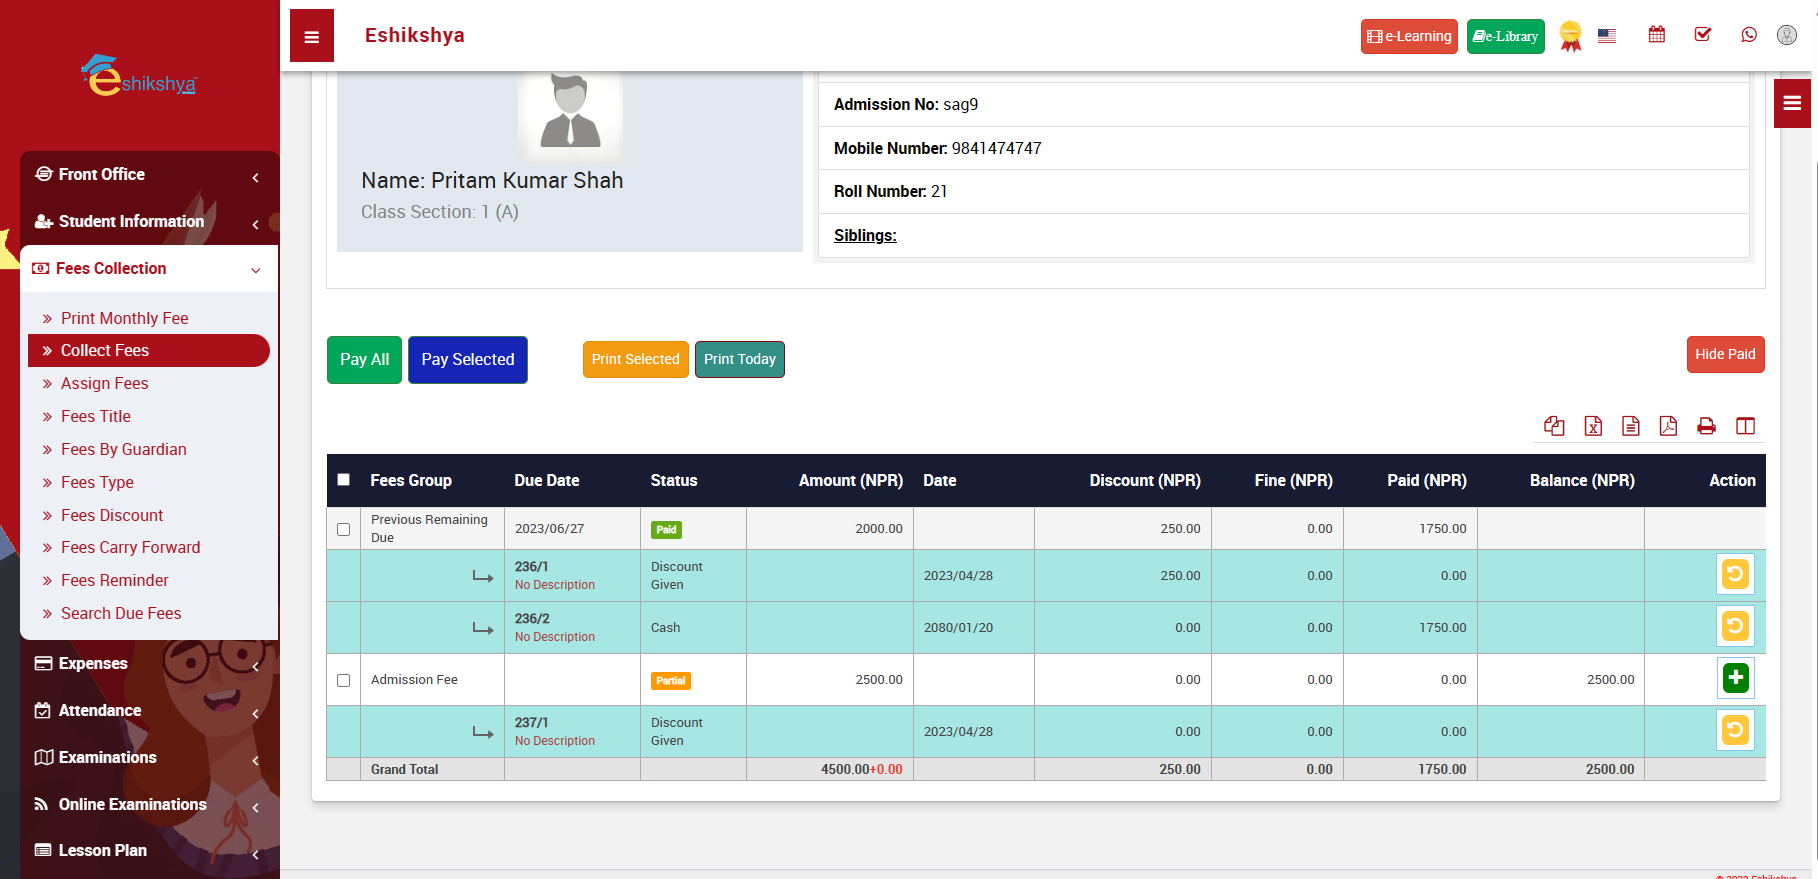 Image 34
Pay All
In reference to Image 34, when you click on Pay All, you see a pop up as shown in the picture below. Update the amount and click save. This will clear all the remaining due fees.
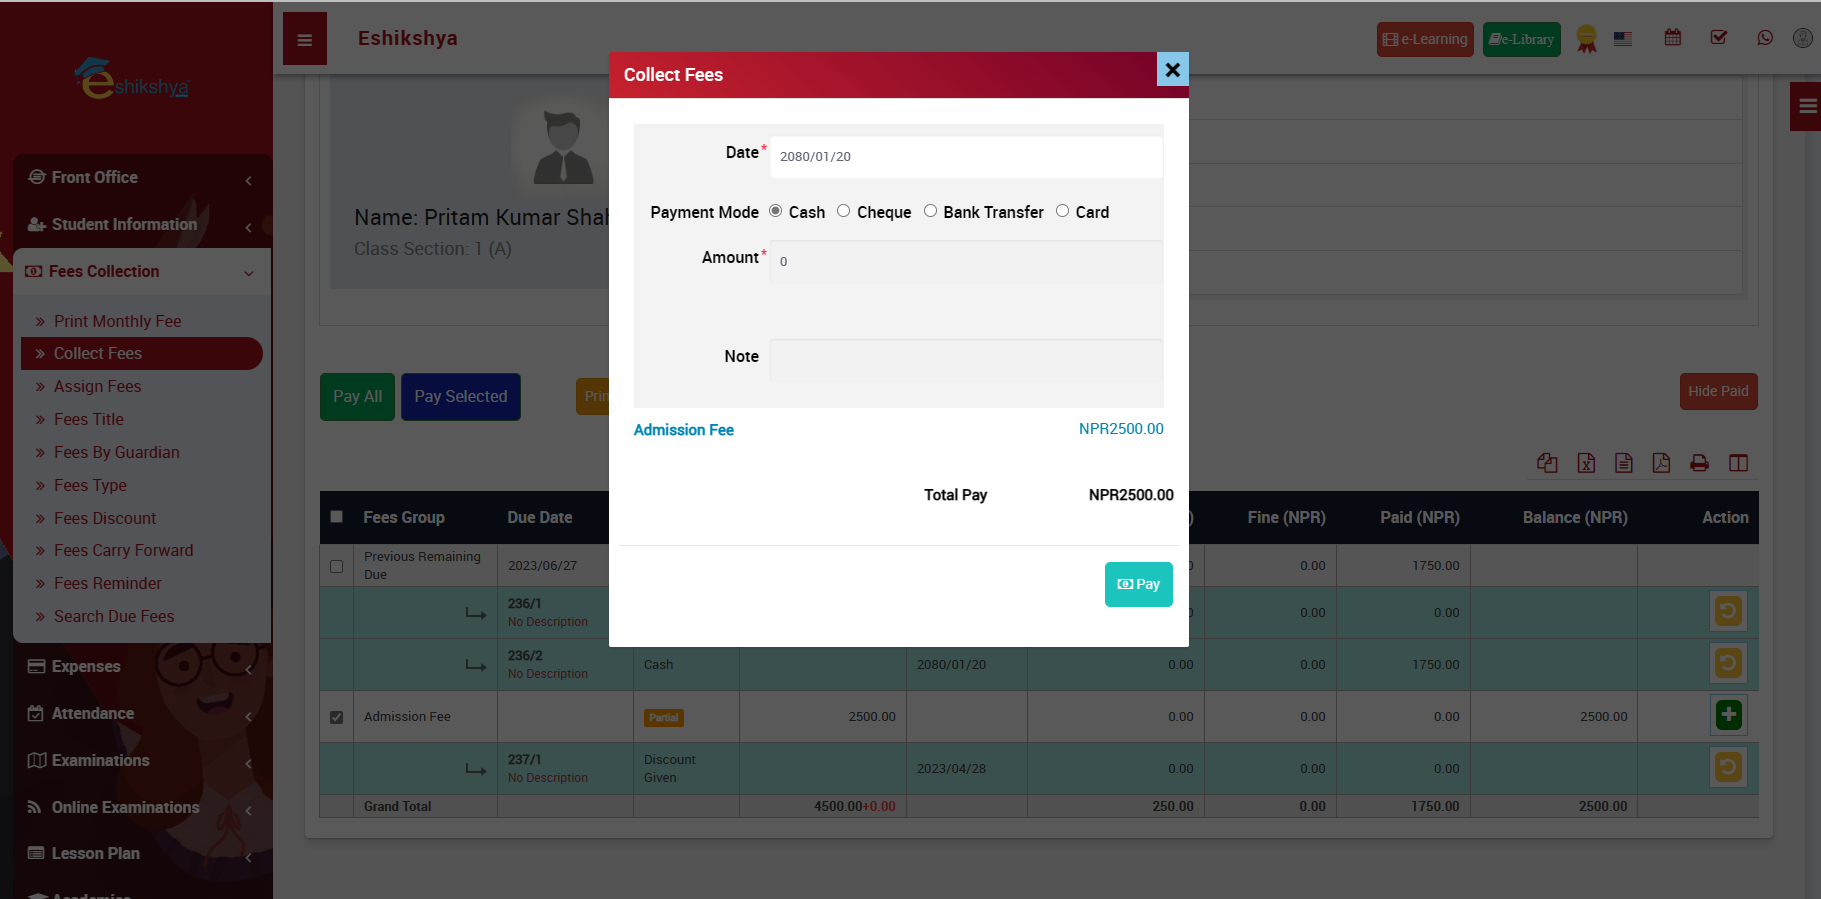
Image 35
Pay Selected
In reference to Image 34, click on the check box on the left to the fee you want to select and click on Pay Selected. This will give you a pop up as shown in the picture below. Update the amount and click save.
Image 36
Print Selected
In reference to Image 34, click on the check box on the left of Fees Group to select all fees from the list OR click on the check box left to the fee you want to select and click on Print Selected. This will give you the receipt of all the selected fees in a printable format.
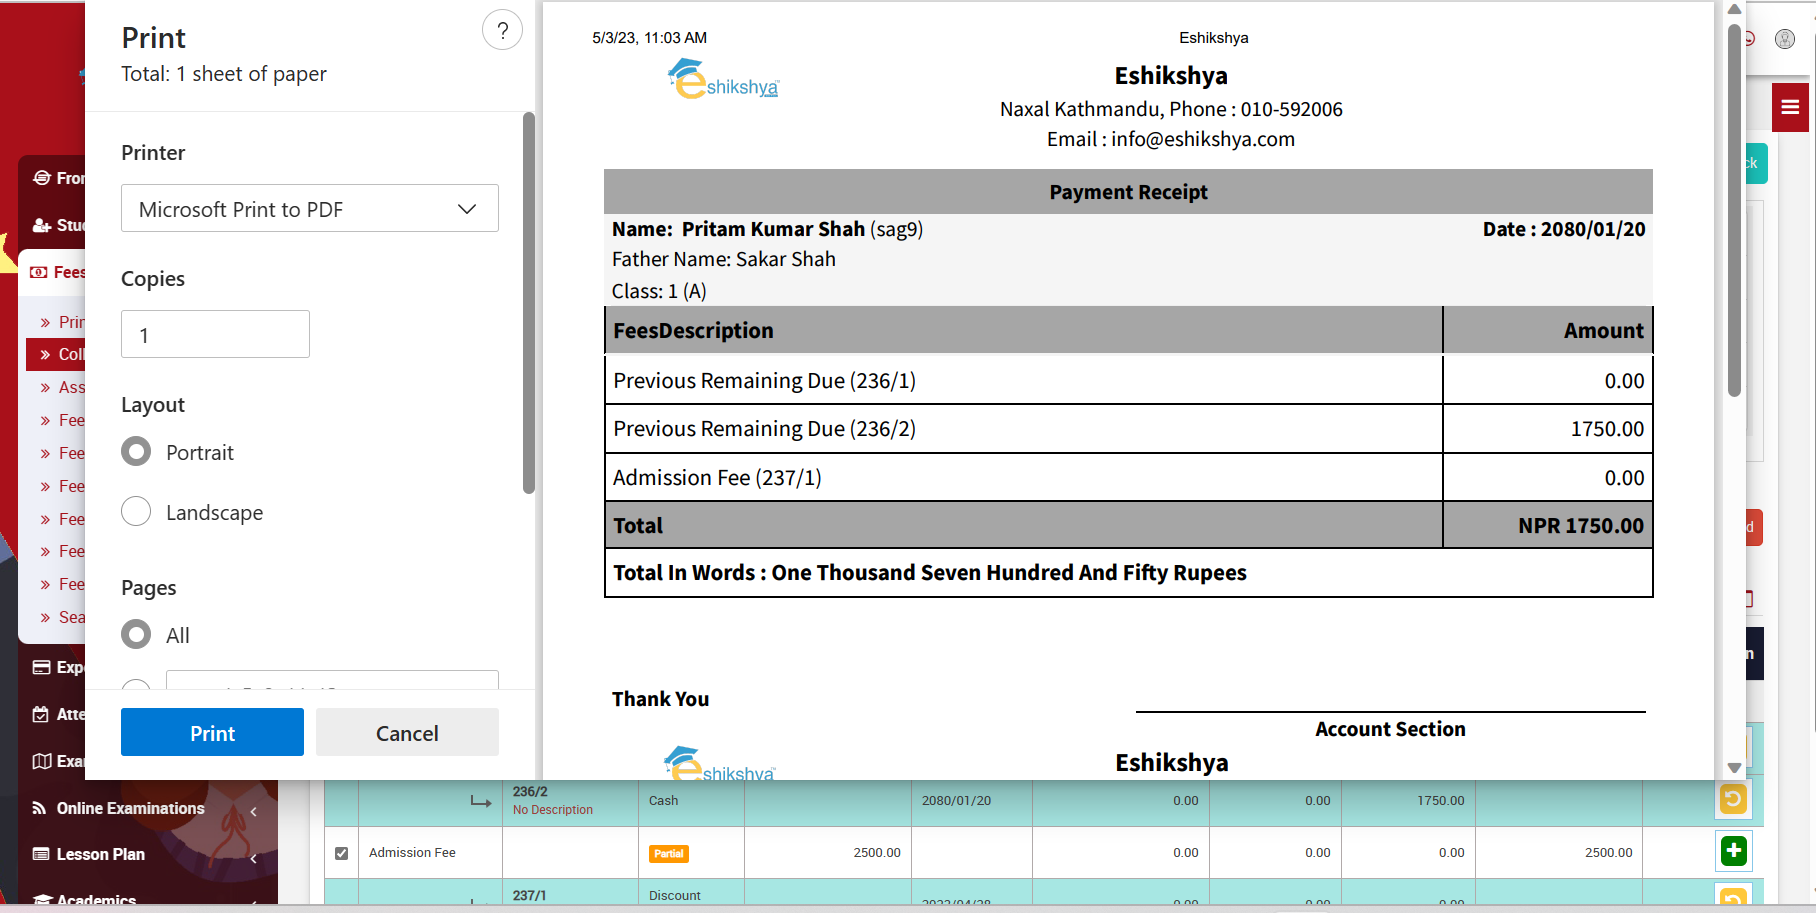 Image 37
Print Today
In reference to Image 34, click on Print Today to get the receipt of all due fees in a printable format.
Image 38
Assign Fees.
In reference to the Image 39:
- Different Fee subgroups can be created here.
- Select Fee group and Fee type. Enter the fee amount.
- If there is a fine to be added, select fine type.
- Select percentage if fine type is in percentage.
- Enter the percentage, the fine amount will automatically be calculated.
- If it is a fix amount, select on Fix amount on Fine Type.
- Enter the fine amount in the entry field.
- Click on save.
- The updated fee group should appear on the Fees Master List.
- Click on the Assign/View student icon under Action.
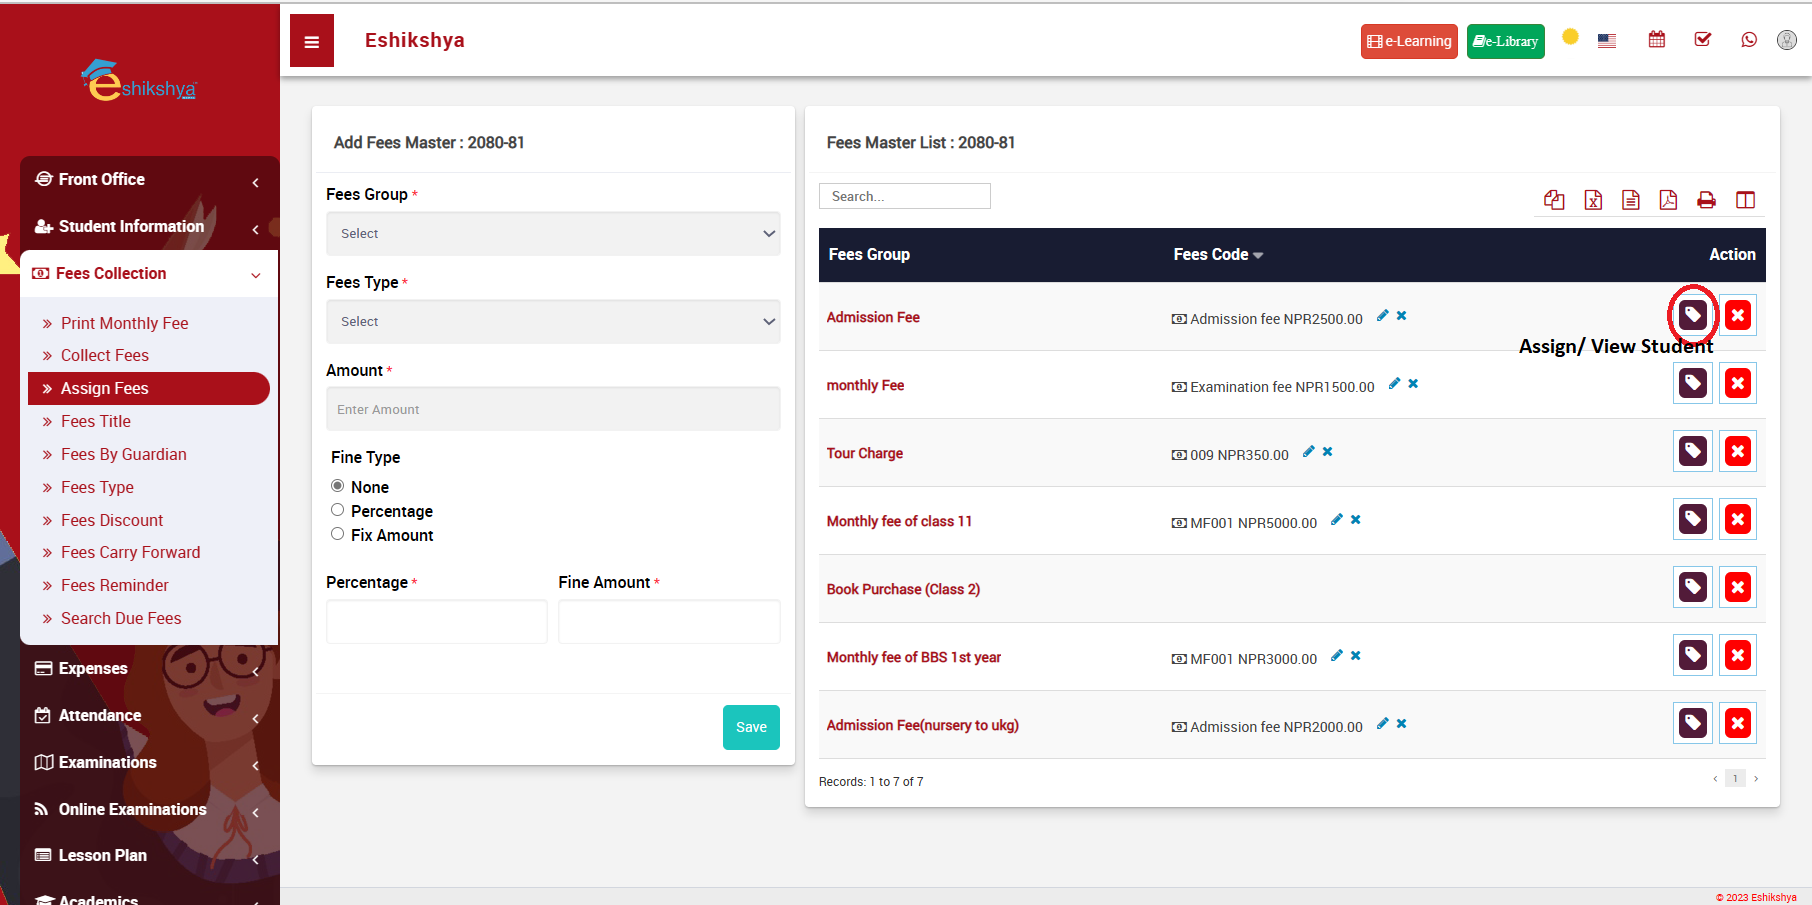 Image 39
You should be redirected to the page shown in Image 40 once you click on Assign/ View student icon.
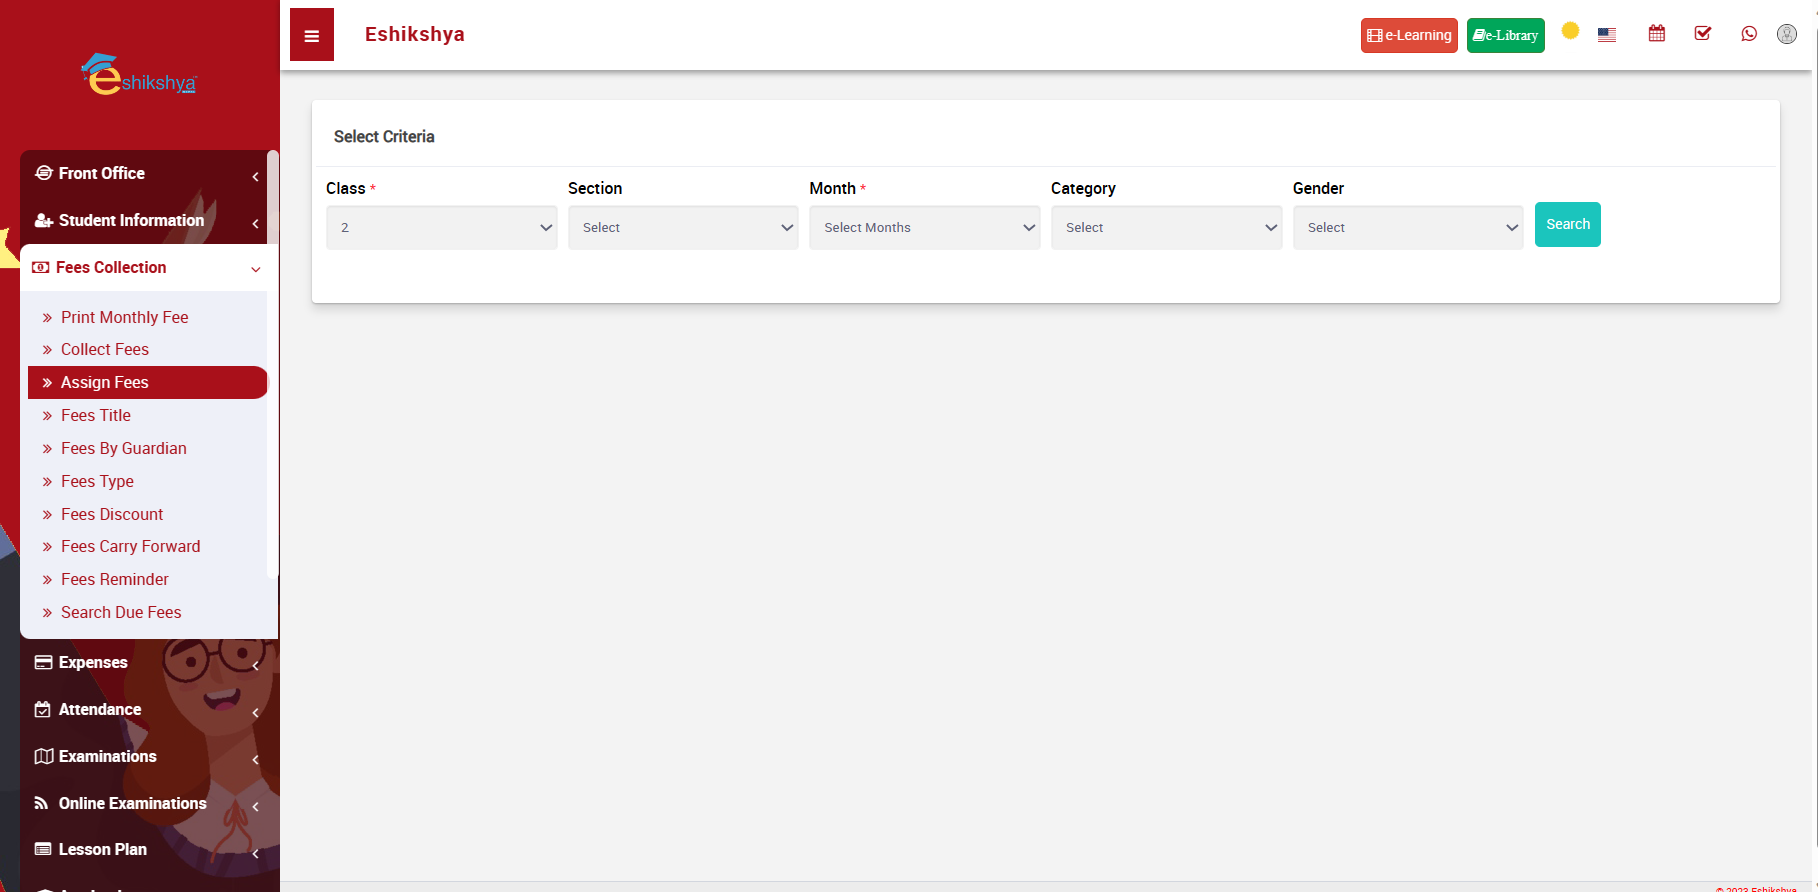 Image 40
- Enter the class, section, month you want to assign the fees to and click on search.
 Image 41
- Click on the check box left to All or click on the checkbox left to the student you want to assign the fee to.
- Click on Save.
Fees Title
The Created Fees Group appears in the Fees Group List selection shown in Image 40.
If the list of options in Fees Group in Assign fees lacks something, new option can be added here.
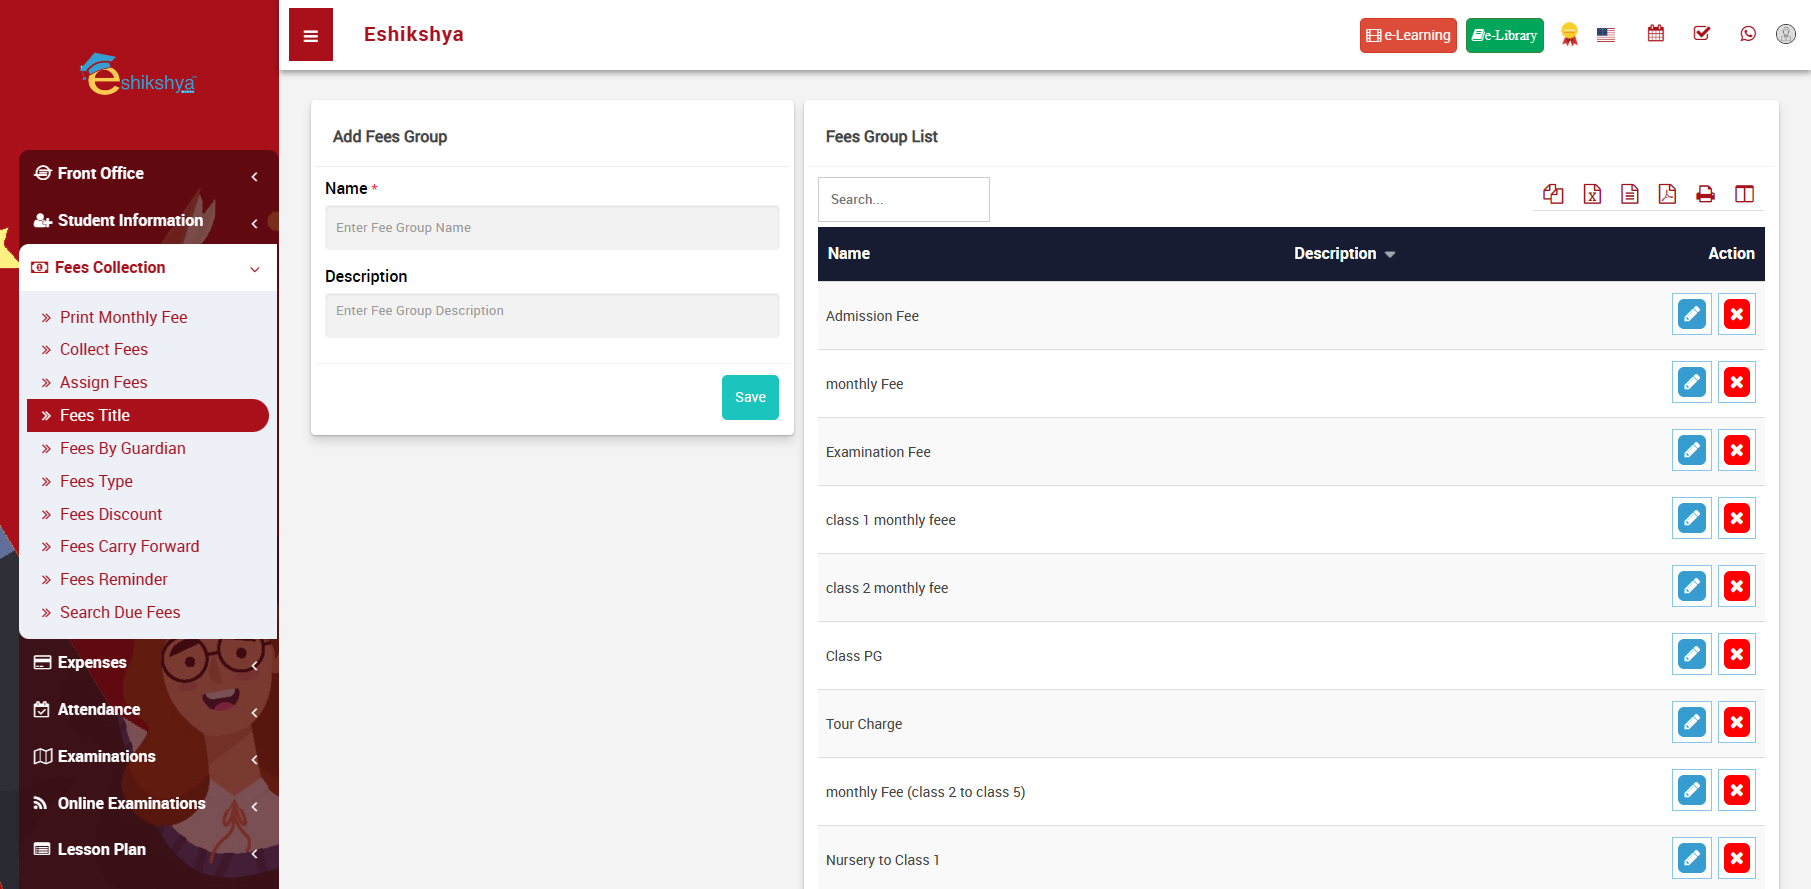 Image 41
Fees Type
The created Fees Type appears in the Fees Type List selection shown in Image 40.
If the list of options in Fees Type in Assign fees lacks something, new option can be added here.
 Image 42
Fees Waiver
- Select class, block and fee type and click on search.
- List of students should appear as shown in the image below.
- Select on the student you want to assign the waiver to.
- Click on Save.
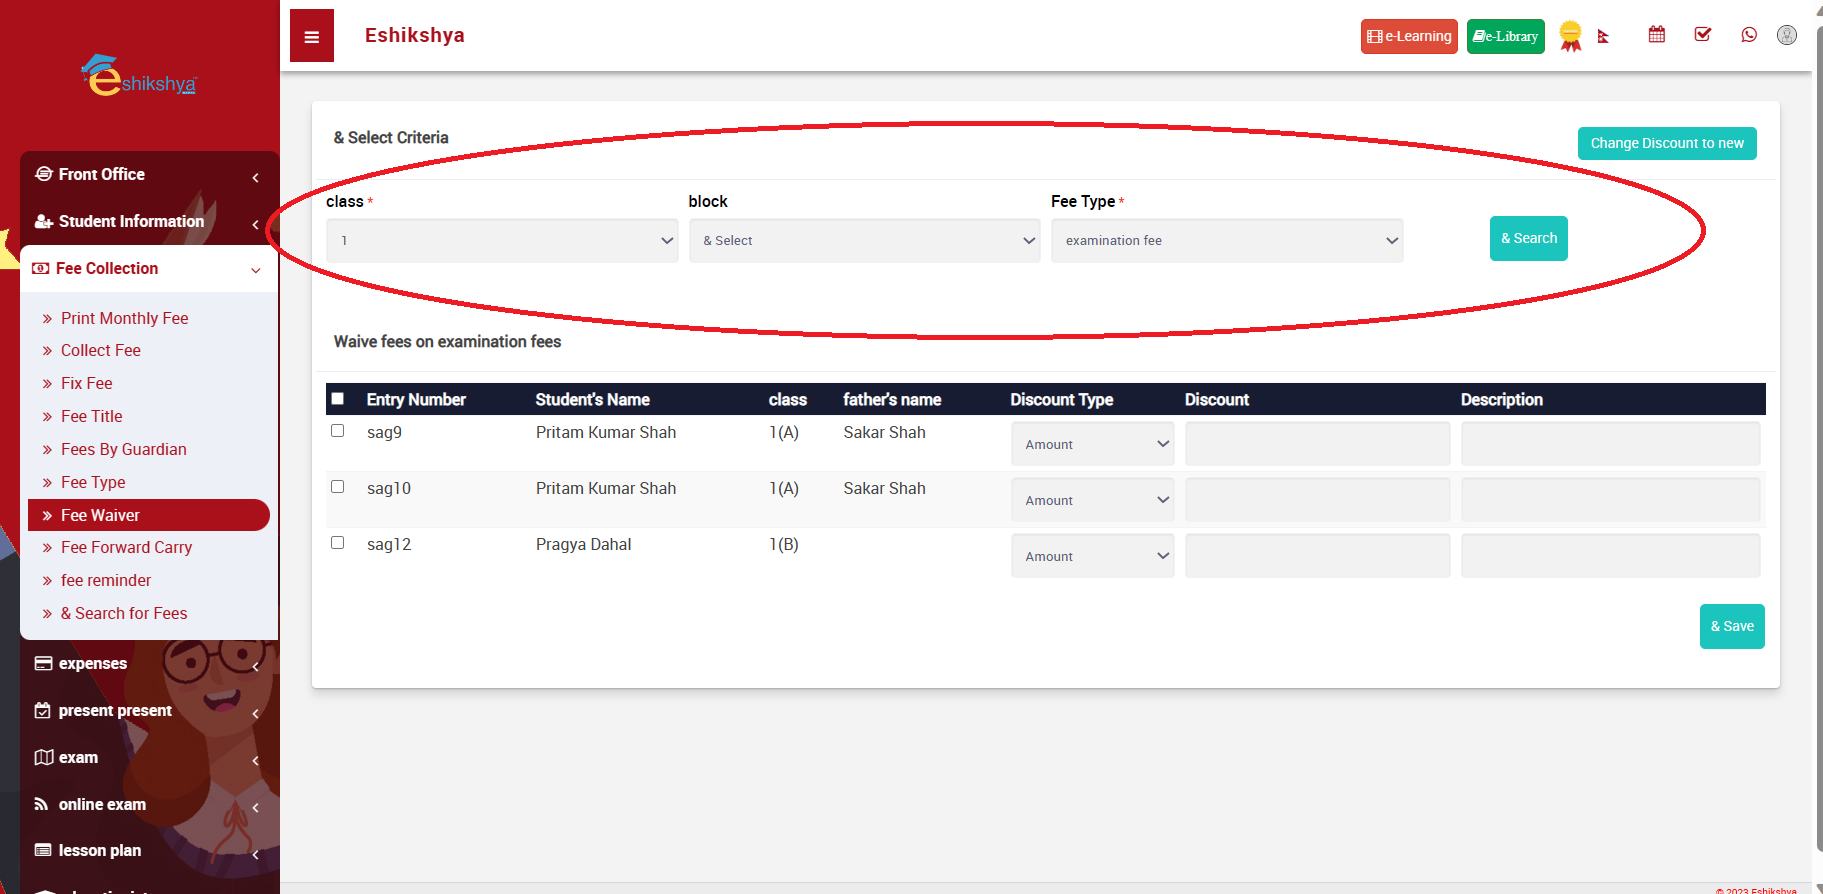 Image 43
Fees Carry Forward
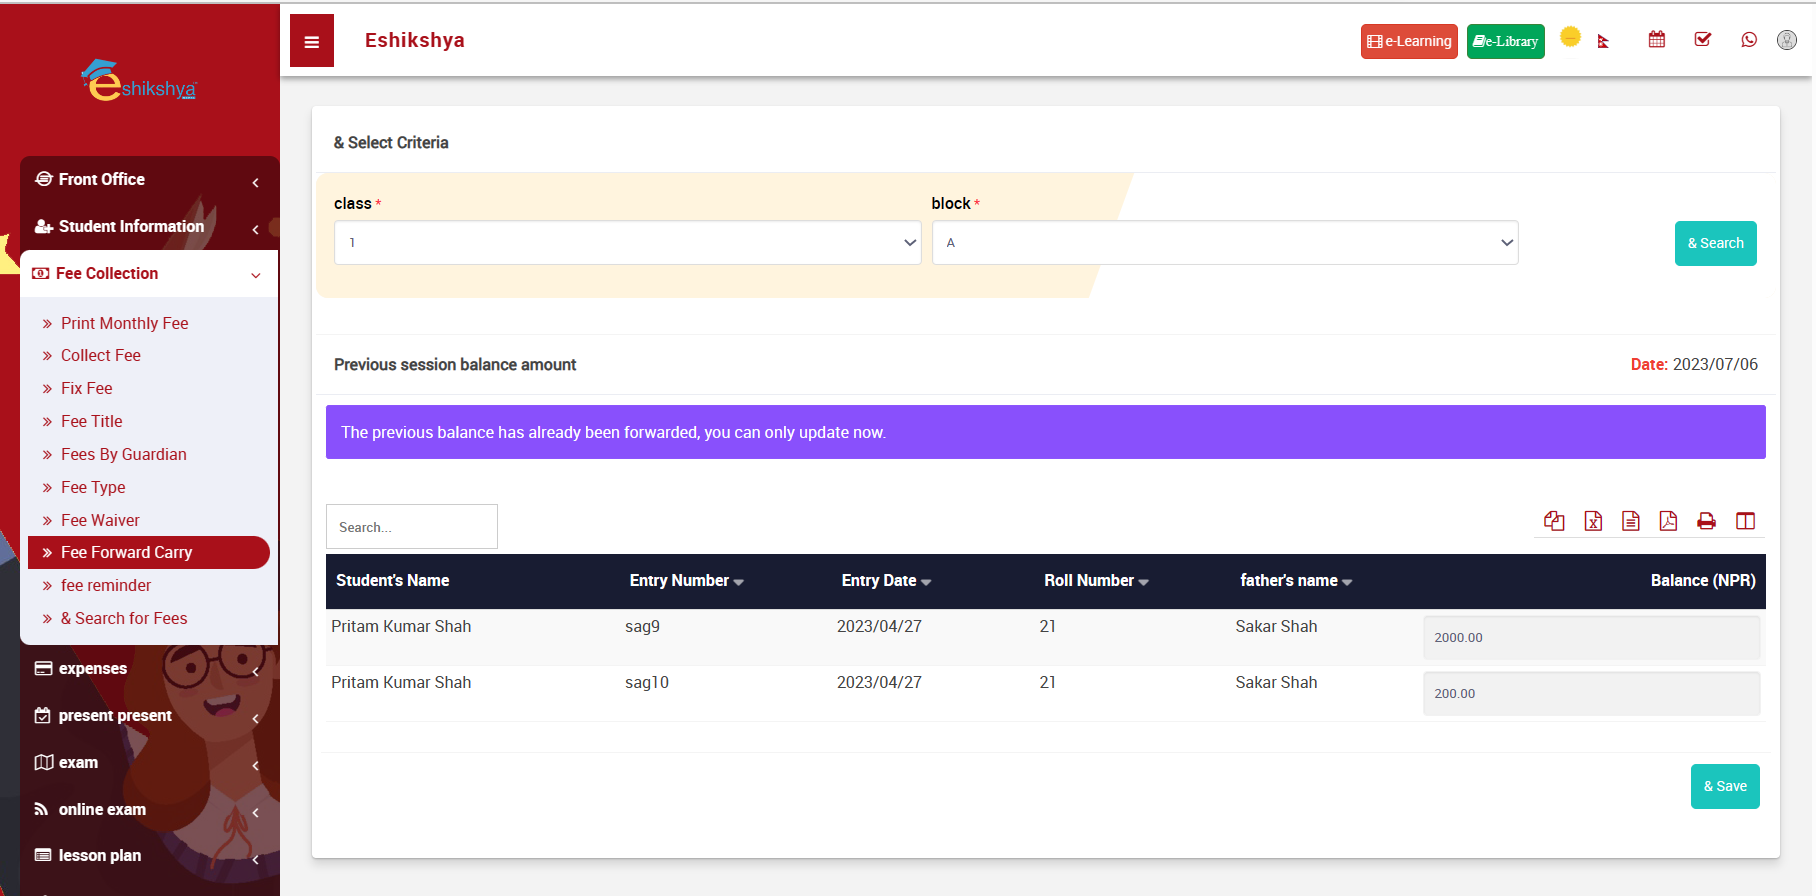 Image 44
Fee Reminder
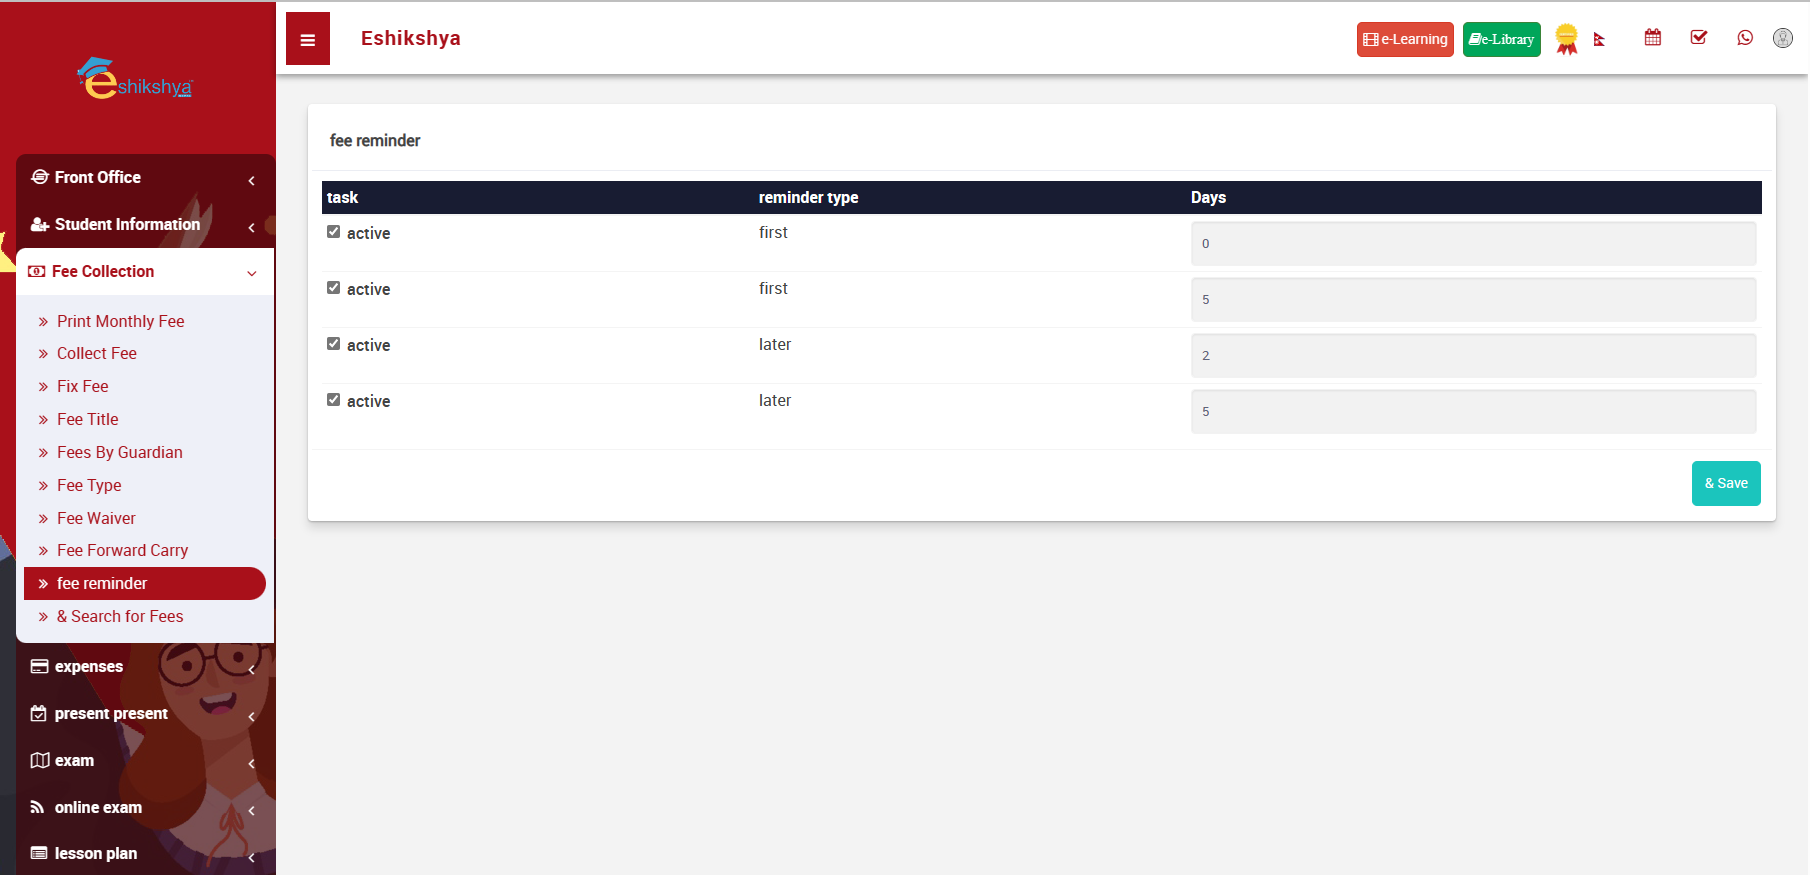 Image 45
Search Due Fees
- To search students who are yet to pay the fees, Select the fee group and class.
- If there are student with fees due, a list should appear.
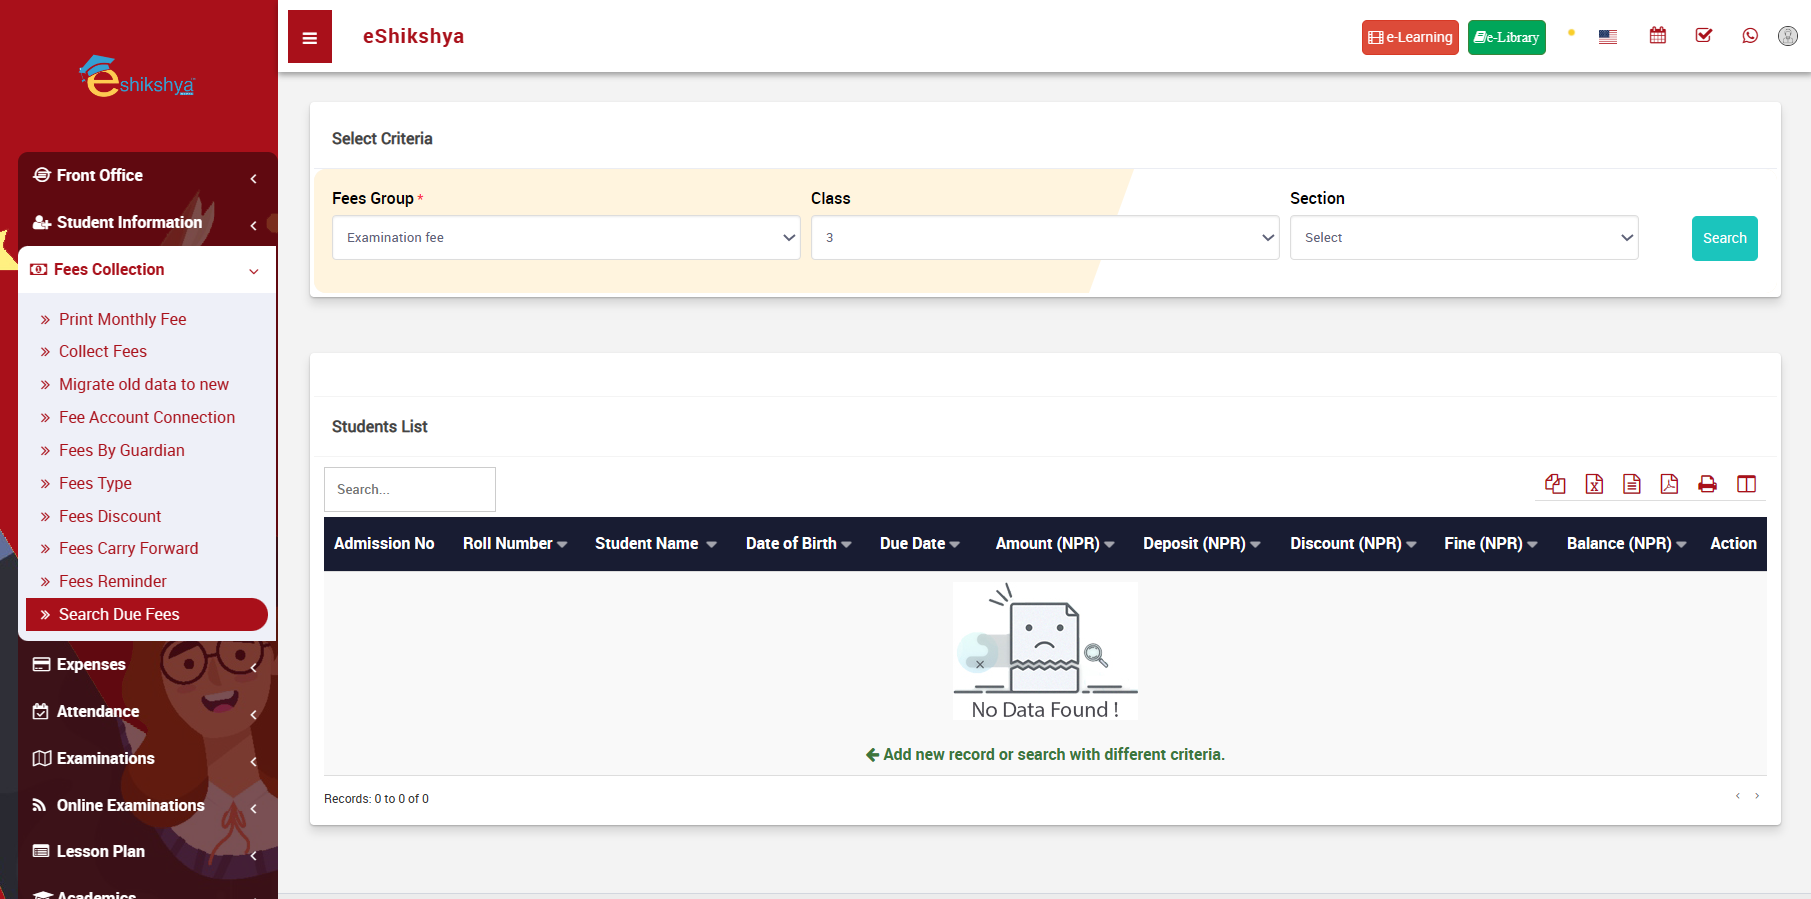 Image 46
Expenses
Add Expenses
Expense are all the spedings done for the school e.g., maintainance costs, vehicle fuel, school supplies, etc.
- To add school expenses, go to Add expense.
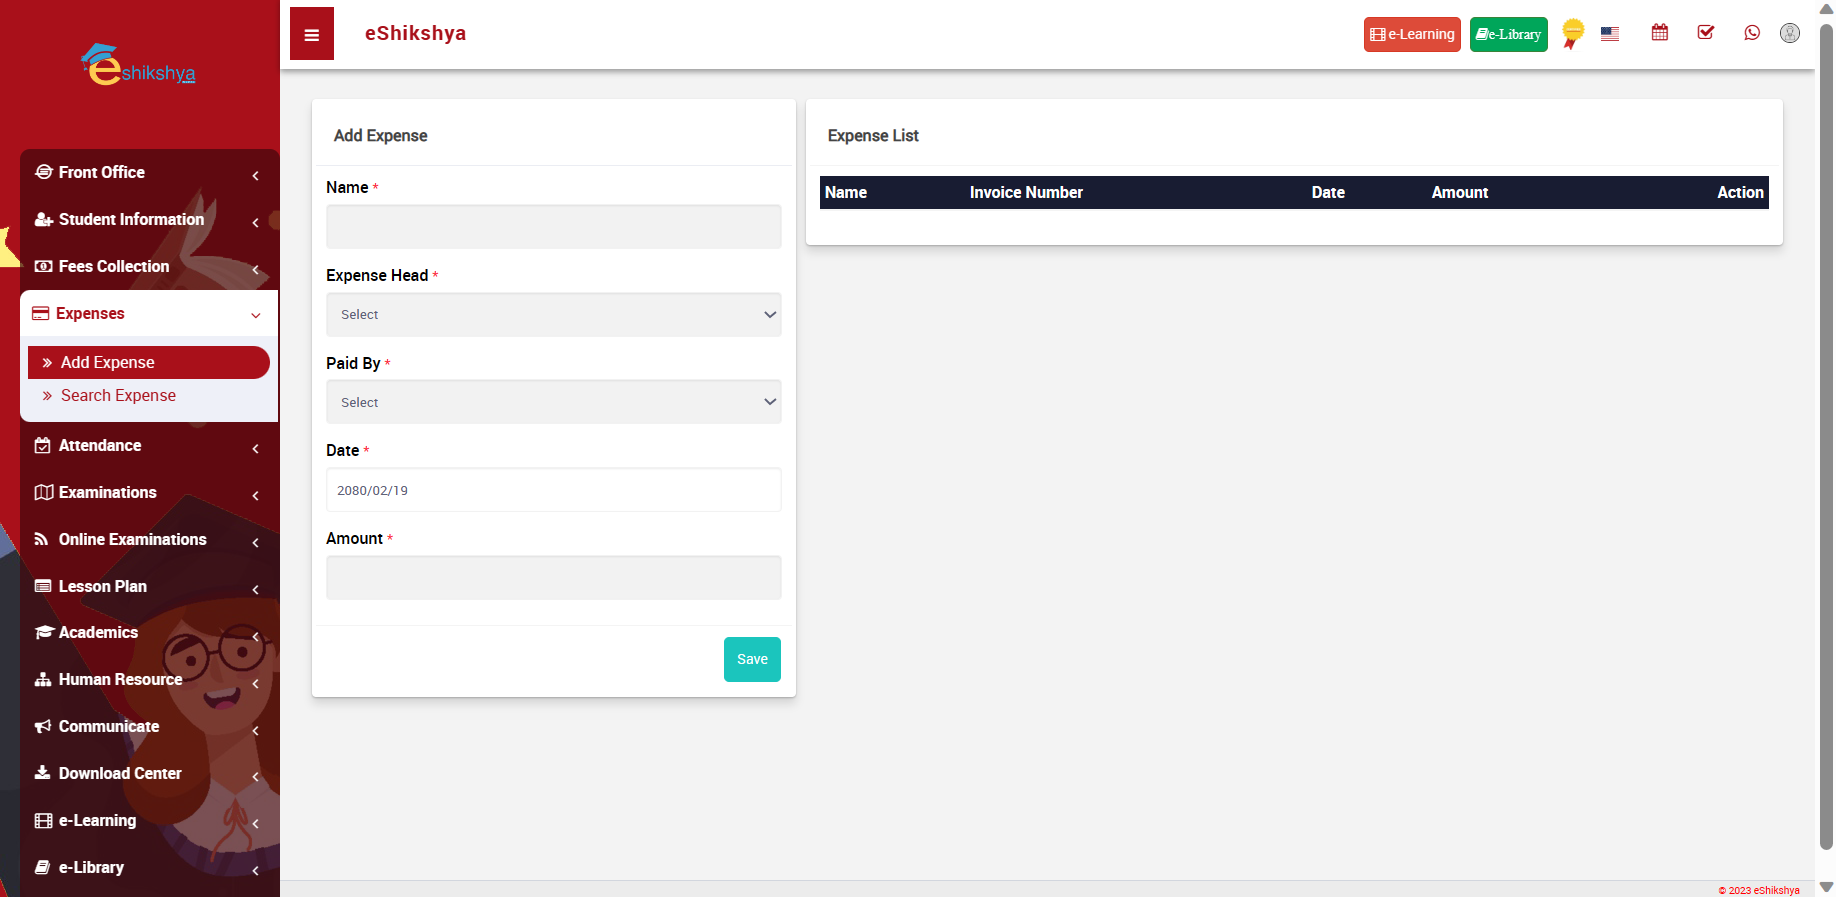 Image 47
Search Expenses
Updated expenses are listed here according to it name, invoice number, date and amount. To search expense, input search type: time.
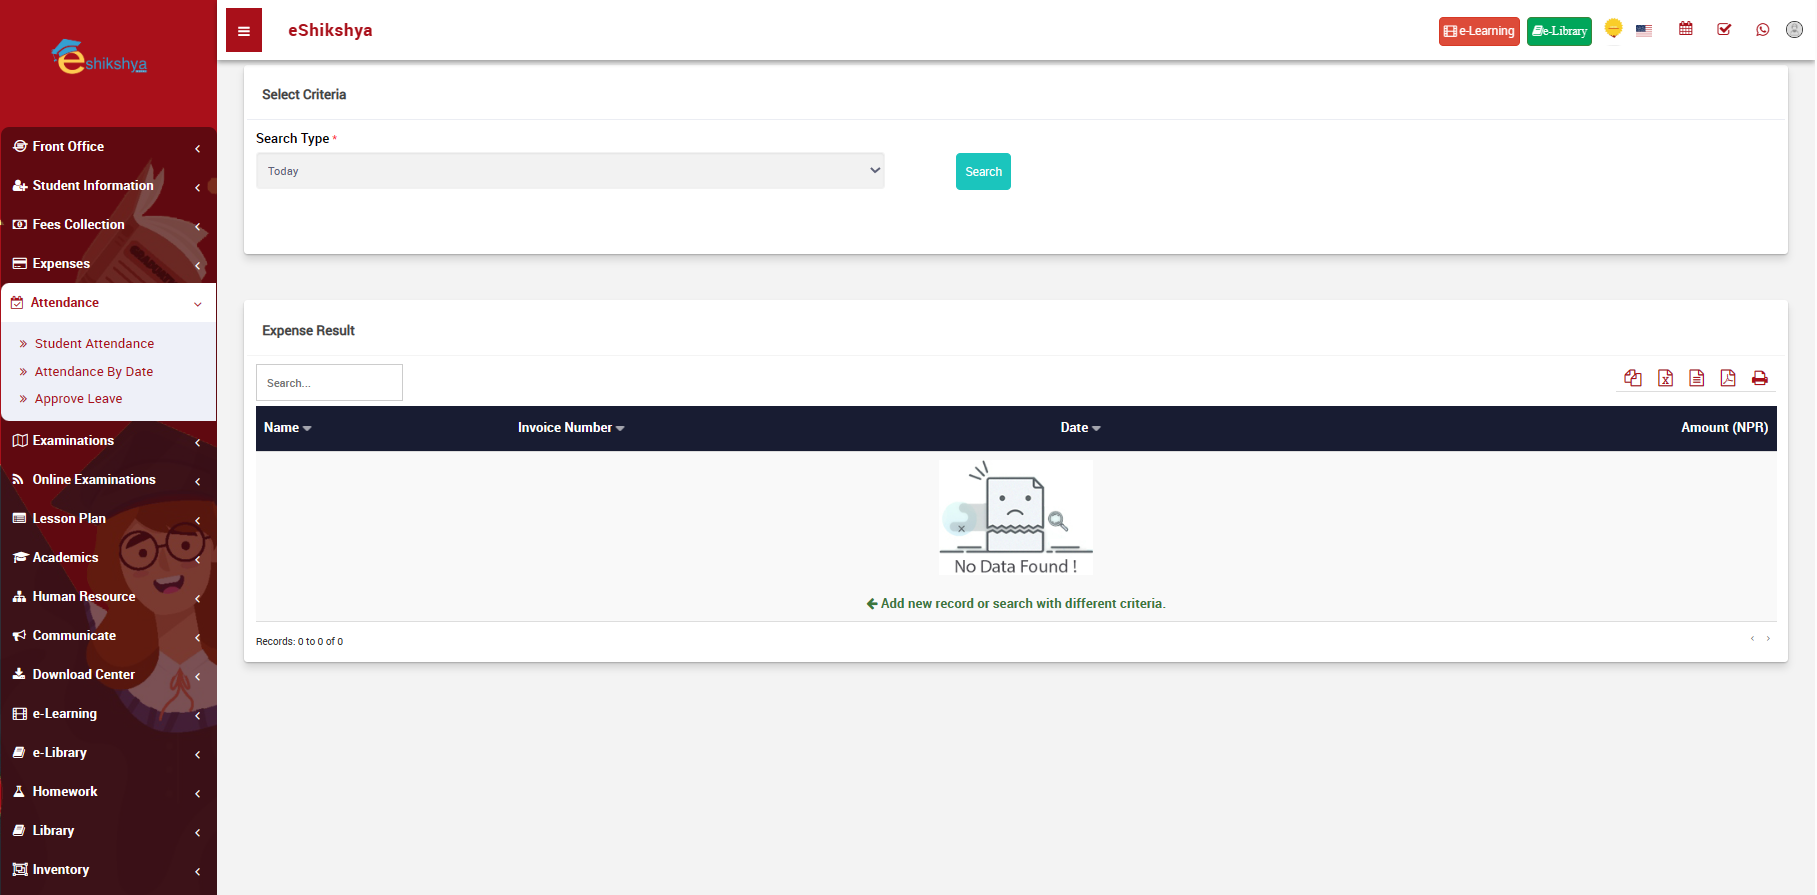 Image 48
Attendance
Search Attendance
To mark student attendance or check student attandance history, Search attendance under Attendace.
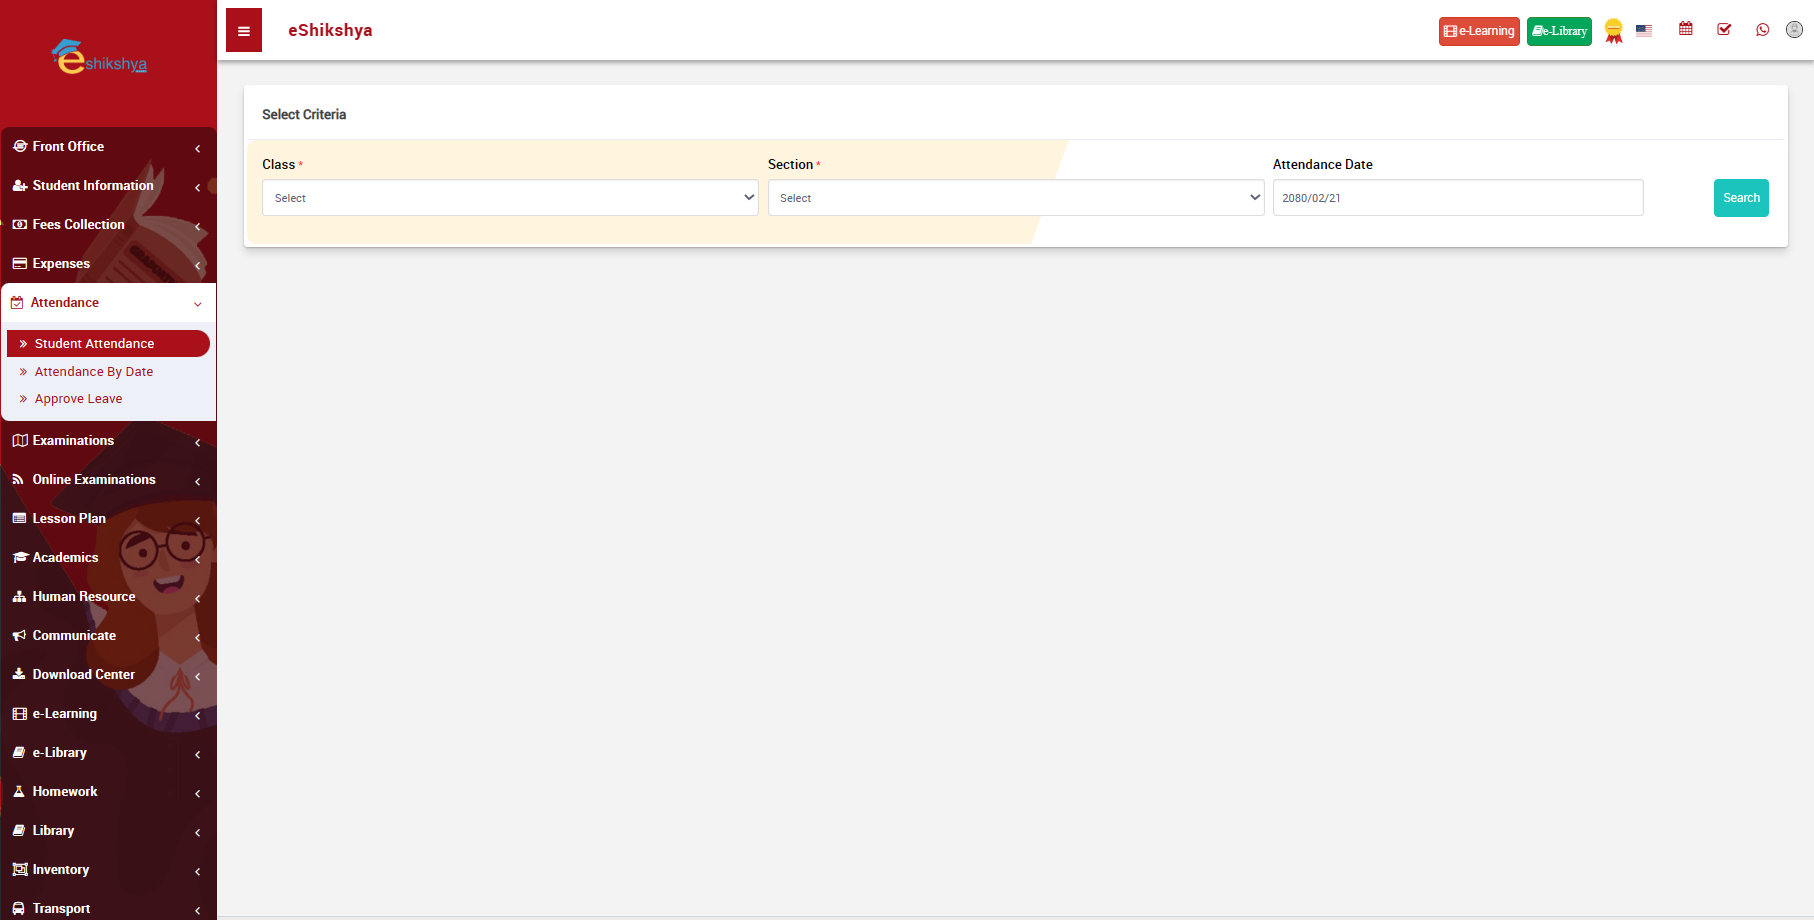 Image 49
Approve Leave
- To view student leave requests, go to Approve leave under Attendance.
-

Image 50
- To add new leave request, click on Add+ on the top right of the page.
- Image 51 is the form that appears when you click on Add.
- Enter the details and click on save.
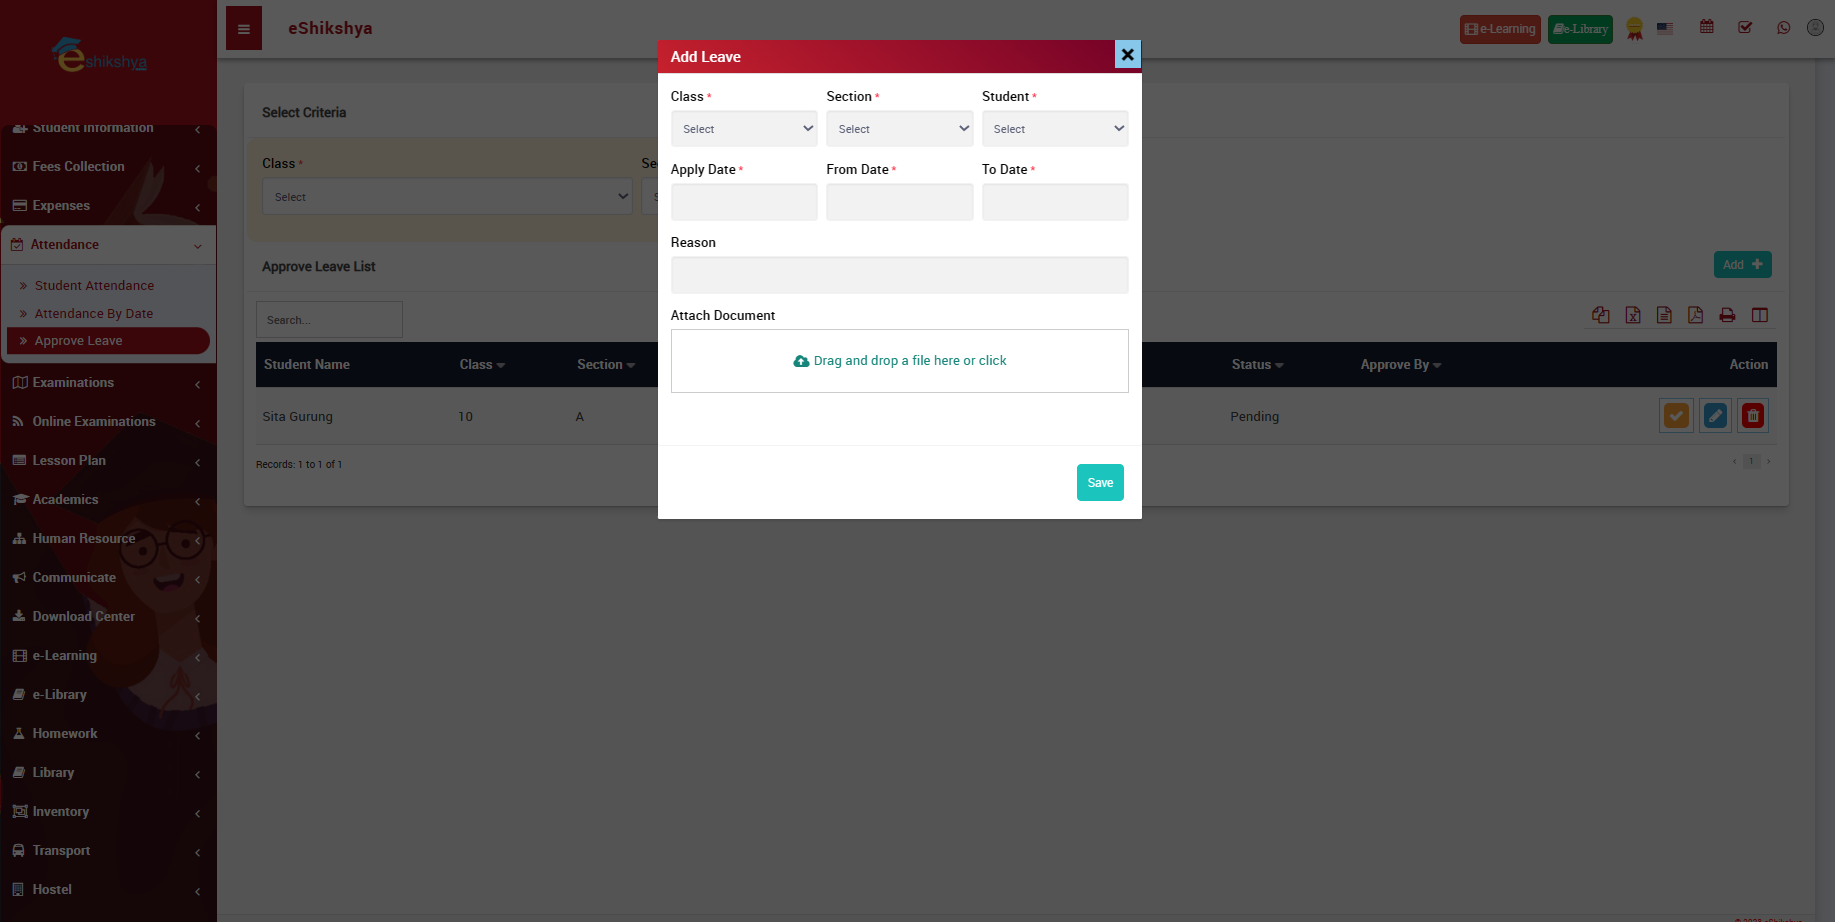 Image 51
Examinations
Exam group
Schools follow different examination patterns such as grading, percentage, GPA. These patterns can be defined here in class group.
- Go to Exam Groups under Examinations.
- Image 52 is the page that appears when you click on Exam Groups.
- Right side has the list of pre defined Exam group list.
- Left side of the page contains the form to define exam group.
- Enter the details and click on save.
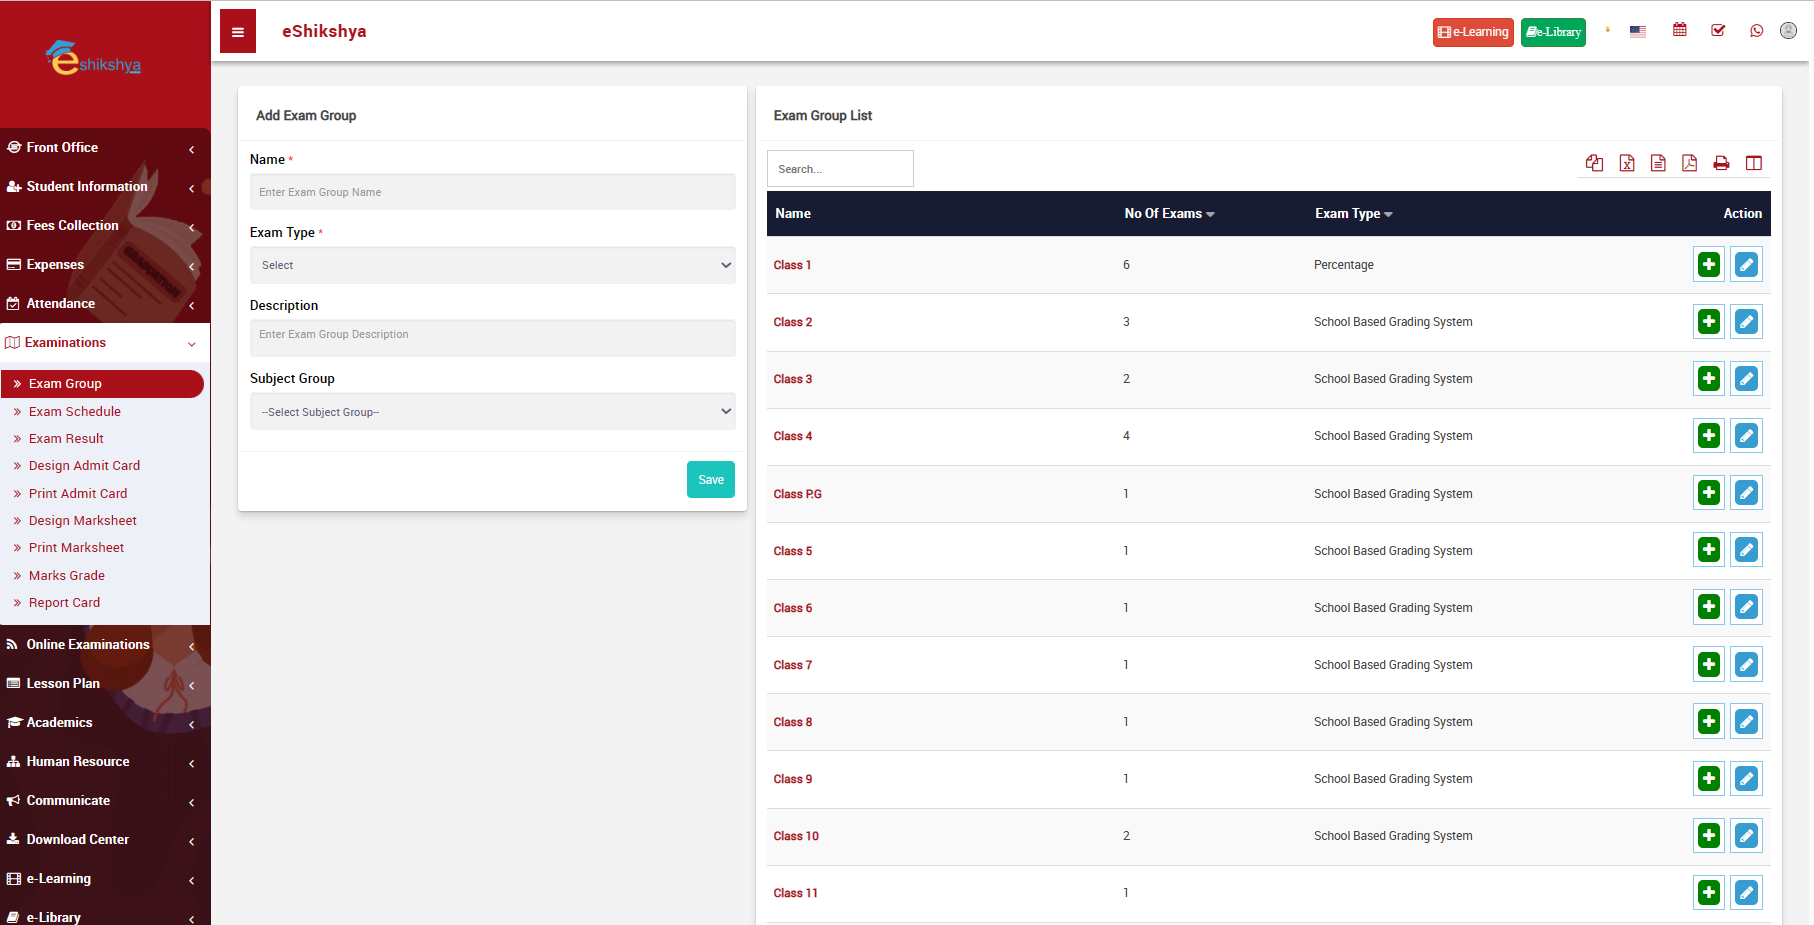 Image 52
Exam Schedule
- Go to Exam Schedule under Examinations.
- Enter the exam group and exam to search examination schedule for a specific class.
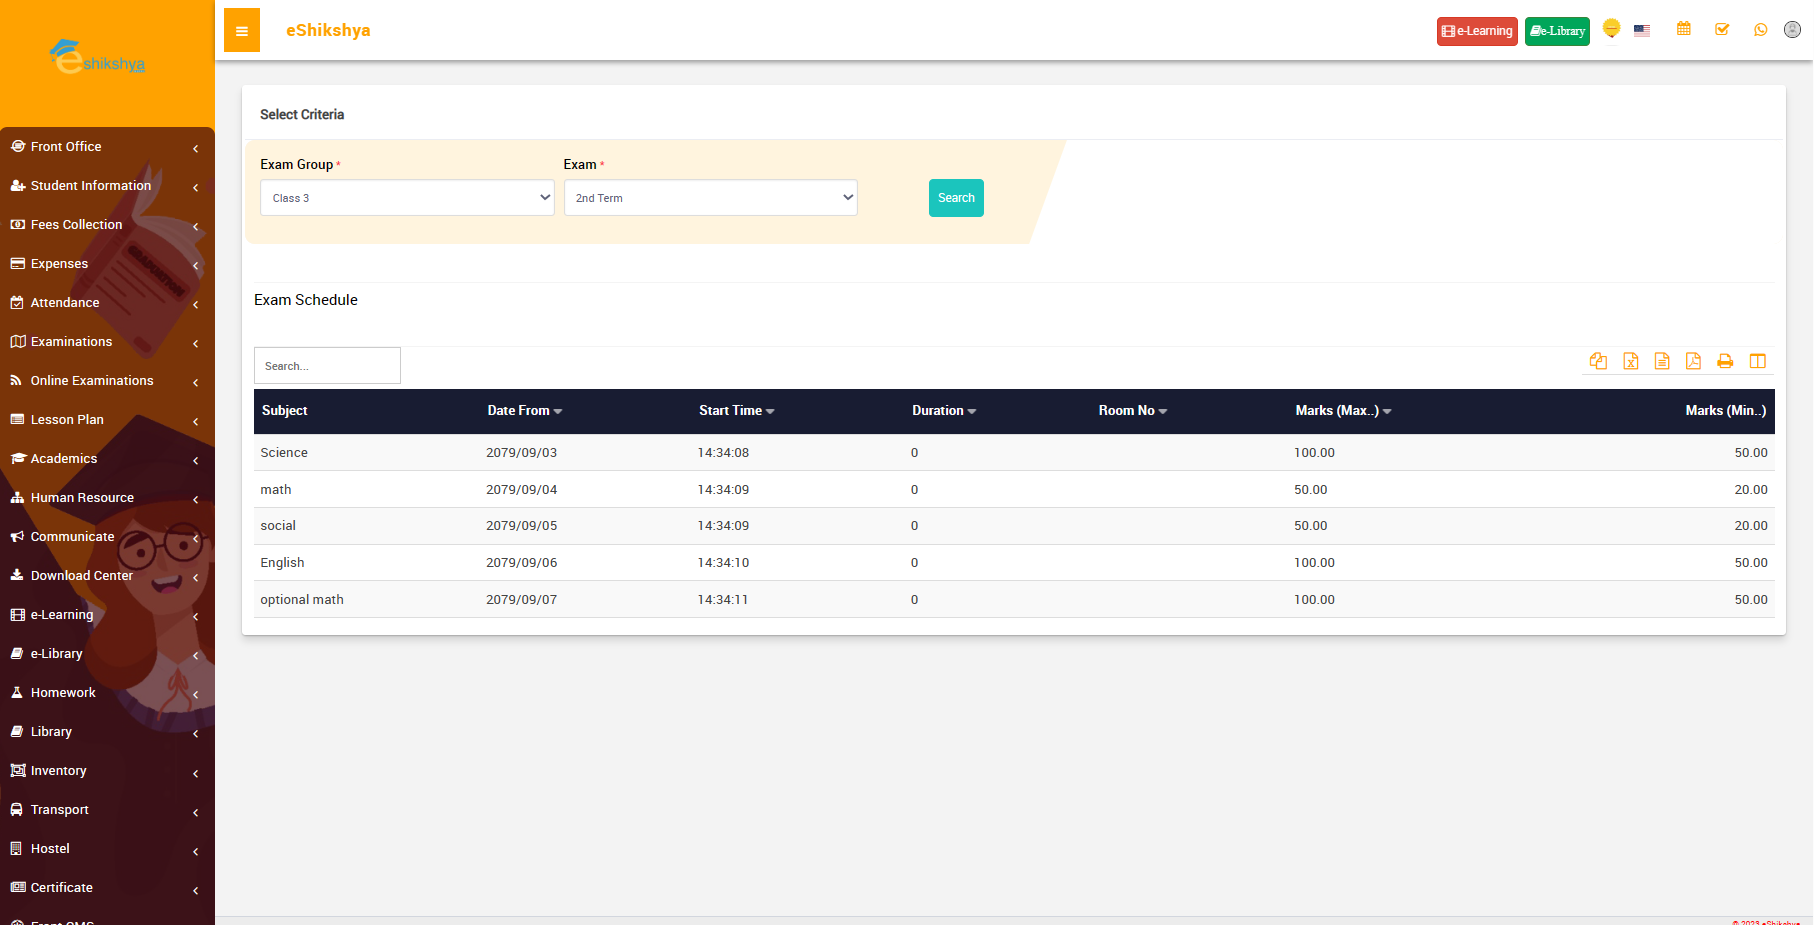 Image 53
Exam Result
- Go to Exam Result under Examinations.
- Enter the Exam group, class and exam to search result for specific class.
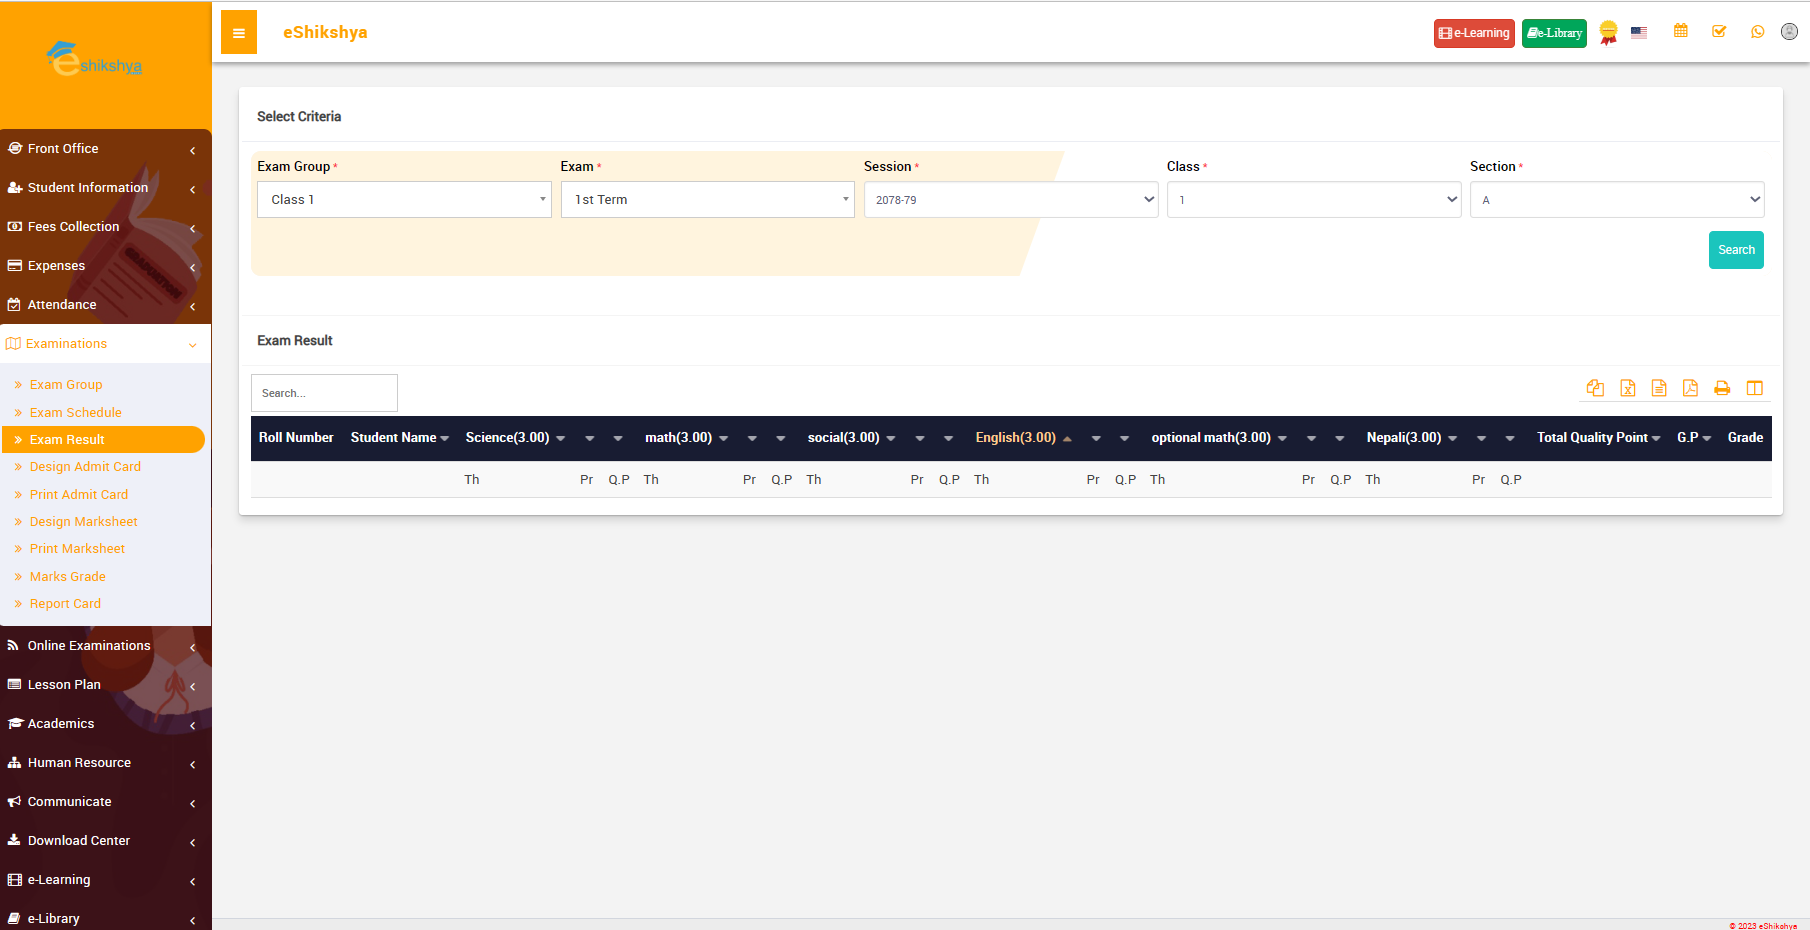 Image 54
Design Admit Card
- Go to Design Admit Card under Examinations.
- Enter the Exam group and exam to search examination schedule for a specific class.
 Image 55
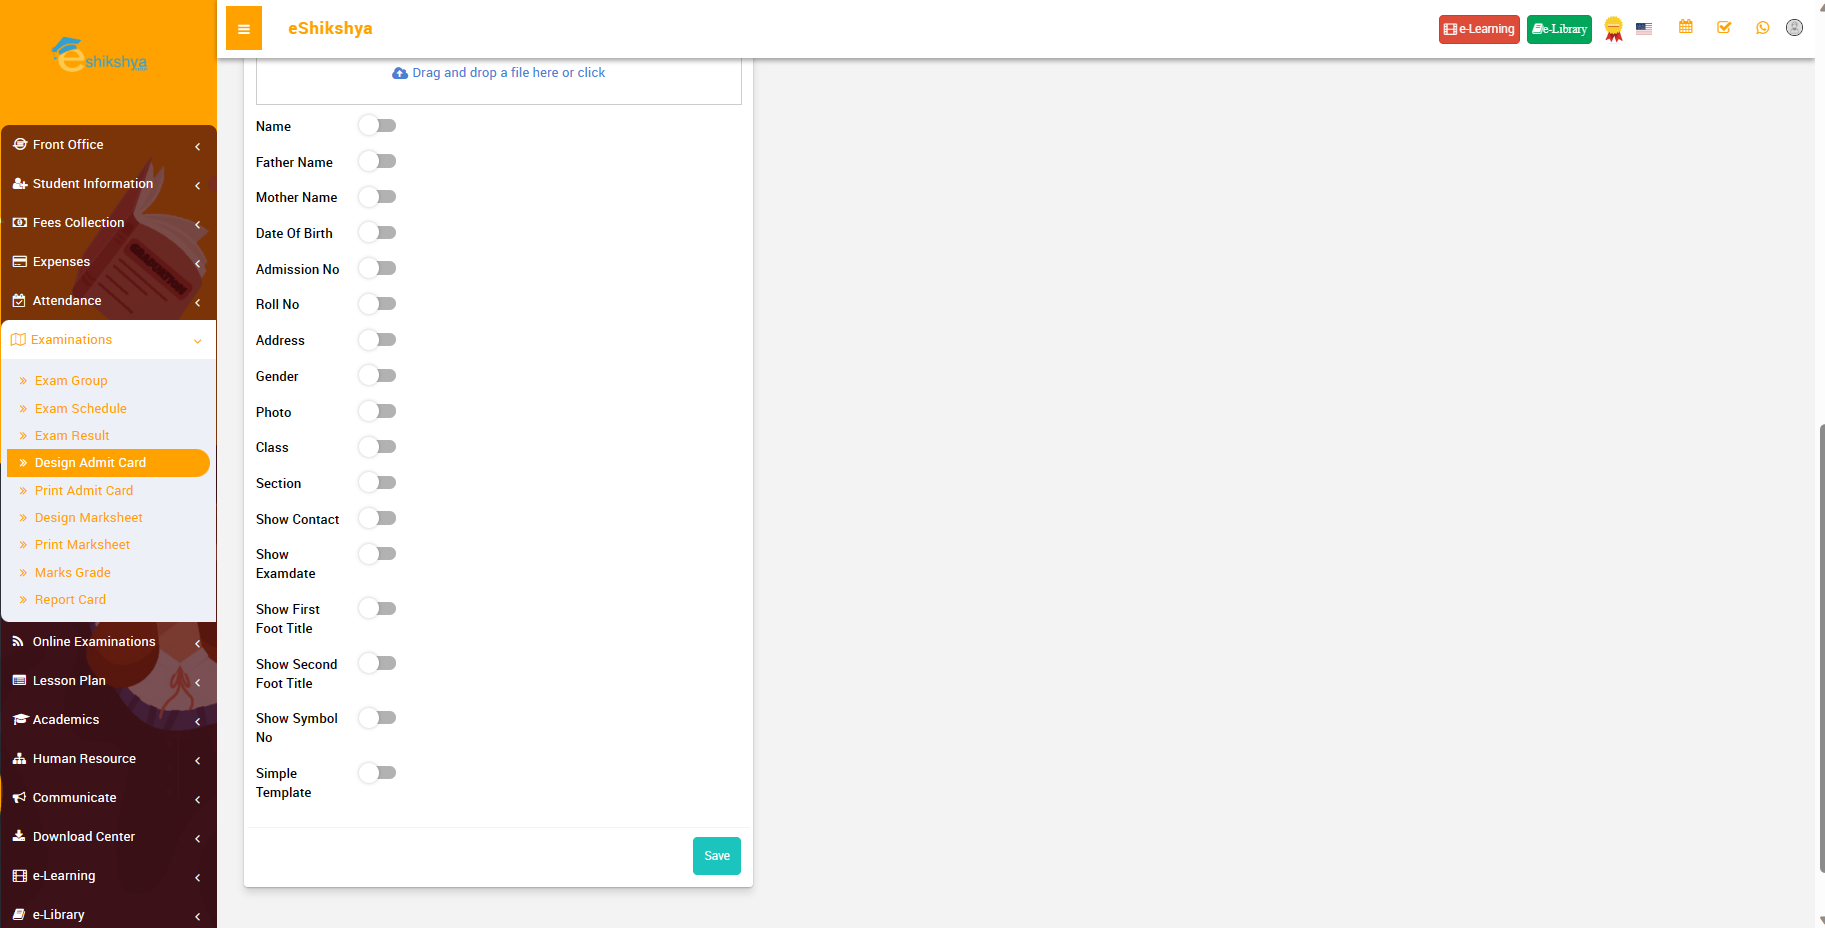 Image 56
Print Admit Card
Design Marksheet
- Go to Design Marksheet under Examinations.
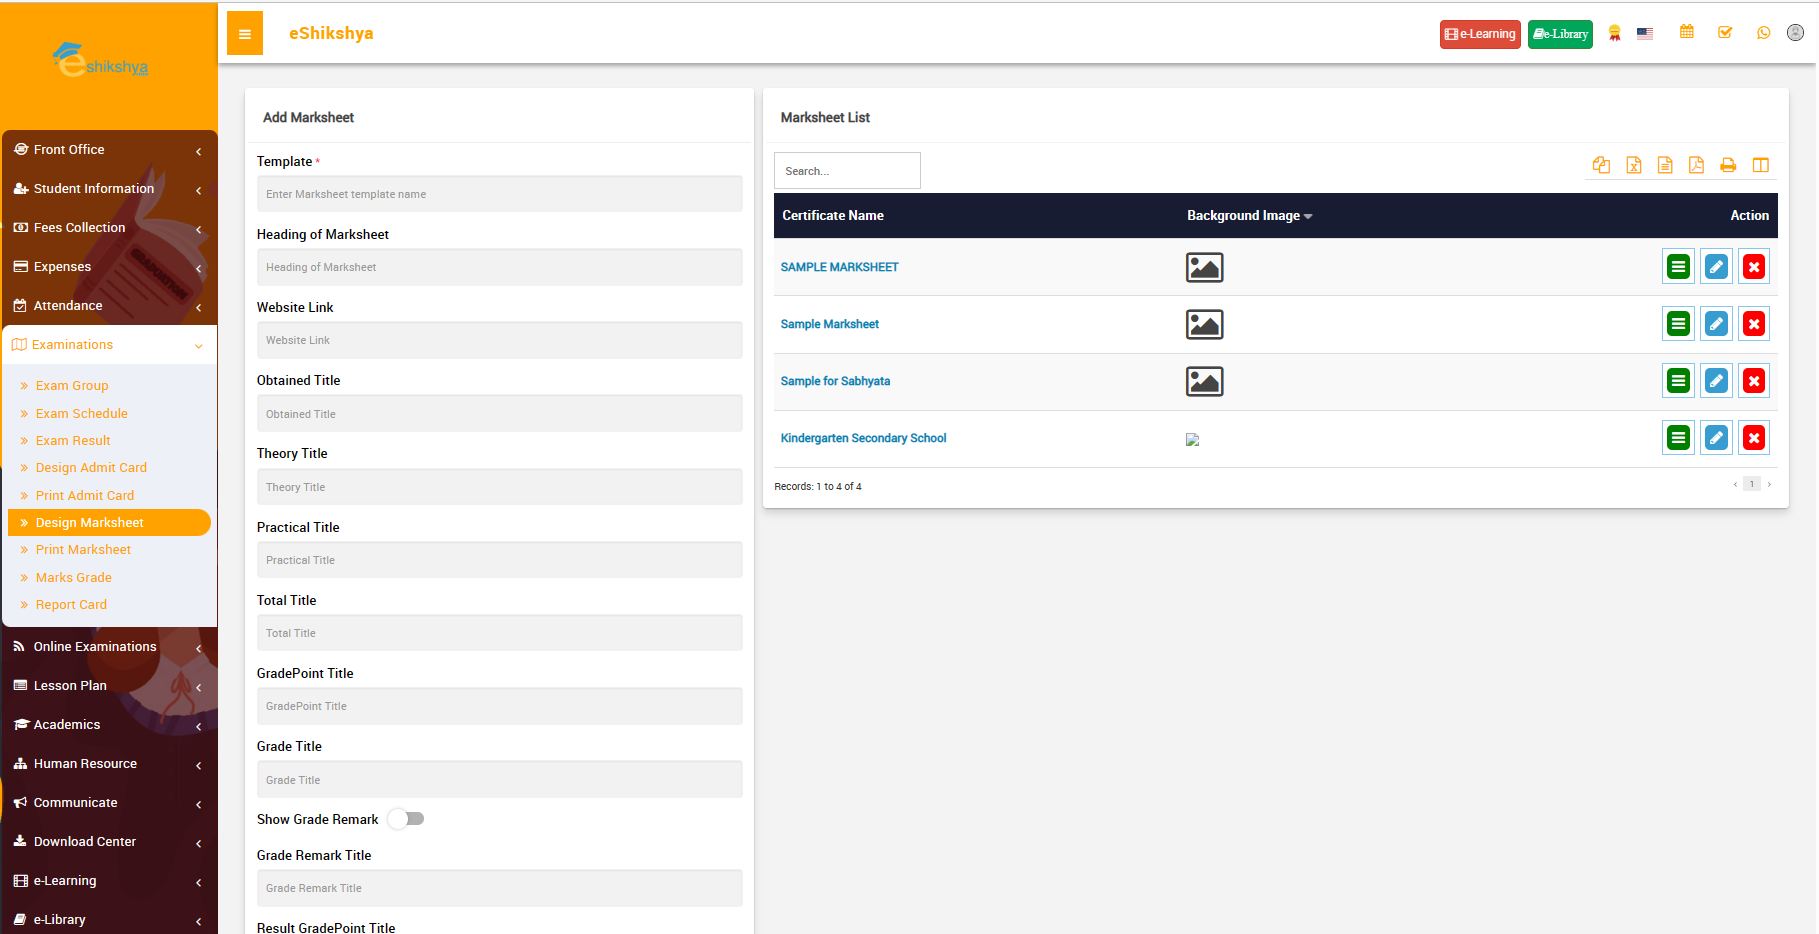 Image 55
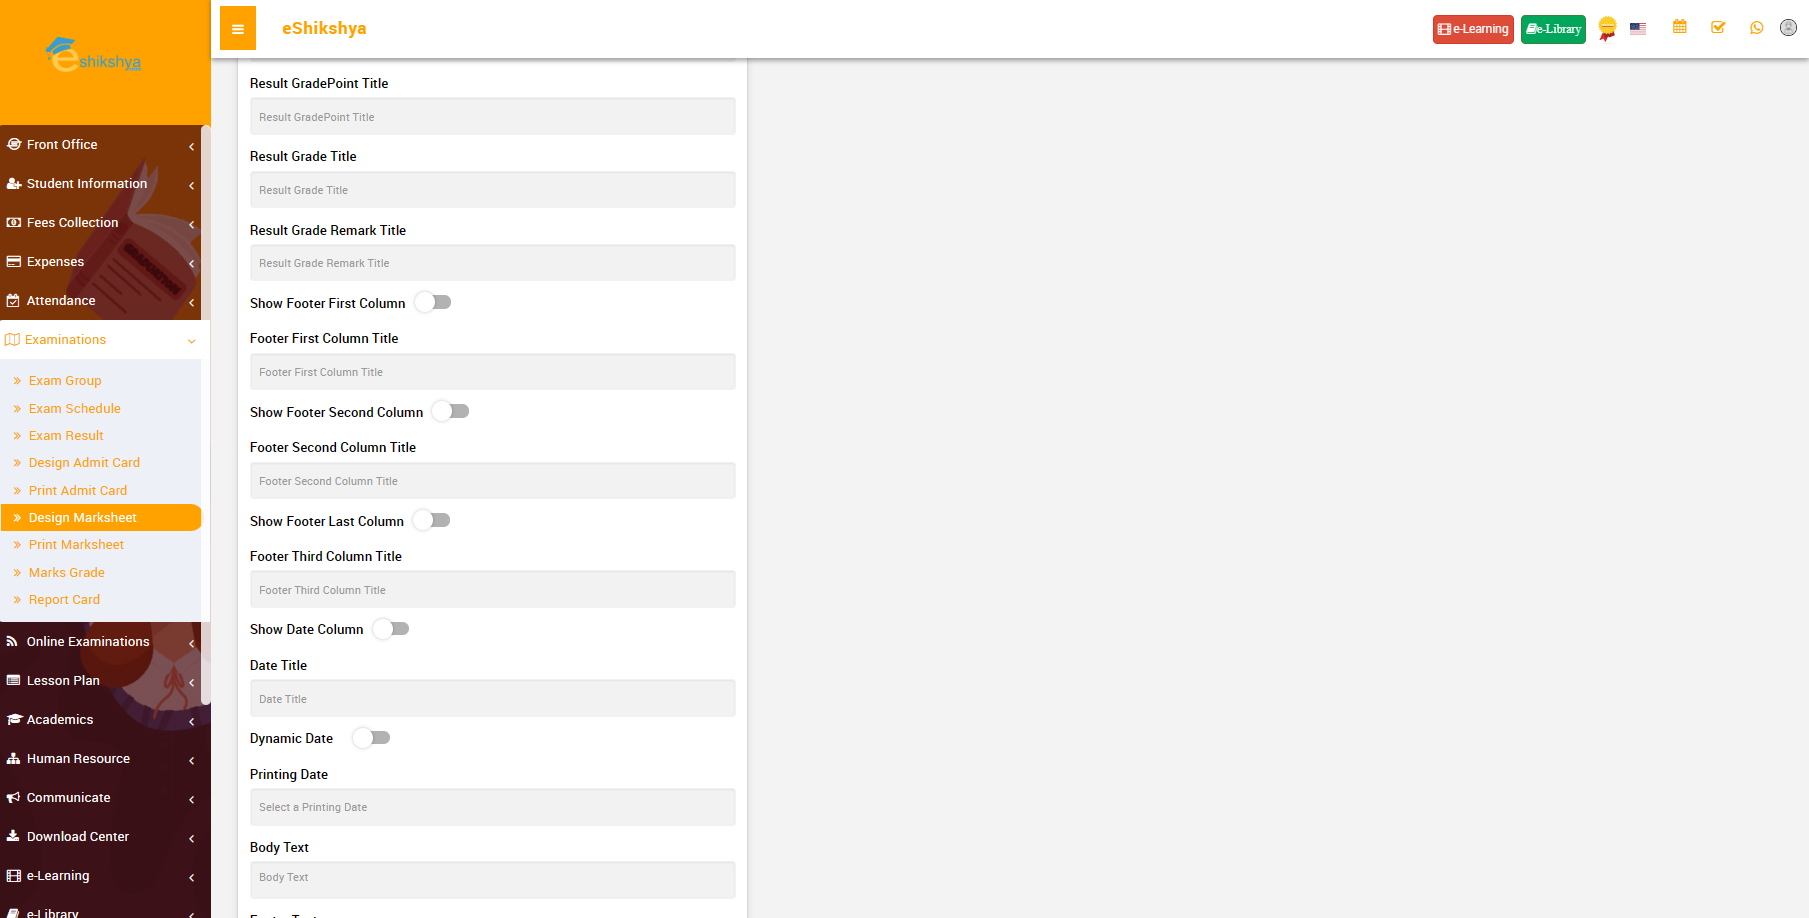 Image 56
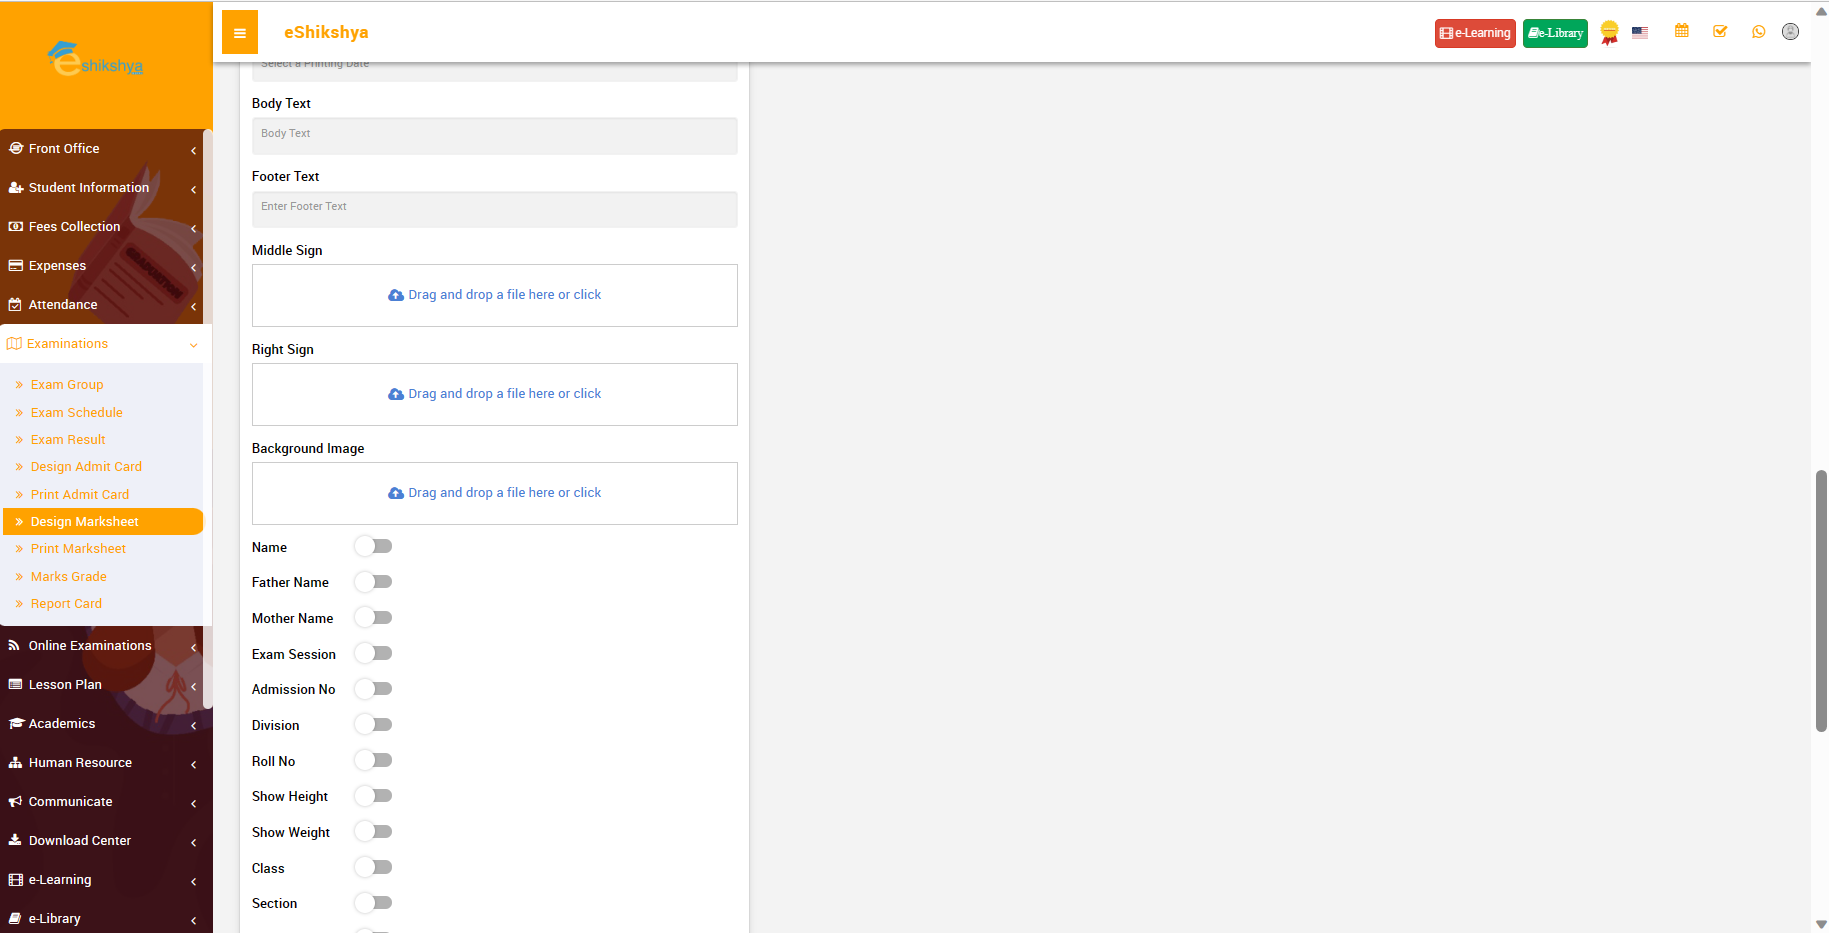 Image 57
Marks Grade
- To define grades and percentage, go to Marks Grade under Examination.
- Select exam type, name Grade neme(e.g., A+, A, B, etc), Percentage range, grade point and click on save.
- The defined grades should appear on the grade list shown in image 58.
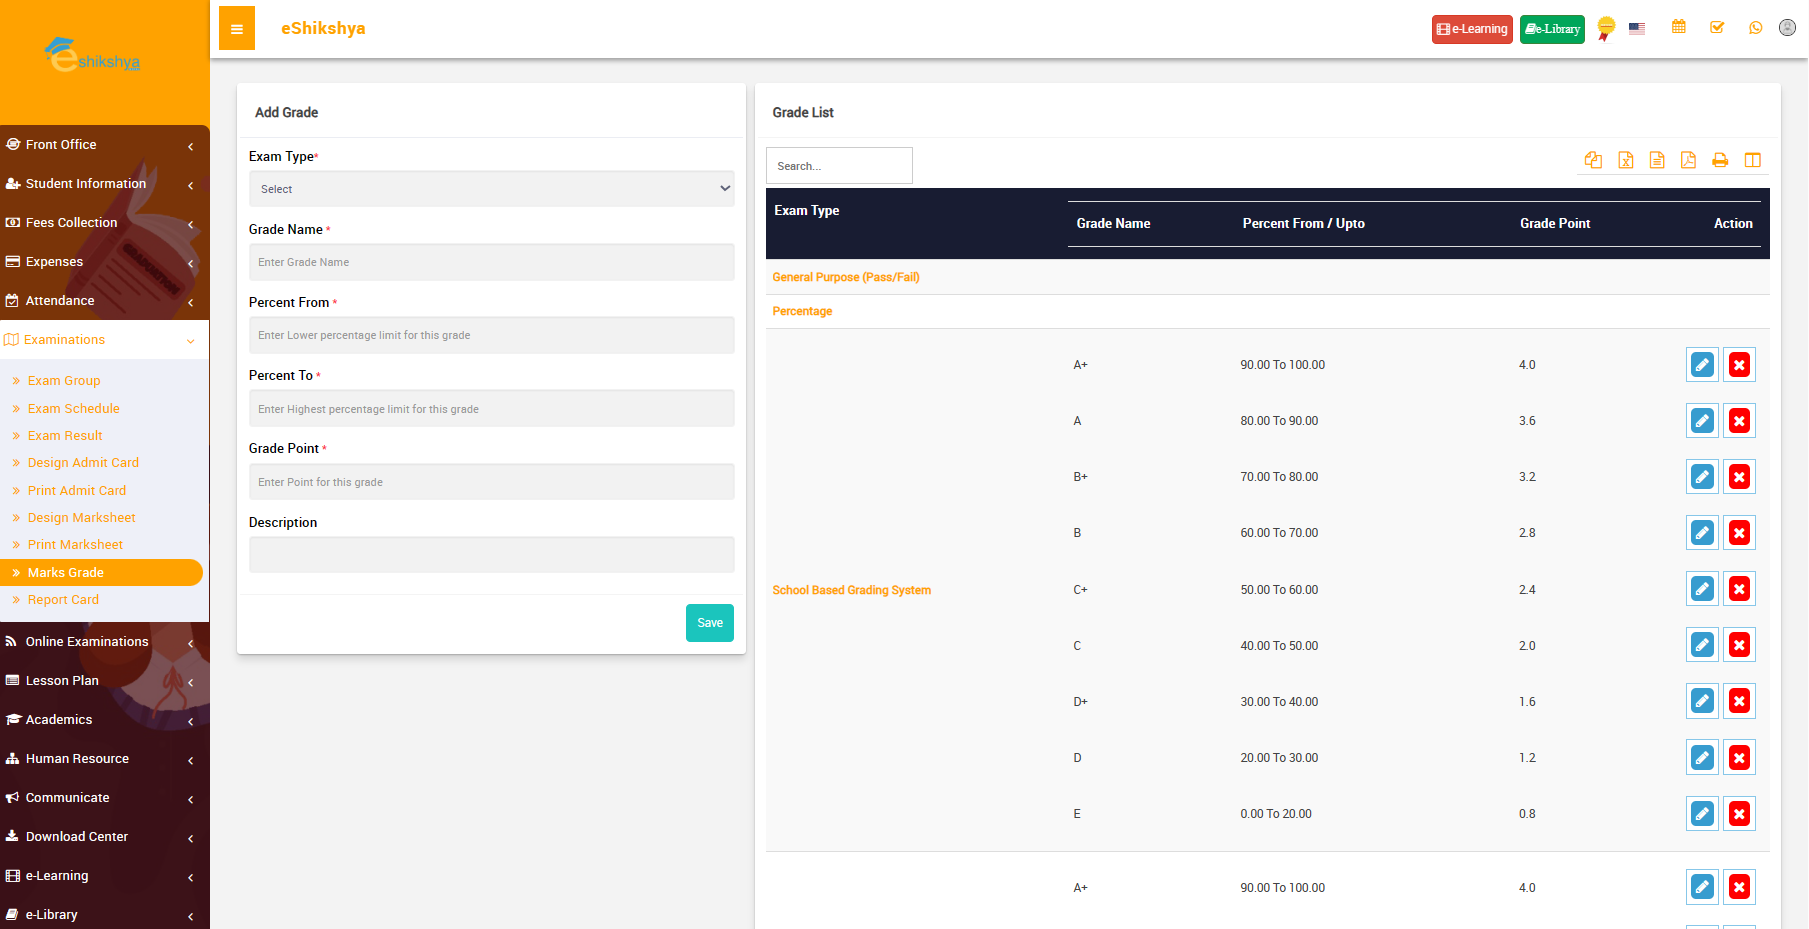 Image 58
Online Examination
Online Exam
You can set up online exam questionaire, schedule and marking pattern here.
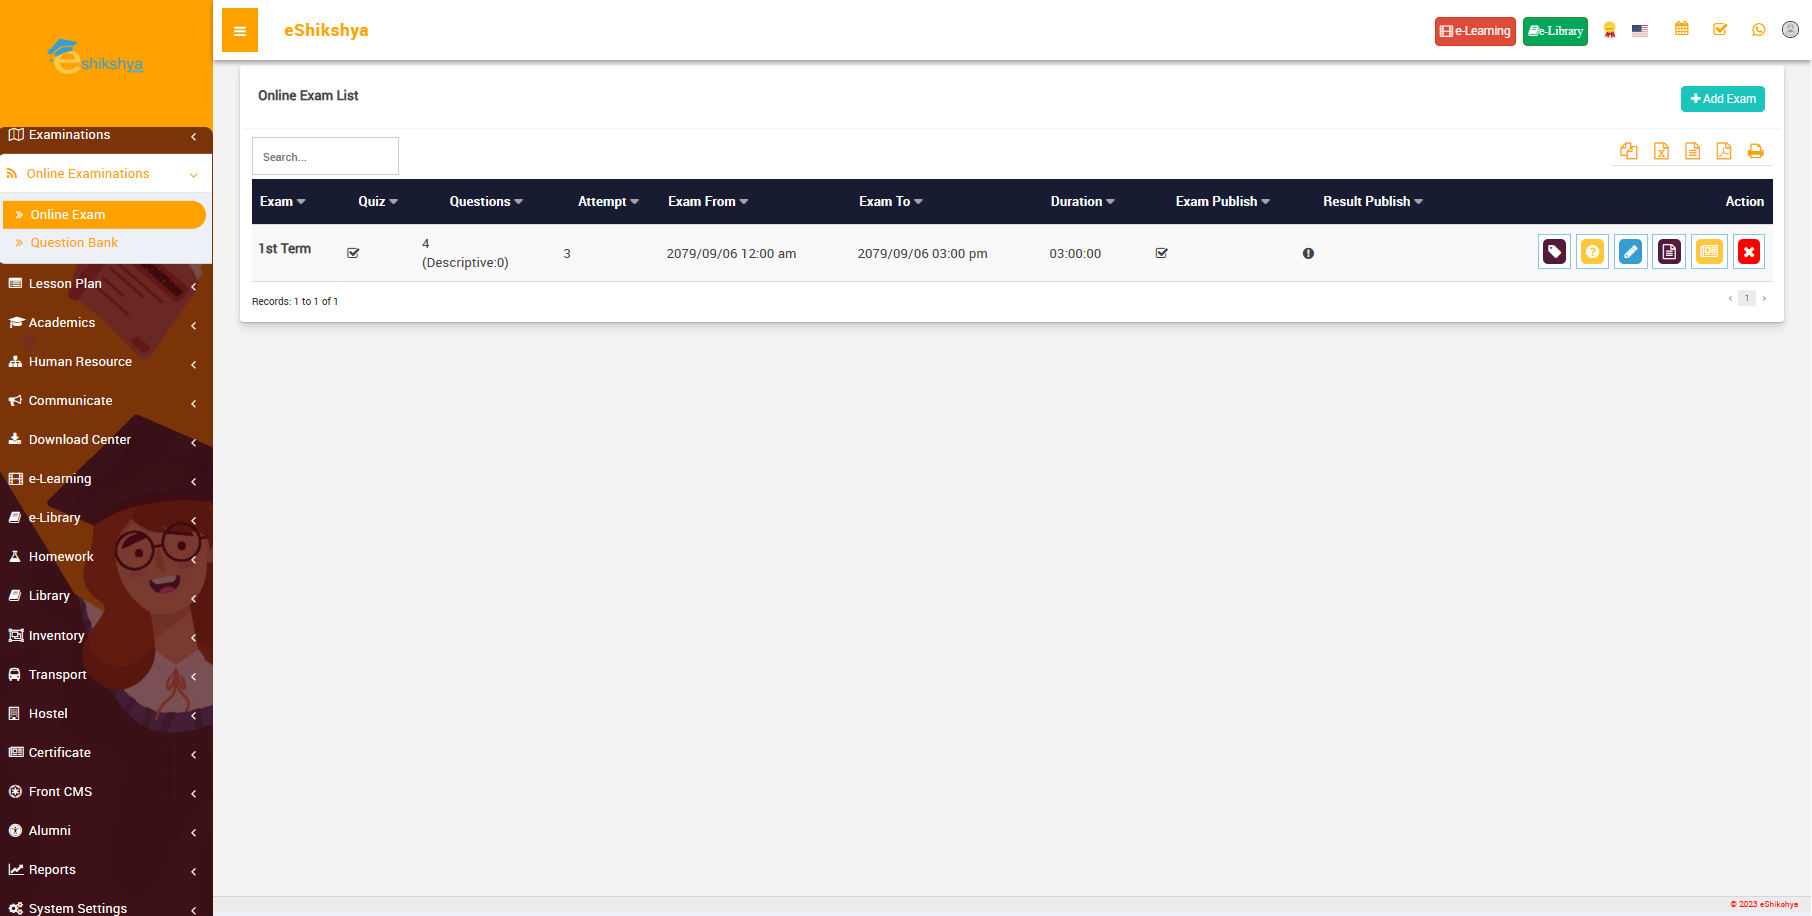 Image 58
Question Bank
- You can set up examination questions here.
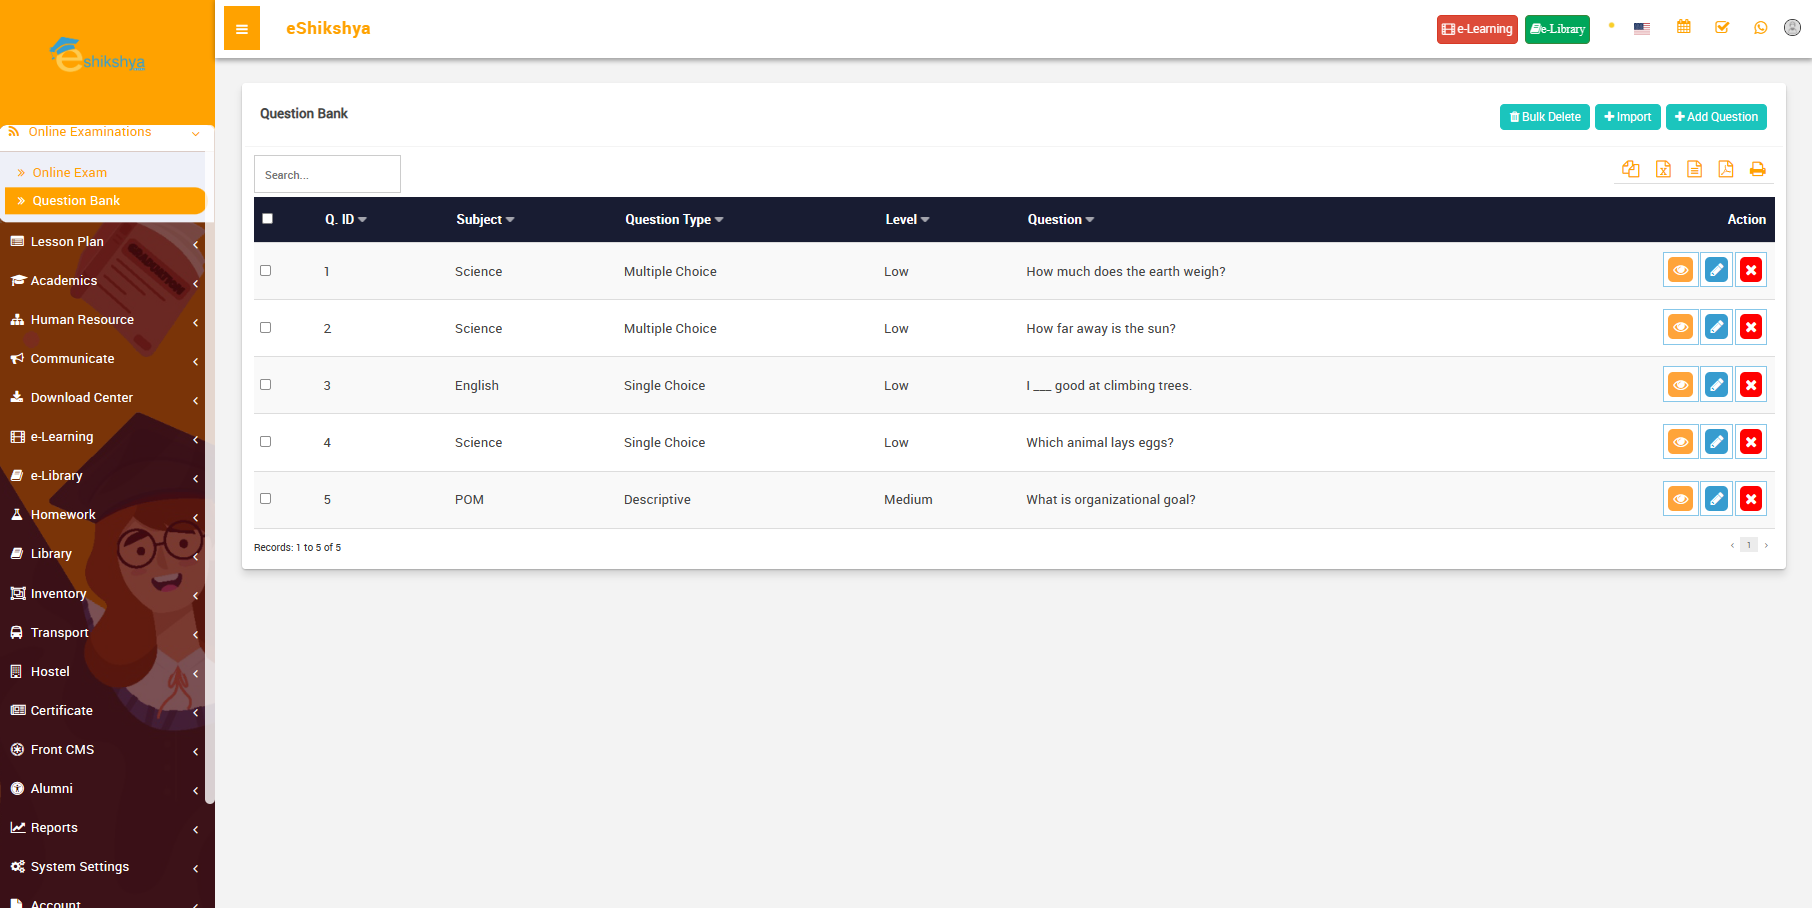 Image 59
- Click on Add question. The form shown in image 60 should appear.
- You can assign questions accorting to its type i.e. multiple chouce, descriptive, etc. Level of question difficulty, subject, class and sections.
- If you want to add image to your question, click on add image which is on the top right of the question entry field.
- Click on save.
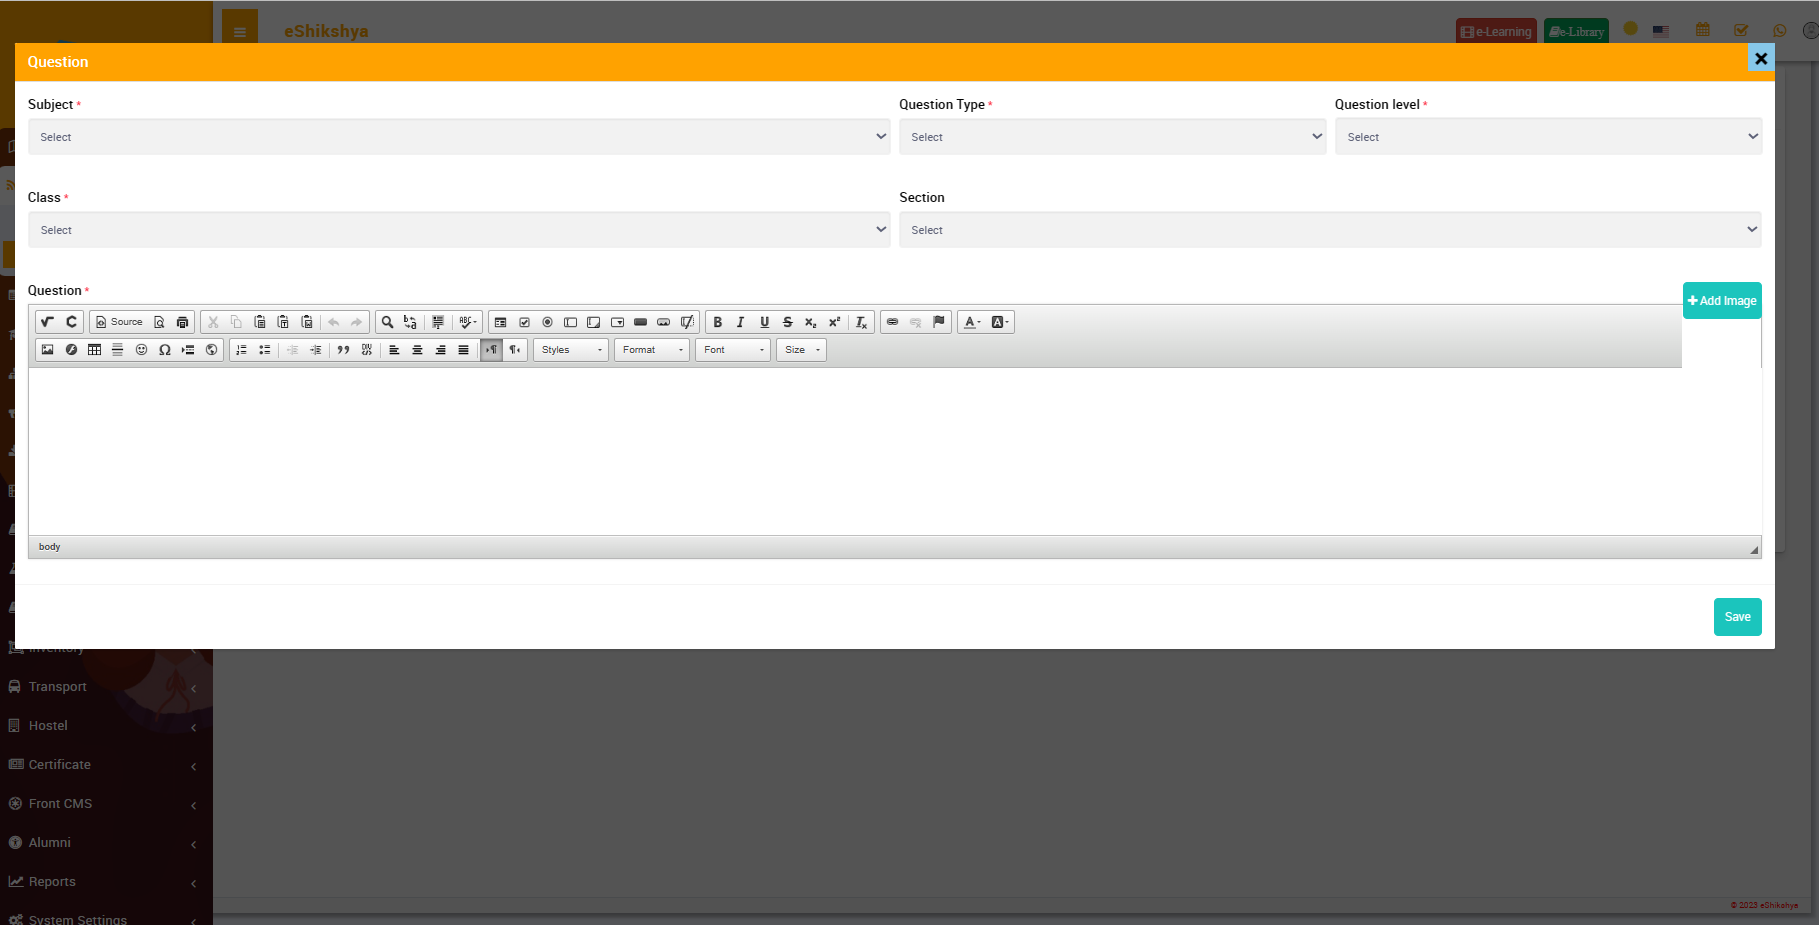 Image 60
- With reference to image 59, click on Import to import your questions file. The form on image 61 should appear.
- The file you upload should match the sample question upload file. To download the sample question upload file, click on the red button next to upload button.
- You can assign questions accorting to subject, class and sections and attach question file and click upload.
Lesson Plan
Manage Lesson Plan
To view the assigned lesson plan for each teacher, go to manage lesson plan. Select the teacher from the list selection and click on search.
This should show you the selected teacher's lesson plan.
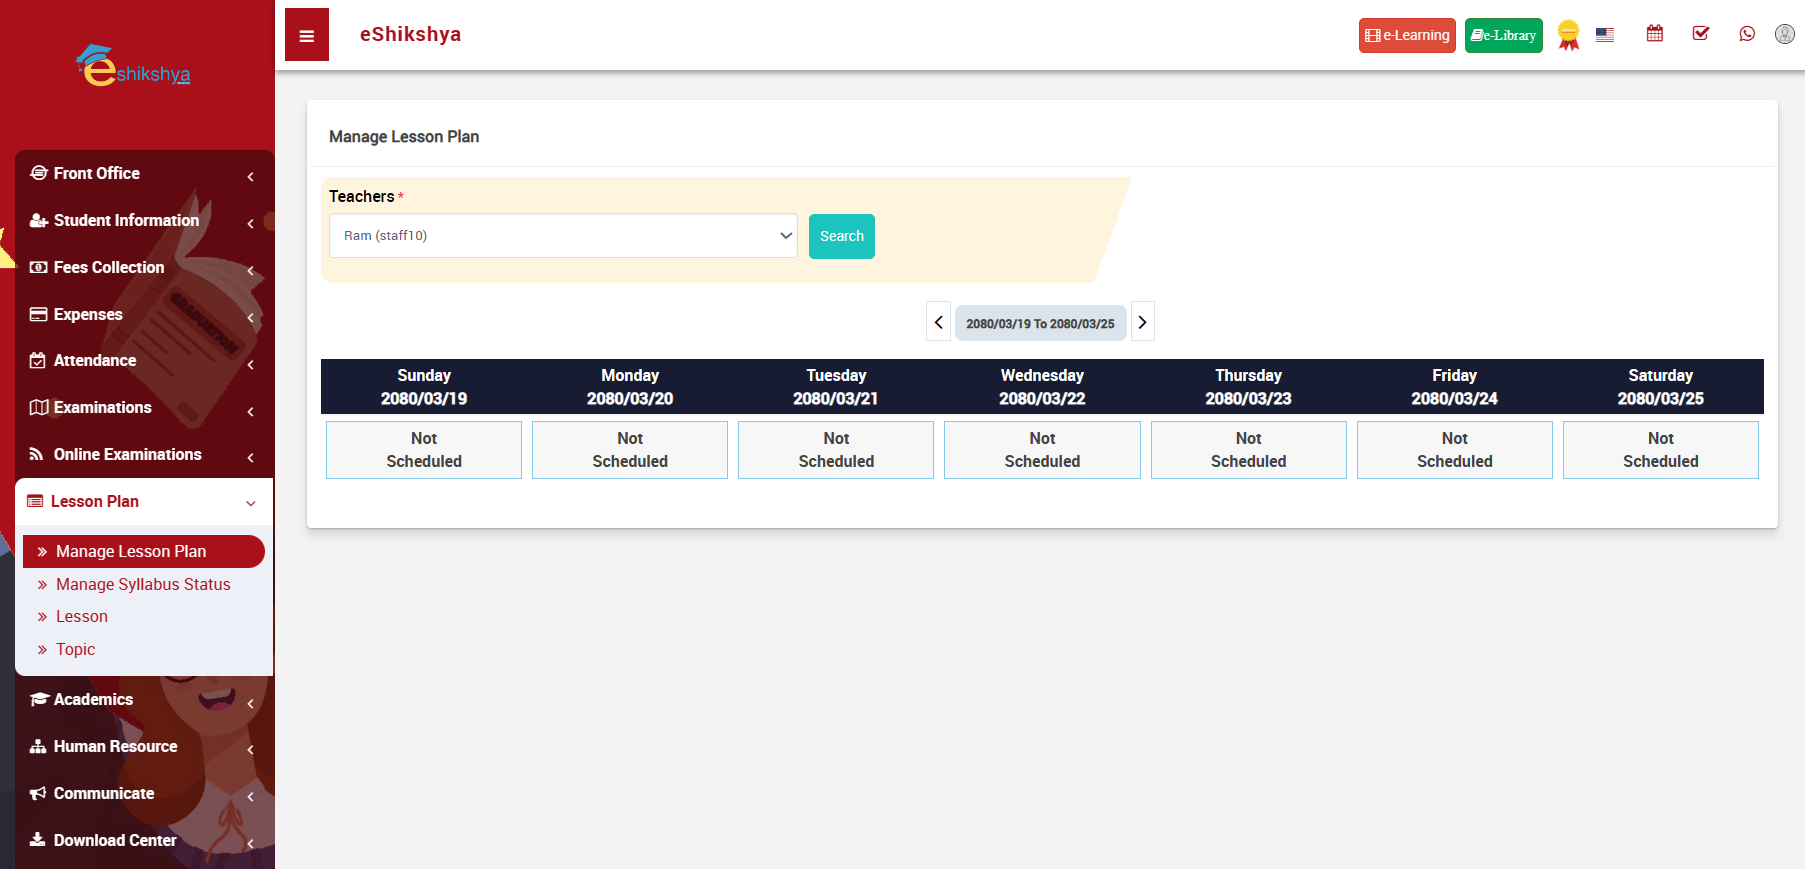 Image 61
Manage Syllabus Status
- Select criteria i.e. Choose the class, section, subject group and subject of which you want to set the status for.
- For example, in the image below, I have chosen to view the syllabus status of class 4 A, for maths. Once you click on search, The syllaus status list should appear.
- As you can see, the status shows incomplete.
- If you want to change status to completed, click on the Action button. A pop up to add the cyllabus completion date should appear.
- Enter the completion date adn click on save.
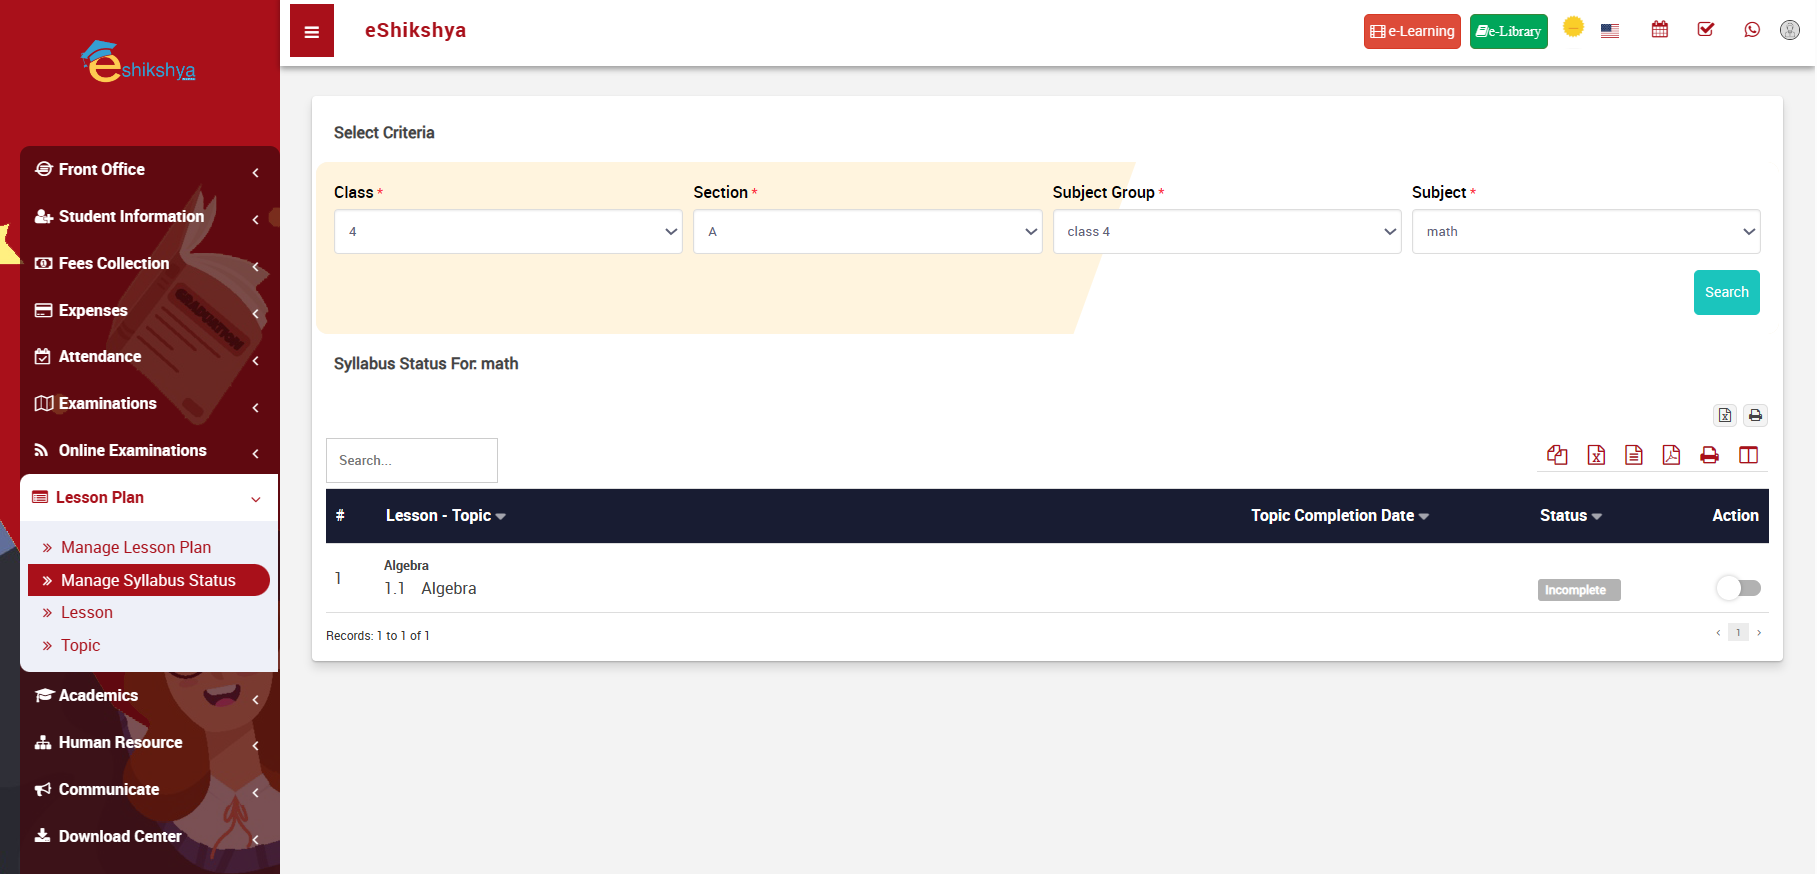 Image 62
Lesson
To add new lesson go to lesson under Lesson Plan. You should be directed to the page shown in image 63.
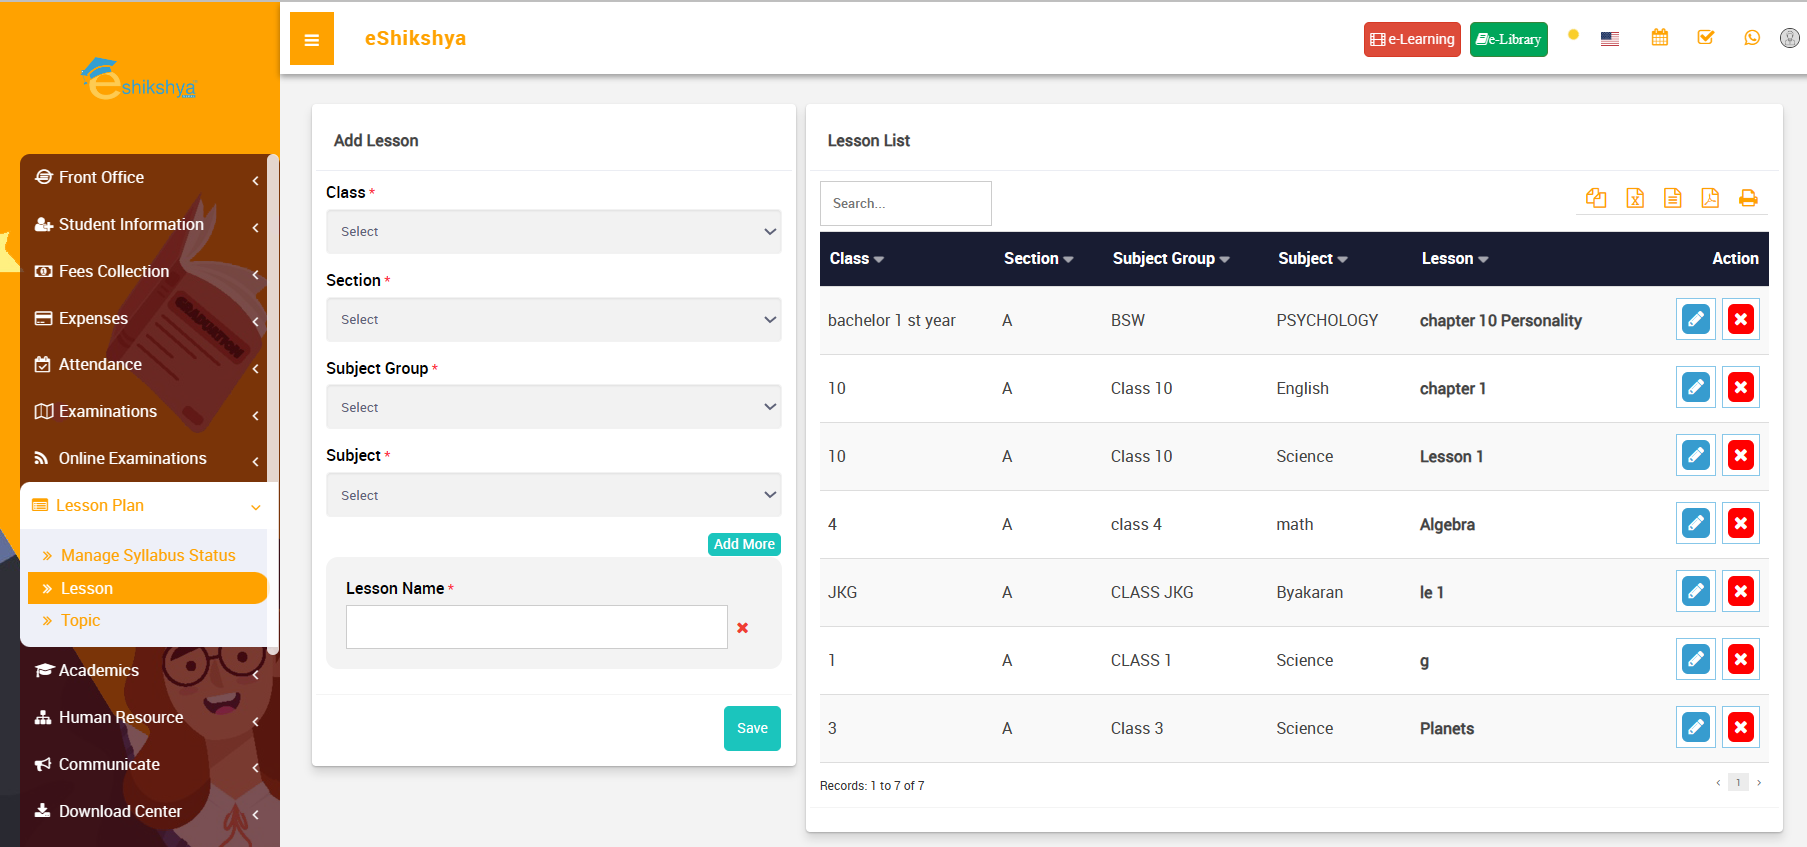 Image 63
- Enter class, section, subject group, Subject name and Lesson name.
- Click on save.
- The added lesson should appear in the list shown in the right side of the page.
Topic
To add a new topic, go to topic under Lesson plan. You should be directed to the page shown in image 64.
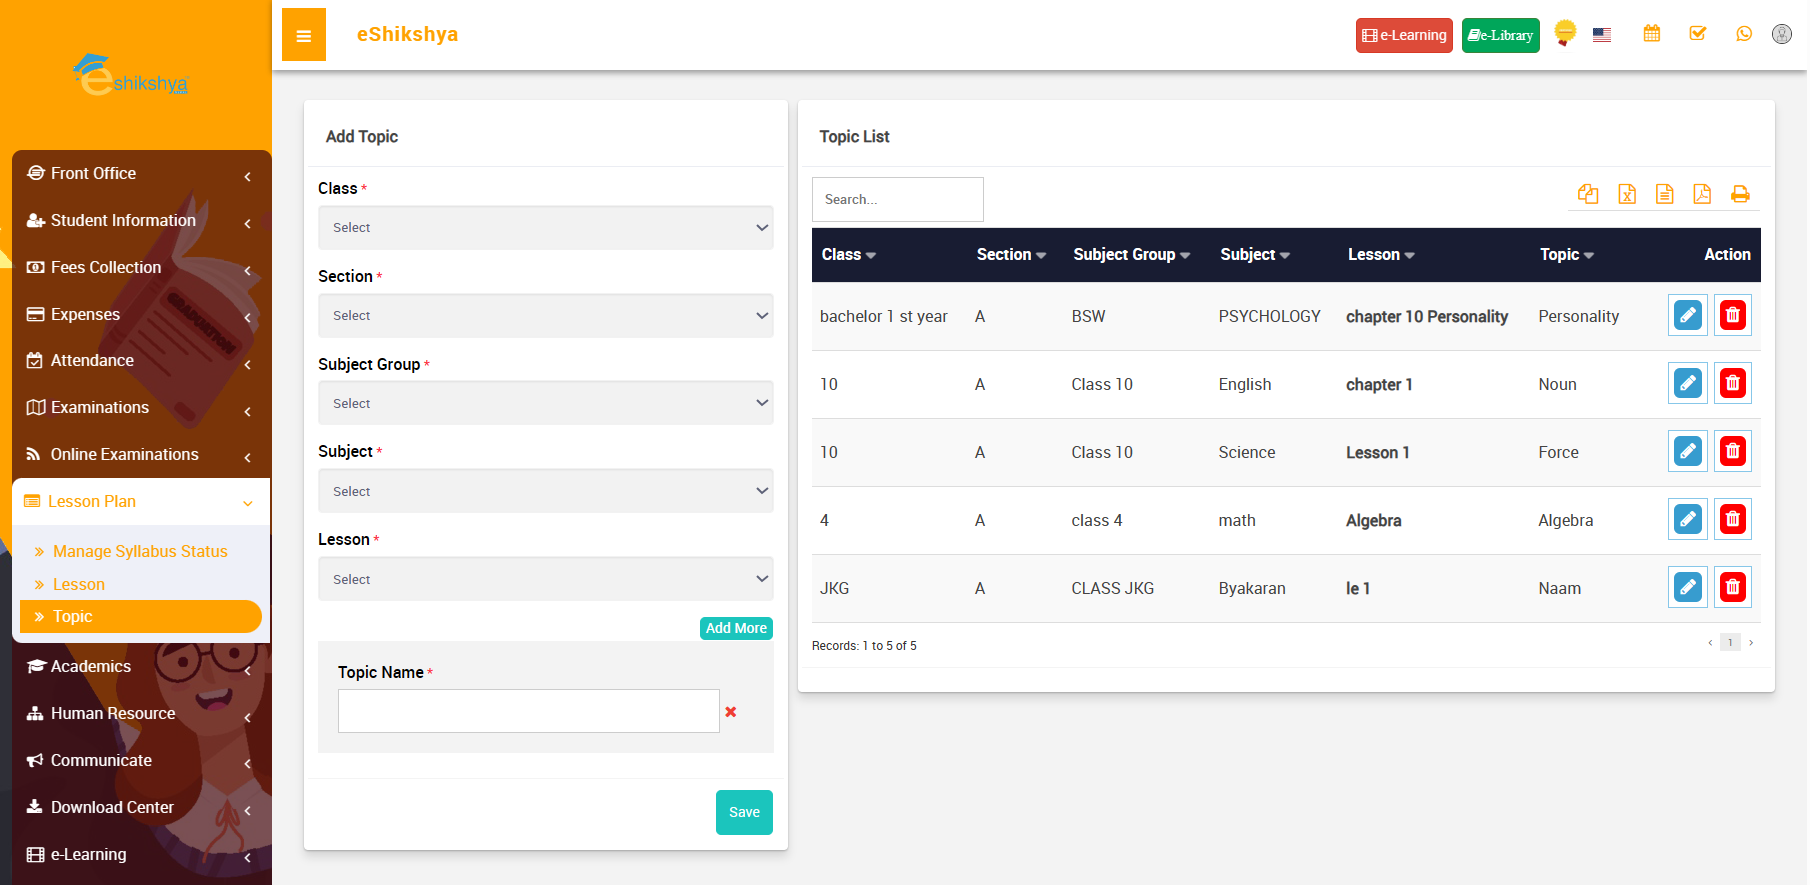 Image 64
- Select class, section, subject group, Subject name, Lesson name from the list and enter its topic name.
- Click on save.
- The added Topic should appear in the list shown in the right side of the page.
Academics
Class Timetable
- To view class timetable, go to Class timetable under Academics.
- Choose the class and section from the list selection and click on search.
- The schedule for the selected class should appear as shown in image 65.
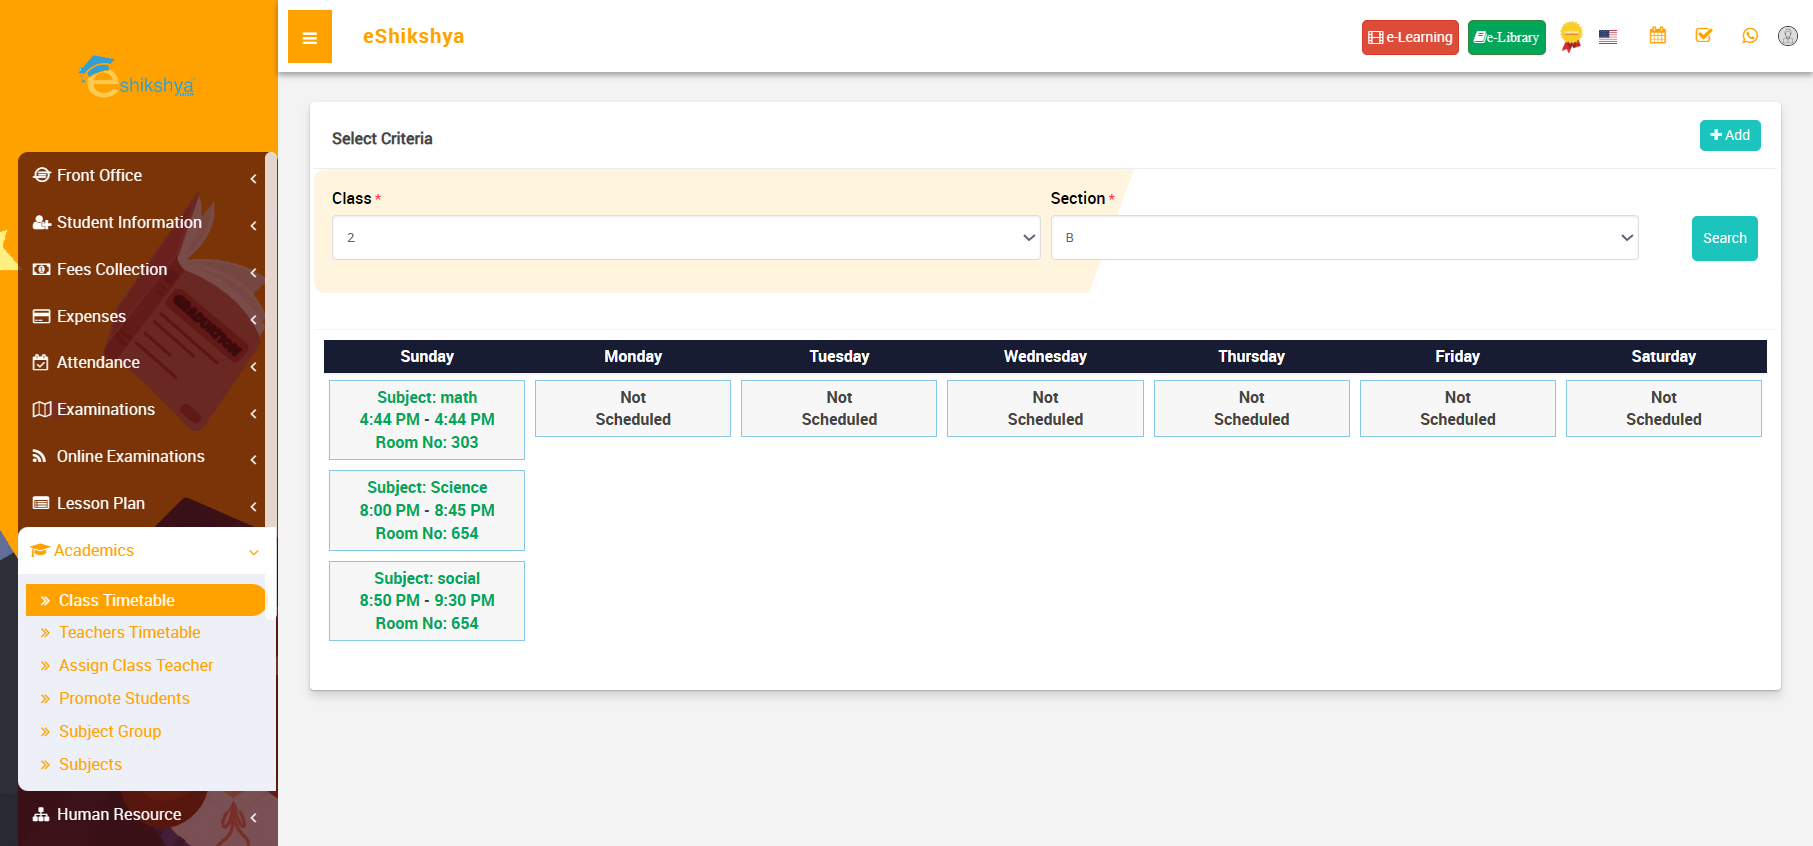 Image 65
Teachers Timetable
- Go to Teacher's timetable under Academics.
- Choose the Teacher from the list selection and click on search.
- The schedule for the selected teacher should appear as shown in image 66.
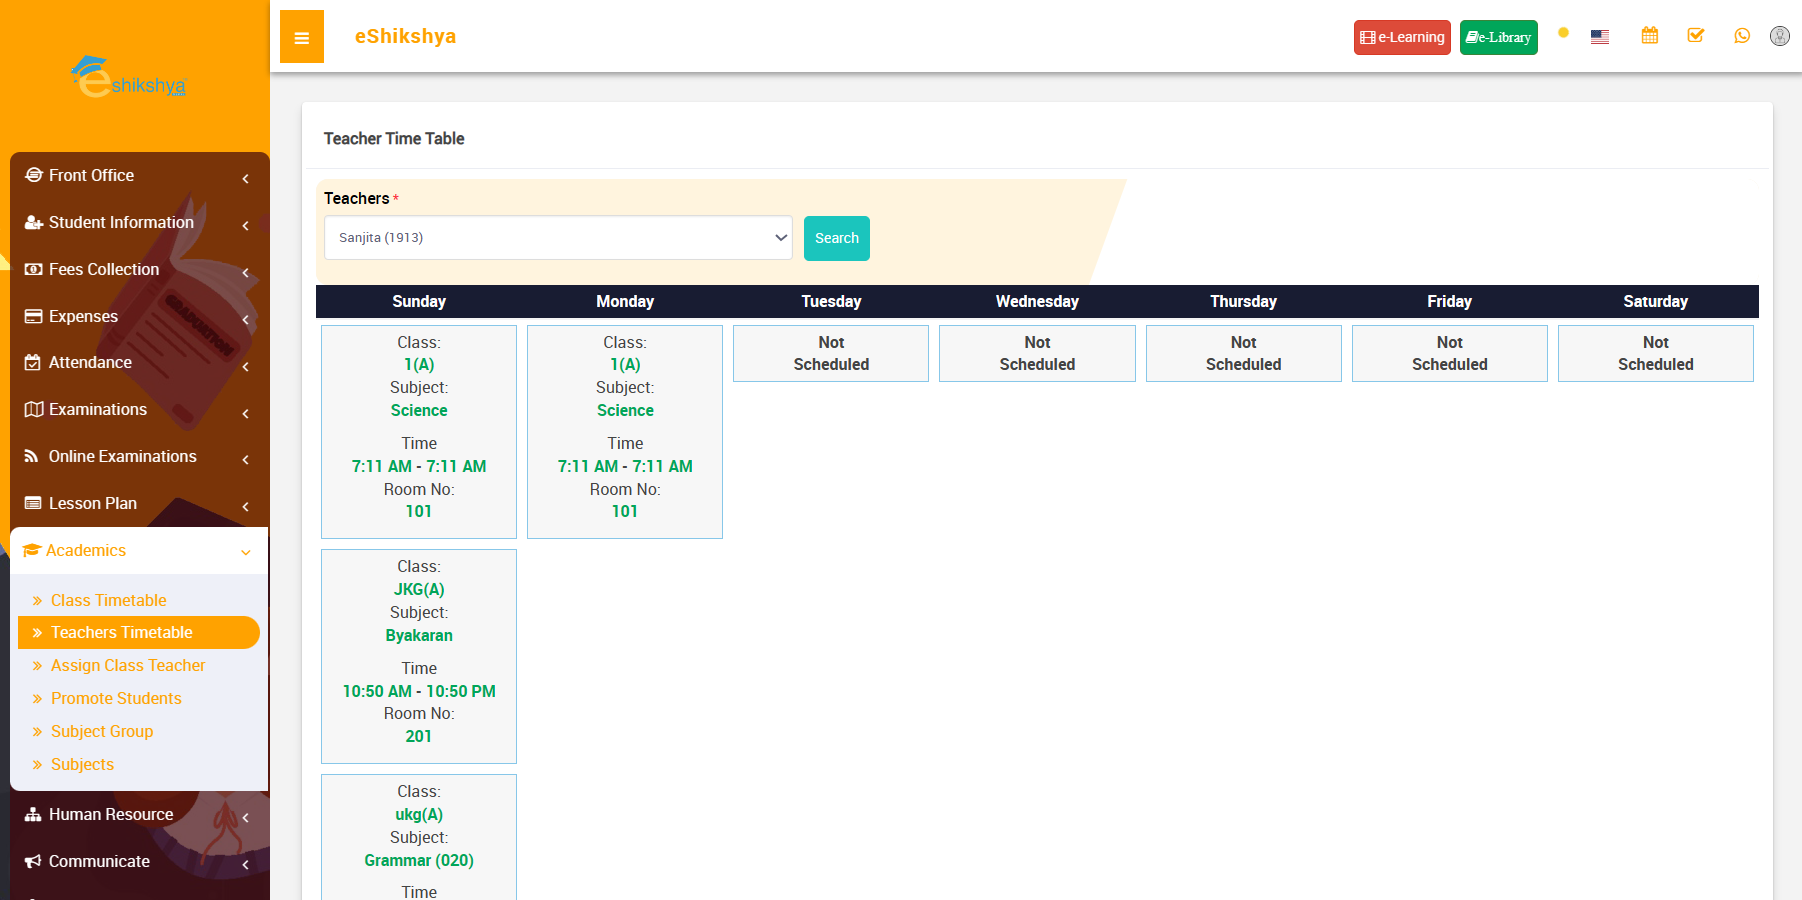 Image 66
Assign Class Teacher
- To Assign Class teacher, go to Assign Class teacher under Academics.
- In the form shown in the left side of the page, select class, section from list selection.
- Select the name to the Class teacher for that class and click on save.
- The Assigned class teacher shpuld appear on the list shown in the right side of the page.
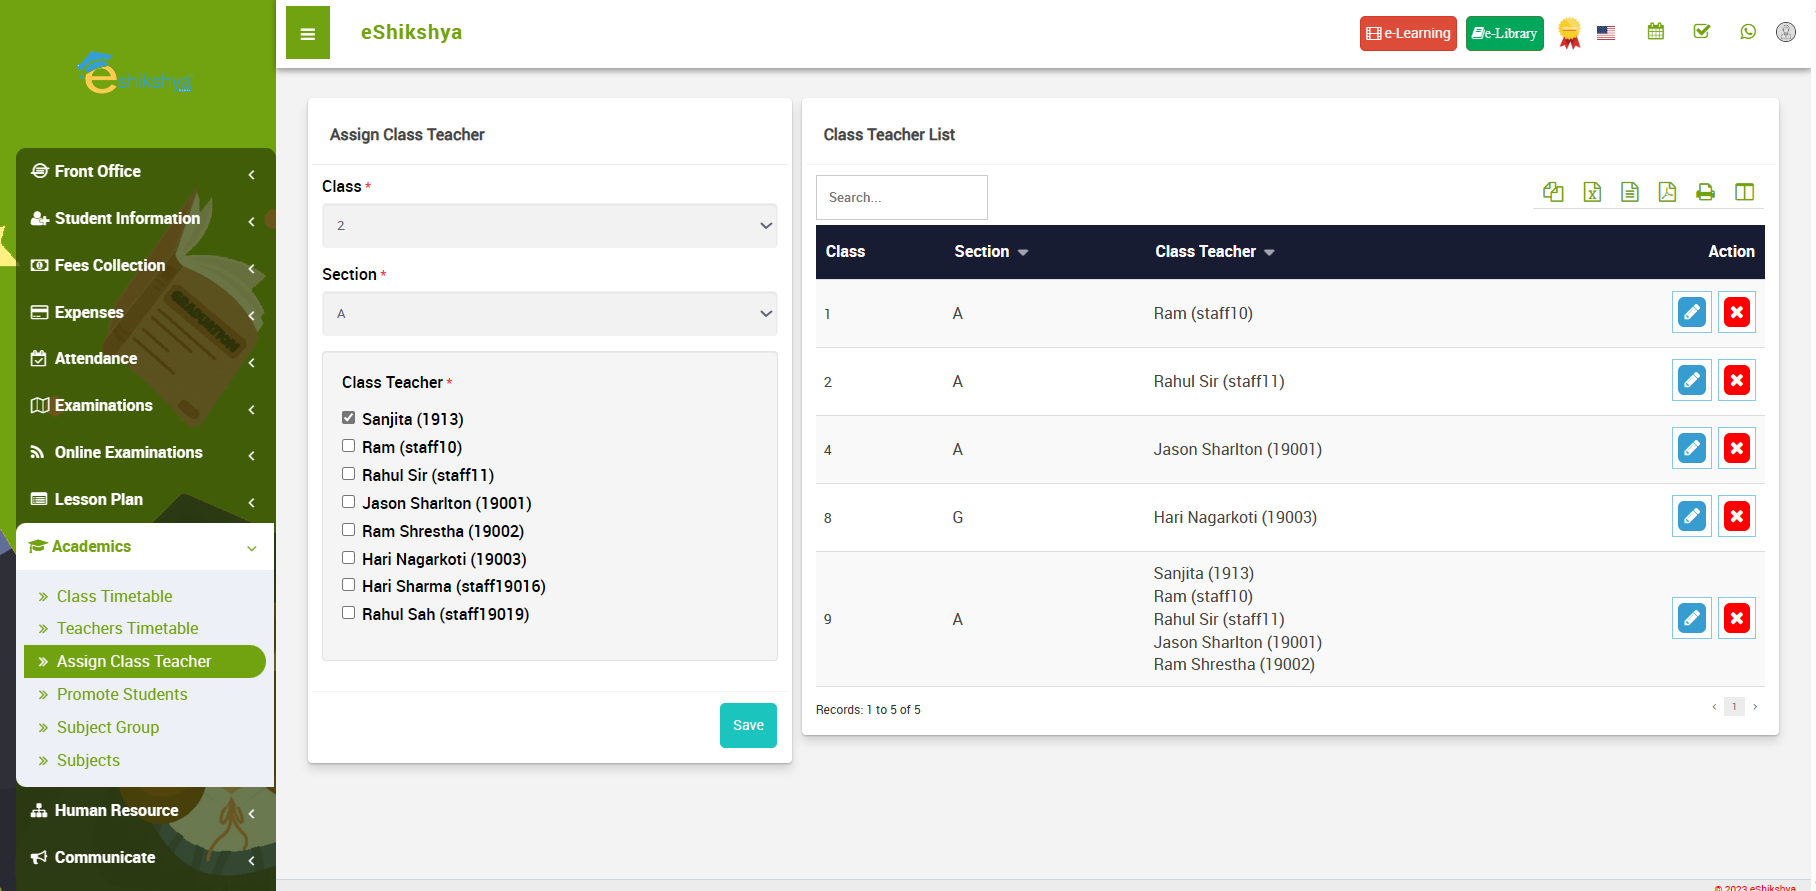 Image 67
Promote Students
- To promote student who have passed from one grade to another, go to Promote Students under Academics.
- Select the class and section of the students you want to promote.
- Select the session, class and section you want to promote them to.
- For example, in the screenshot below, I've chosen students of class 2 'A' and chosen the session 2080-81 class 3 'A'.
- The list of students of class 2'A' will appear.
- Select on the checkbox next to admission no of your selected student and click on promote.
- The student will be assigned to class 3 'A' for the session 2080-81.
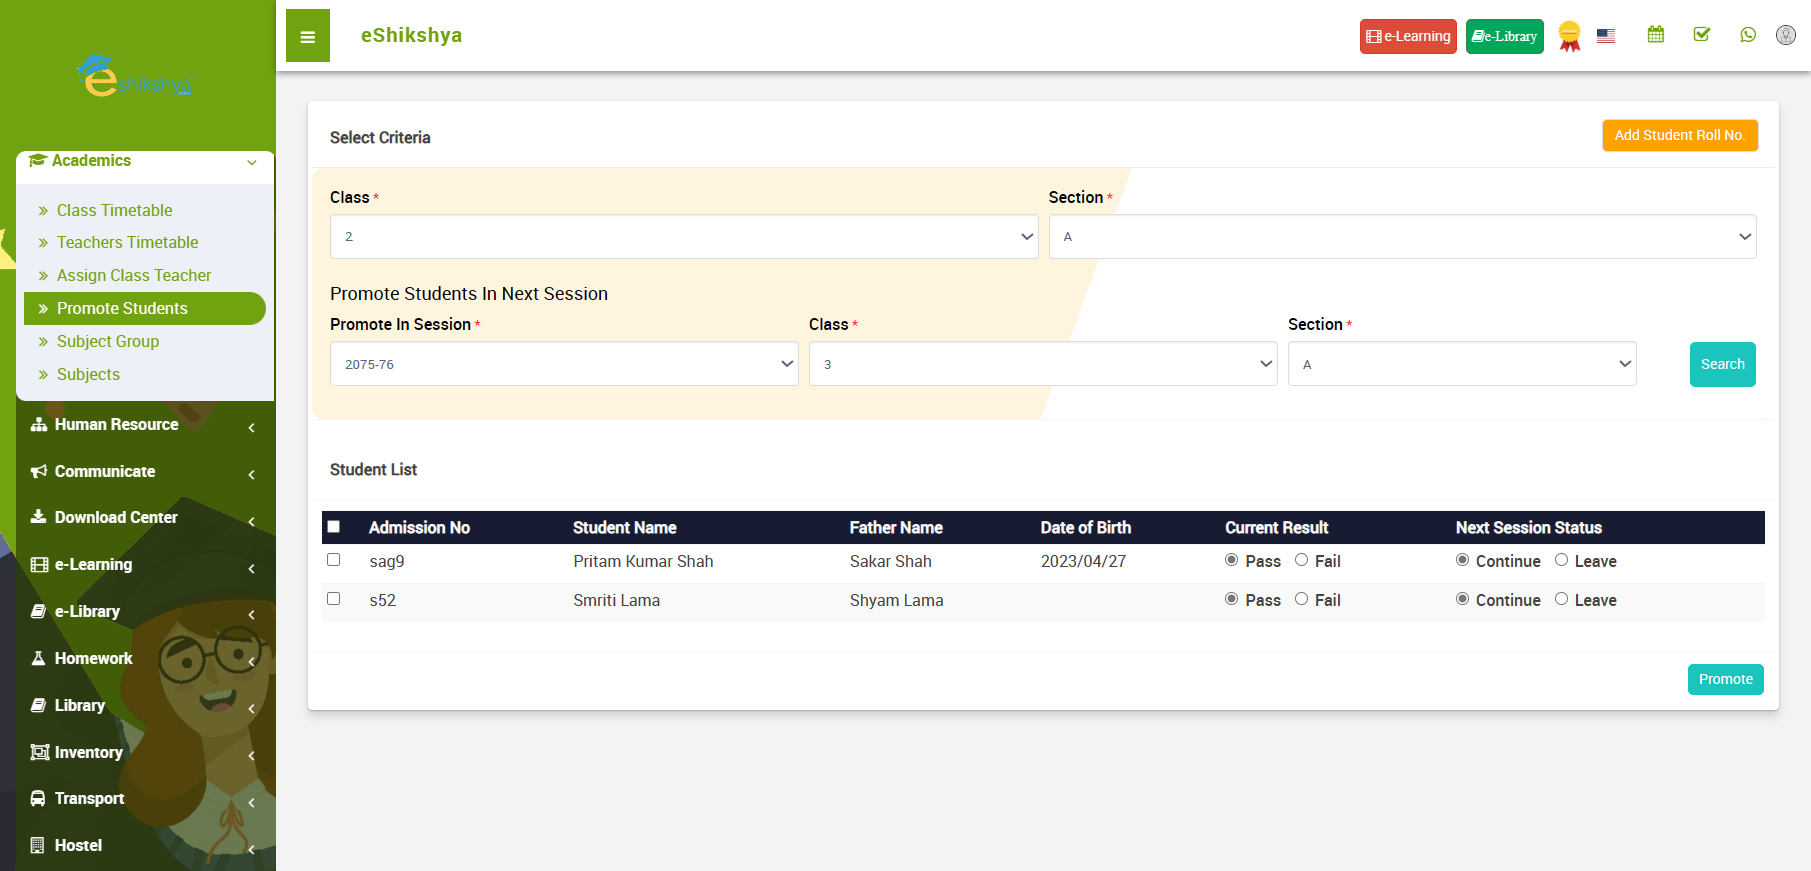 Image 68
Subject Group
- To assign subject groups to each class, go to subject group.
- Write the name of the subject group, select class.
- Select the subjects to assign to that class.
- Click on save.
 Image 69
Subjects
- The subjects that are assigned to subject groups can be defined here.
- To define subjects, go to subjects under Academics.
- Enter the subject name and select its type (theory or practical).
- Enter its subject code and click on save.
 Image 70
Human Resource
Staff Directory
- To view the staff details, go to staff directory.
- A page with role search should appear.
- Select the Role from the role list i.e. teacher, librarian, canteen staff etc.
- Once you select the role and click on search, the teacher with card view/ list view should appear.
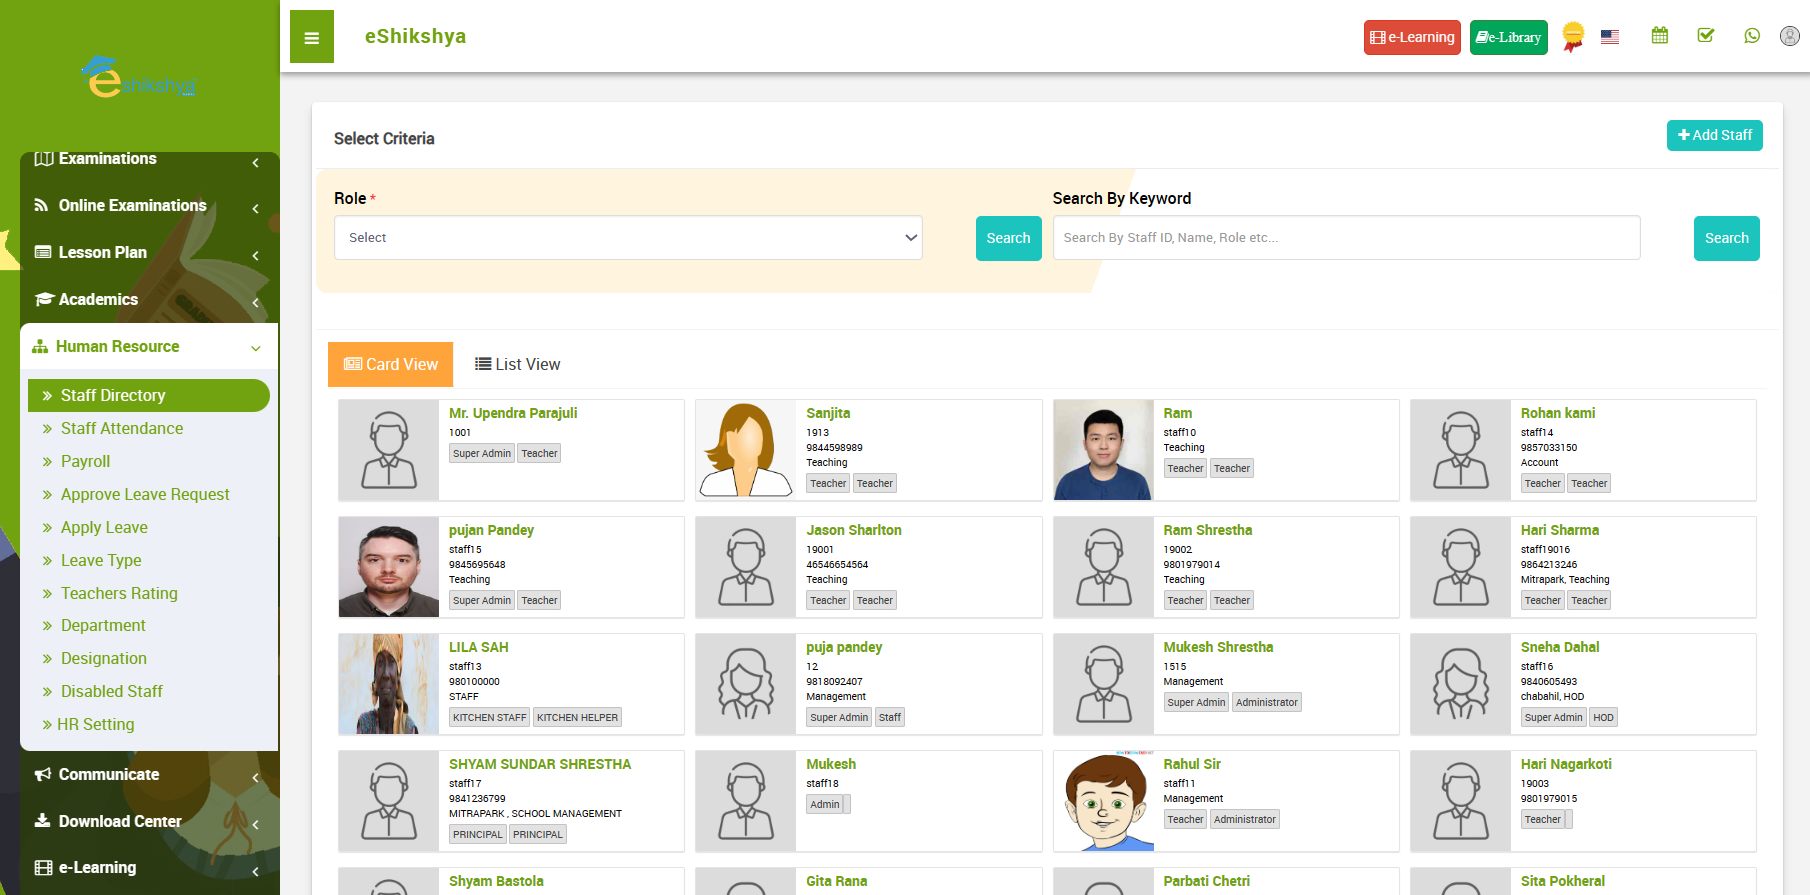 Image 70
Staff Attendance
- To view the staff details, go to Staff Attendance.
- A page with role search should appear. Suppose you select Teacher as a role, then a list of teachers will appear along with options to mark preset, absent, leave, half day.
- Select the attendance status for the teacher you want to.
- Click on save. The attendance status will be updated.
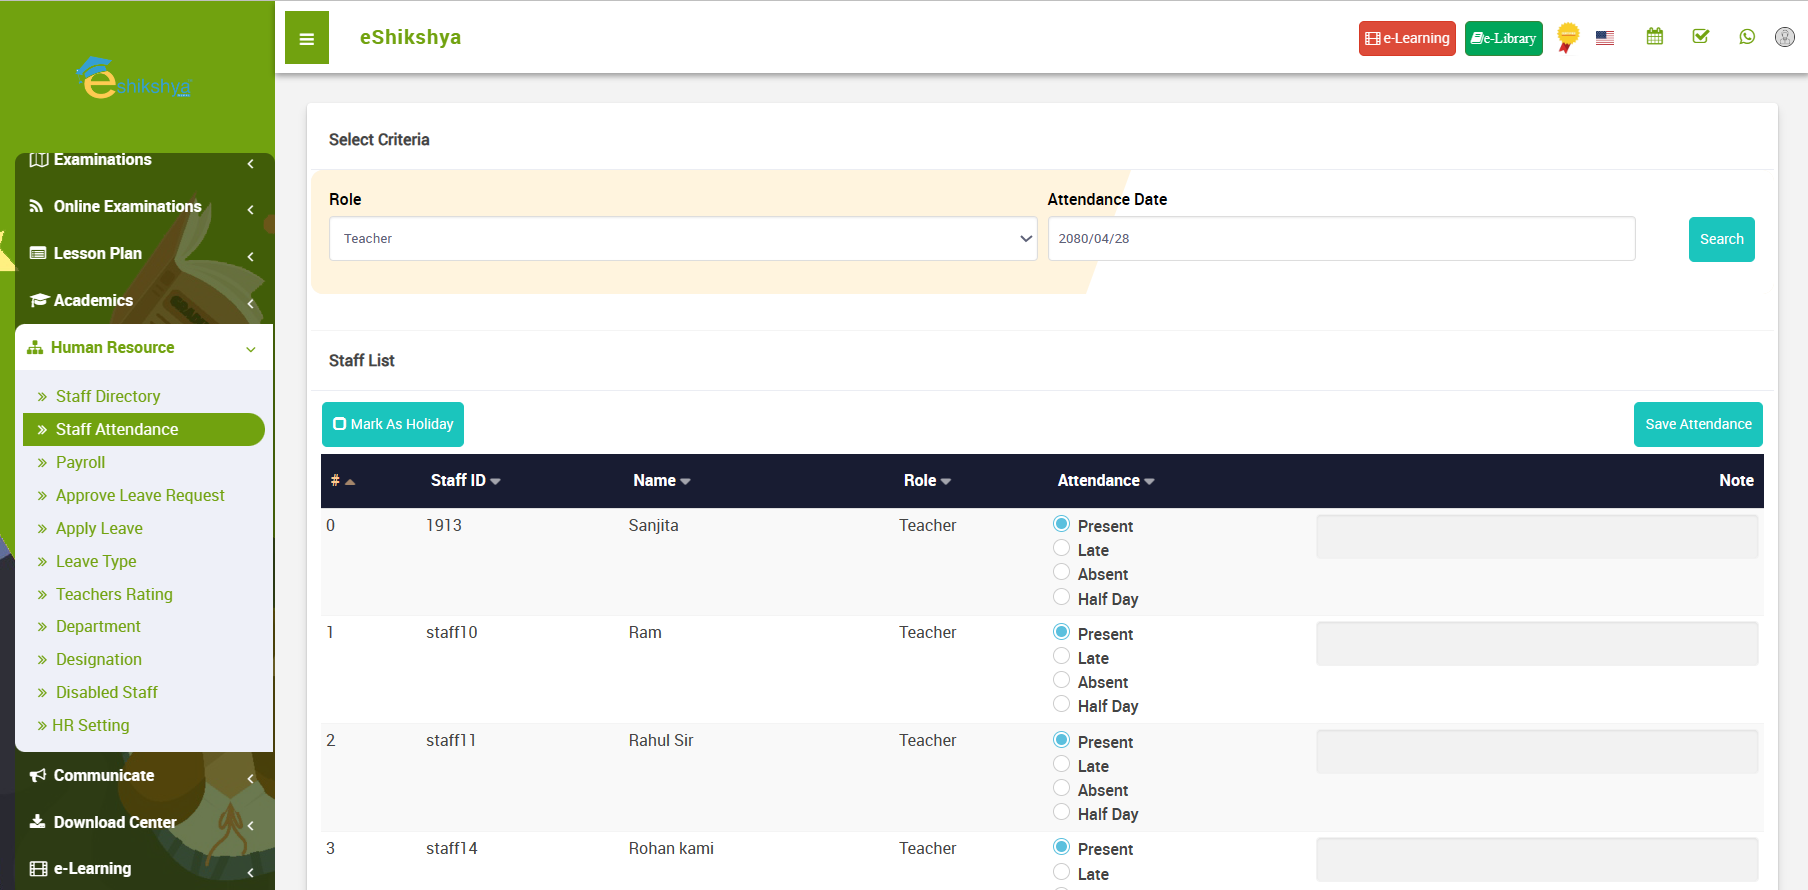 Image 71
Payroll
- To generate staff payroll, go to payroll under Human Resource.
- A page with filter with role, month, as shown in image 72 should appear.
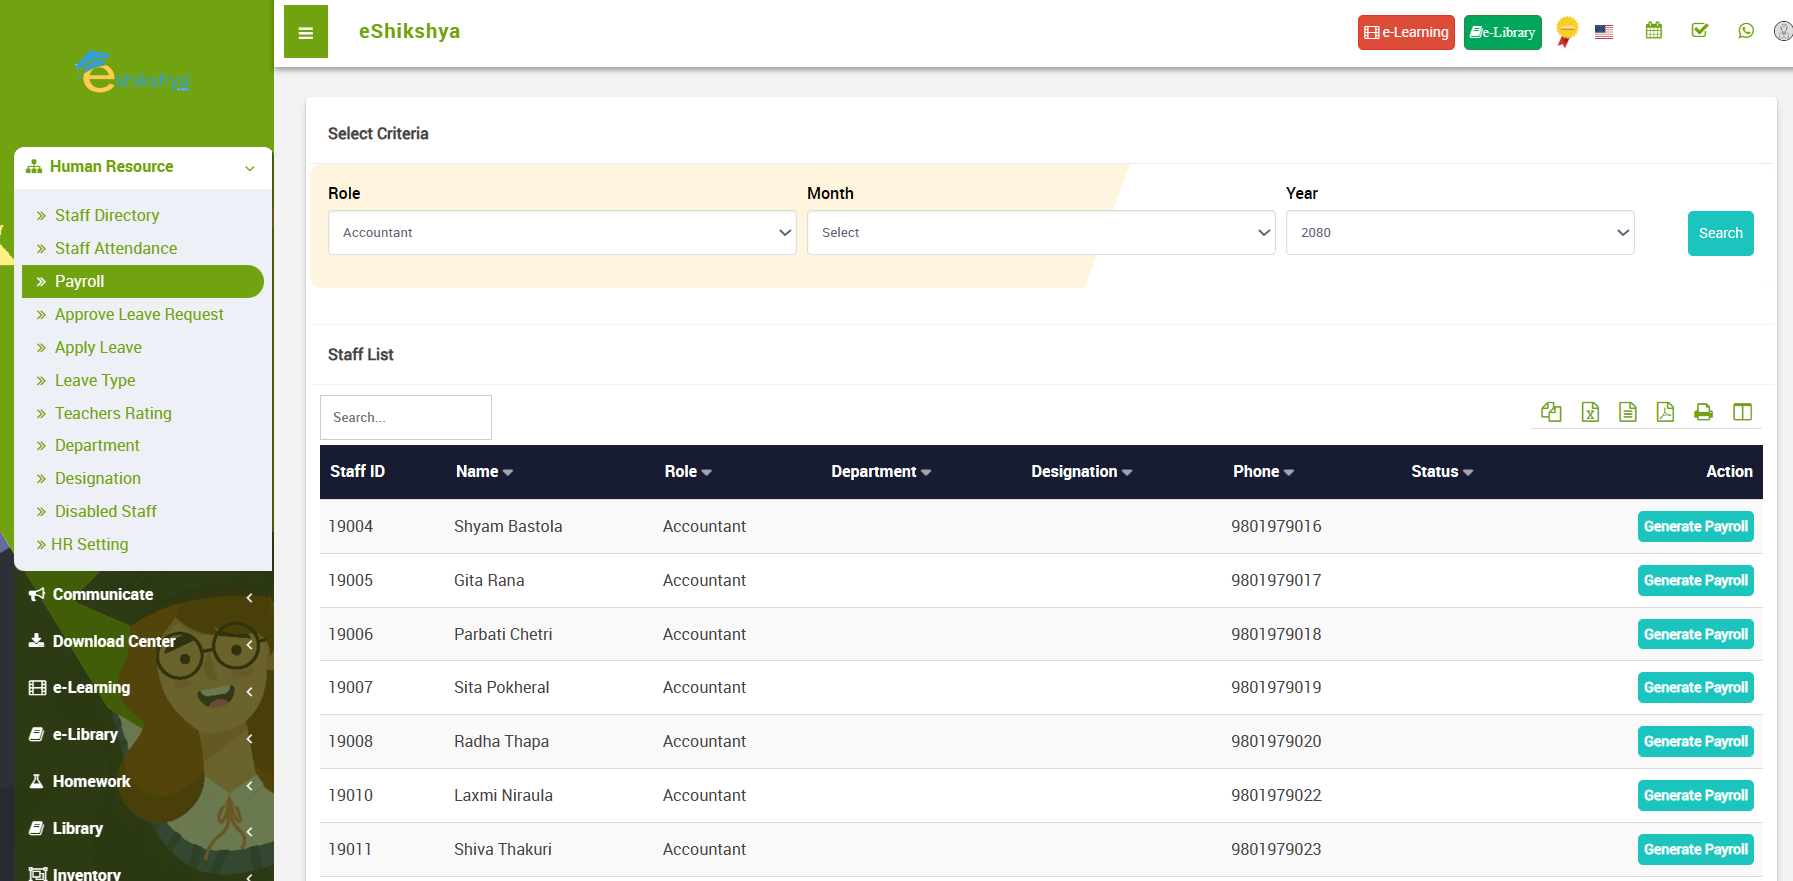 Image 72
- Suppose you select Teacher as a role, then a list of teachers will appear where you'll see and action button next to the name of your selected teacher.
- Click on generate, you will be directed to the following page.
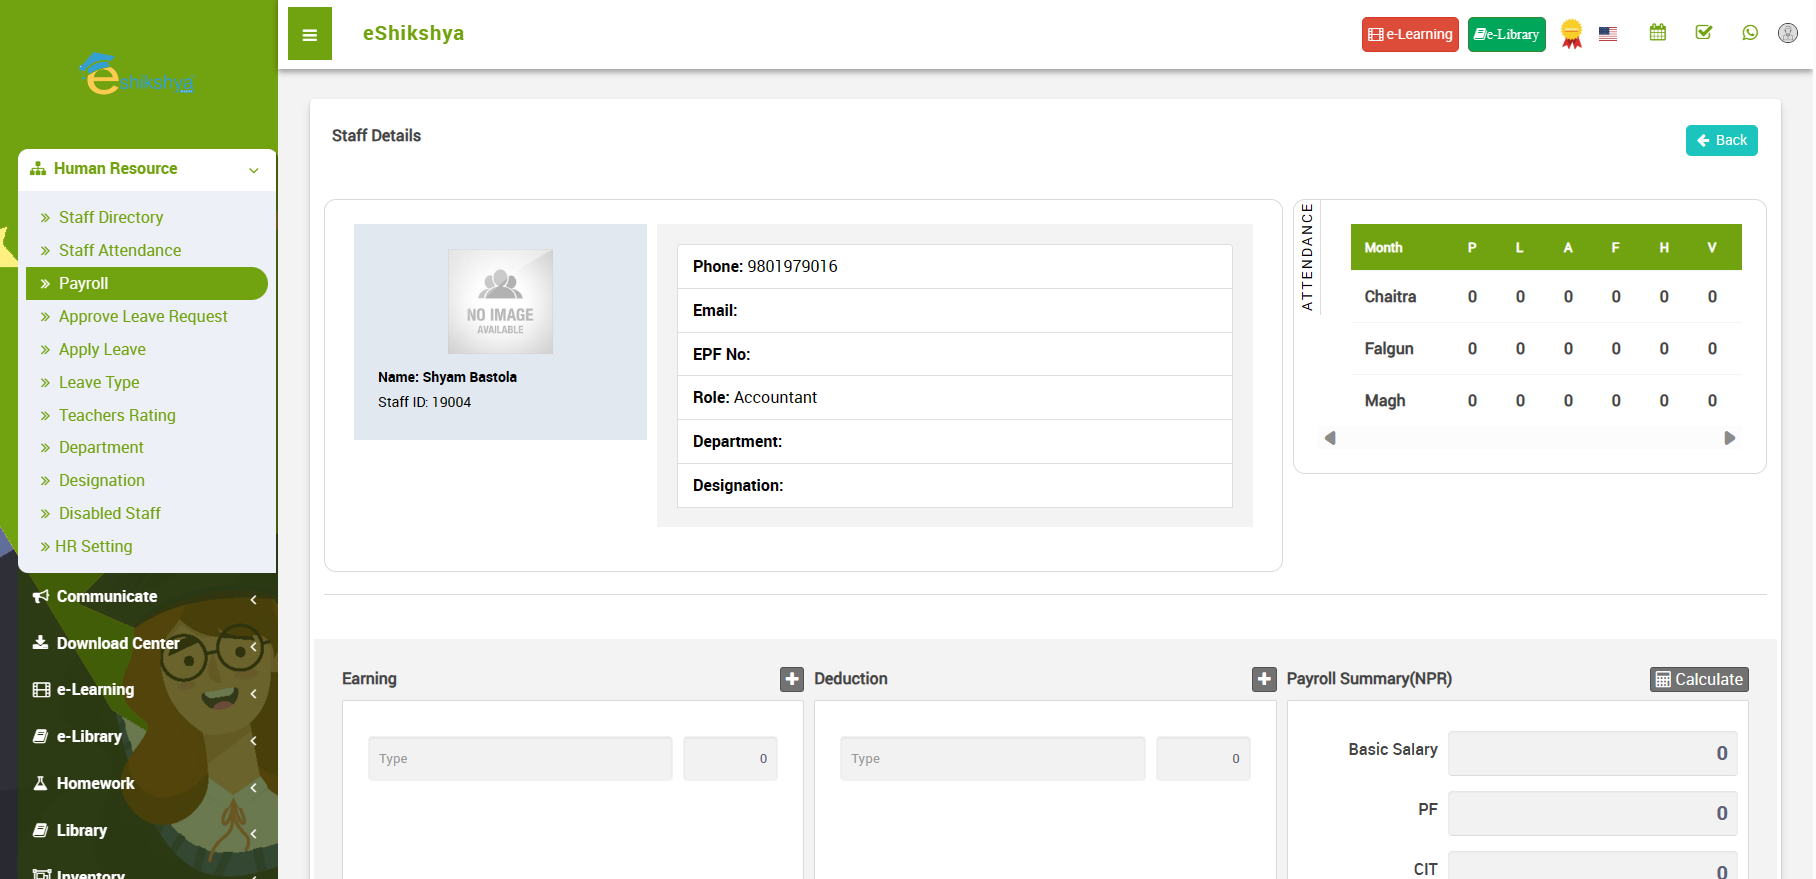 Image 73
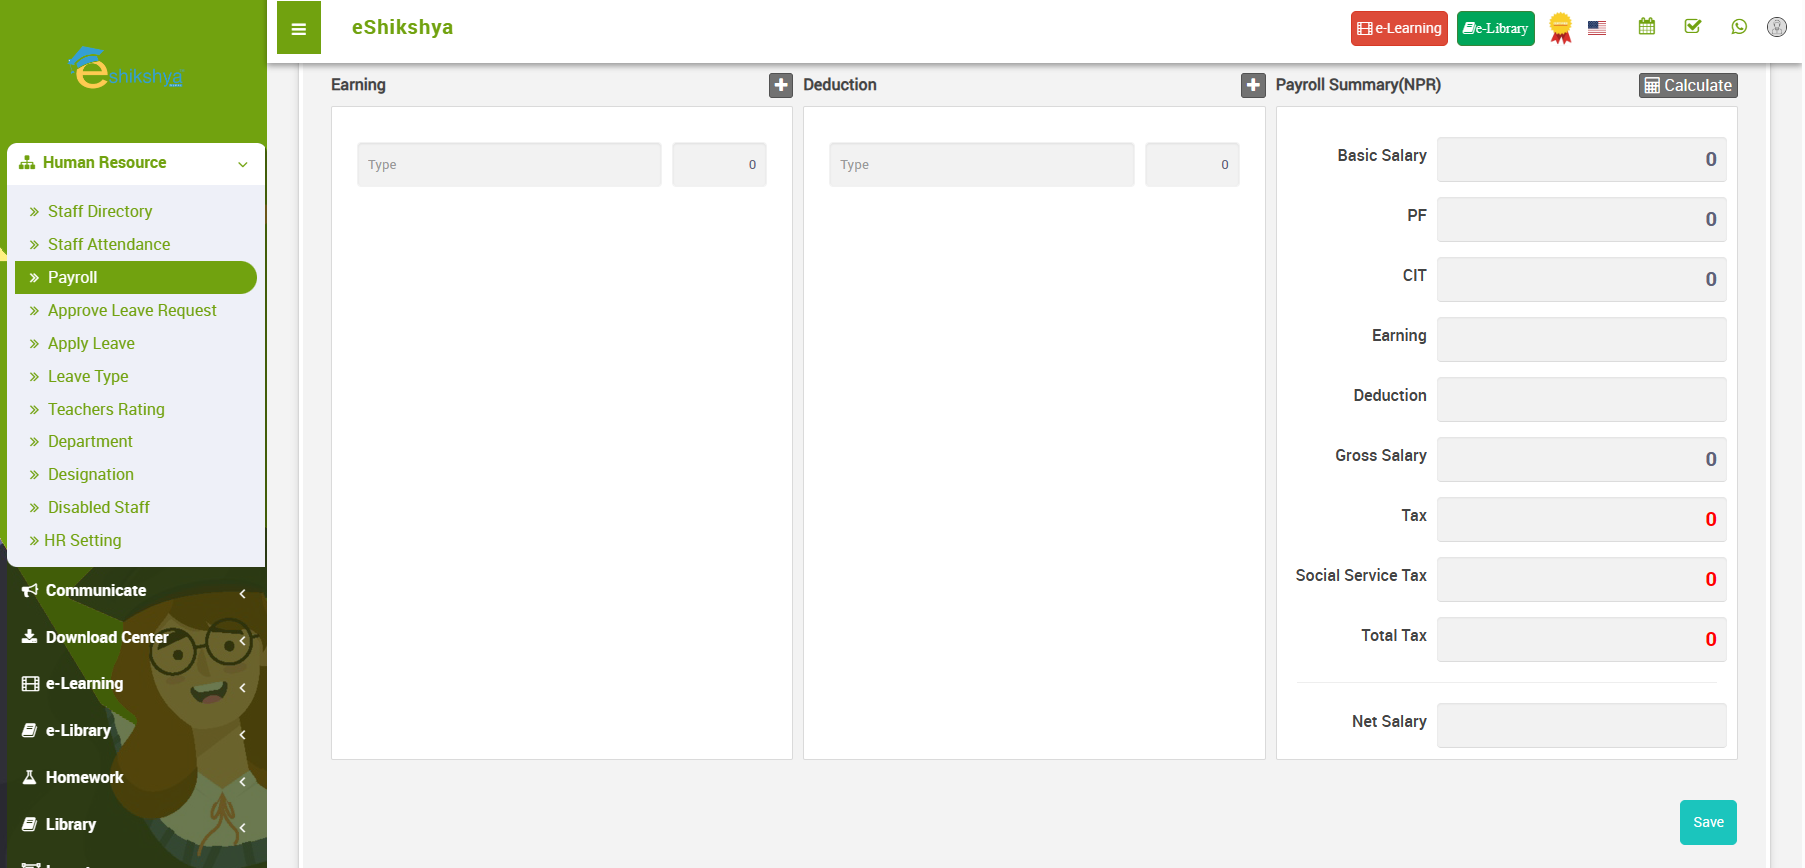 Image 74
- Enter the salary details for the selected teacher and click on save.
Leave Request
- To check for staff leave request, approve/ reject them or add new leave request, go to Leave request under Human resource.
- The list of existing leave requests with an option to approve from staffs should appear as shown in the image below.
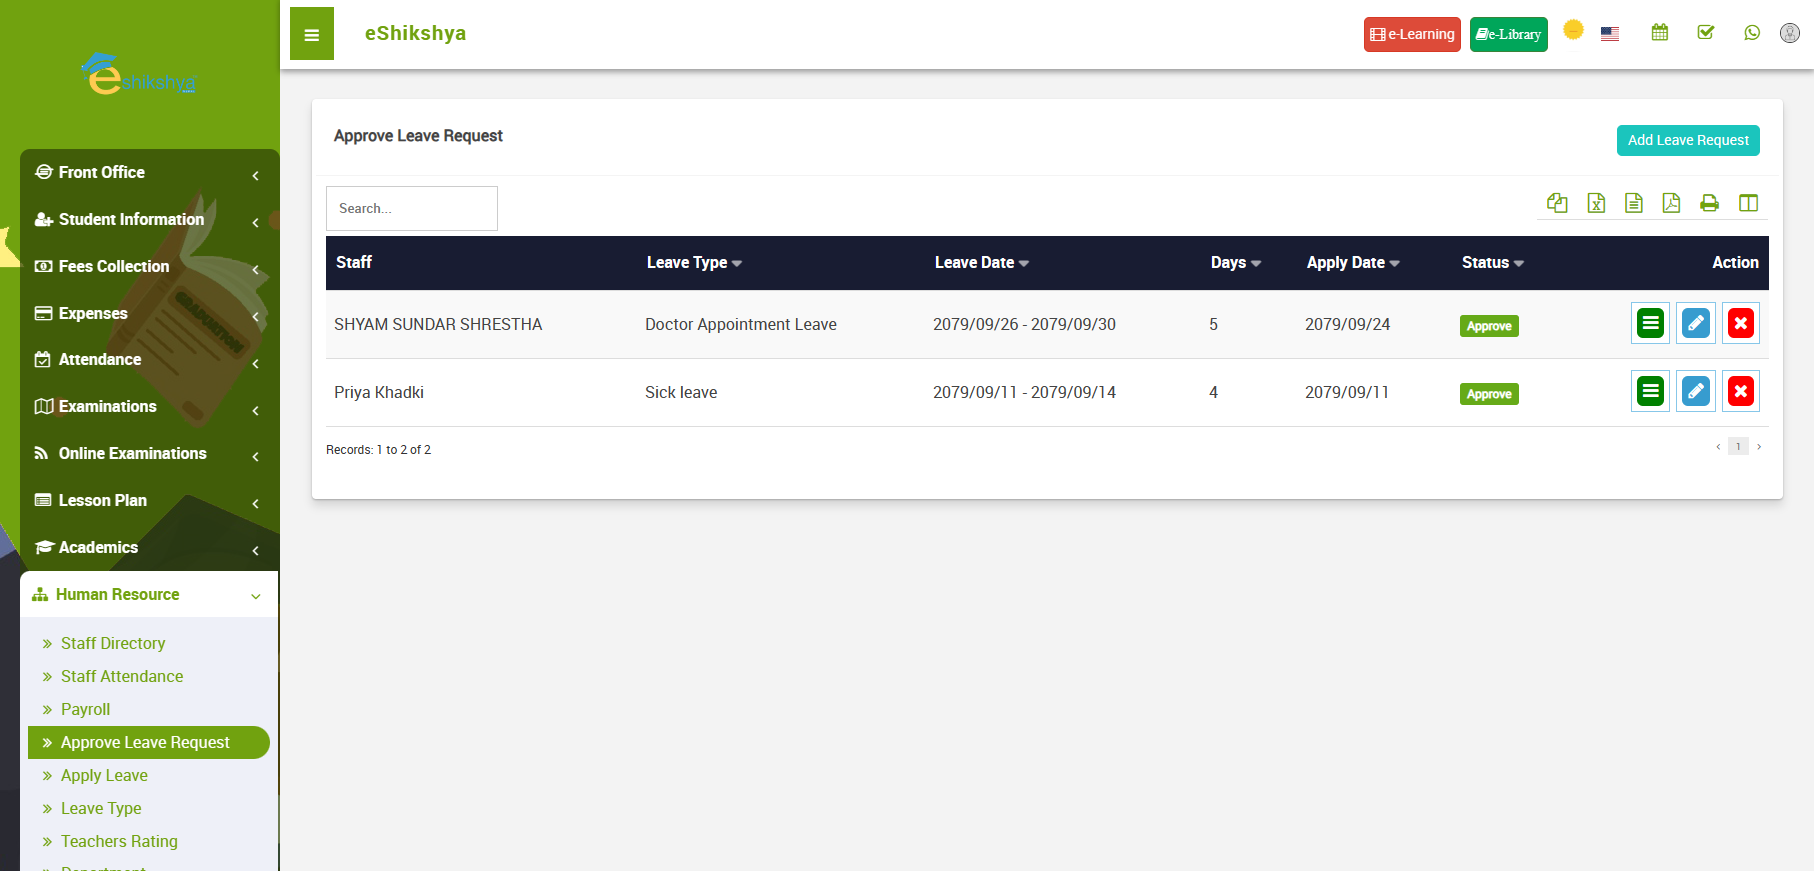 Image 75
- As you can see on the top right, there is an option to Add new leave request.
- Click on it. The following image should appear.
Image 76
- Fill out the form like role, name, leave apply dates, reason and click on save.
Leave type
- To create leave type, go to Leave type under Human resource.
- A form on the left side to define the leave type should appear.
- Leave types are different types of leaves your institution offers; e.g., sick leave, mourning leave, etc.
- Your created leave appears on the right side of the screen in a listed format.
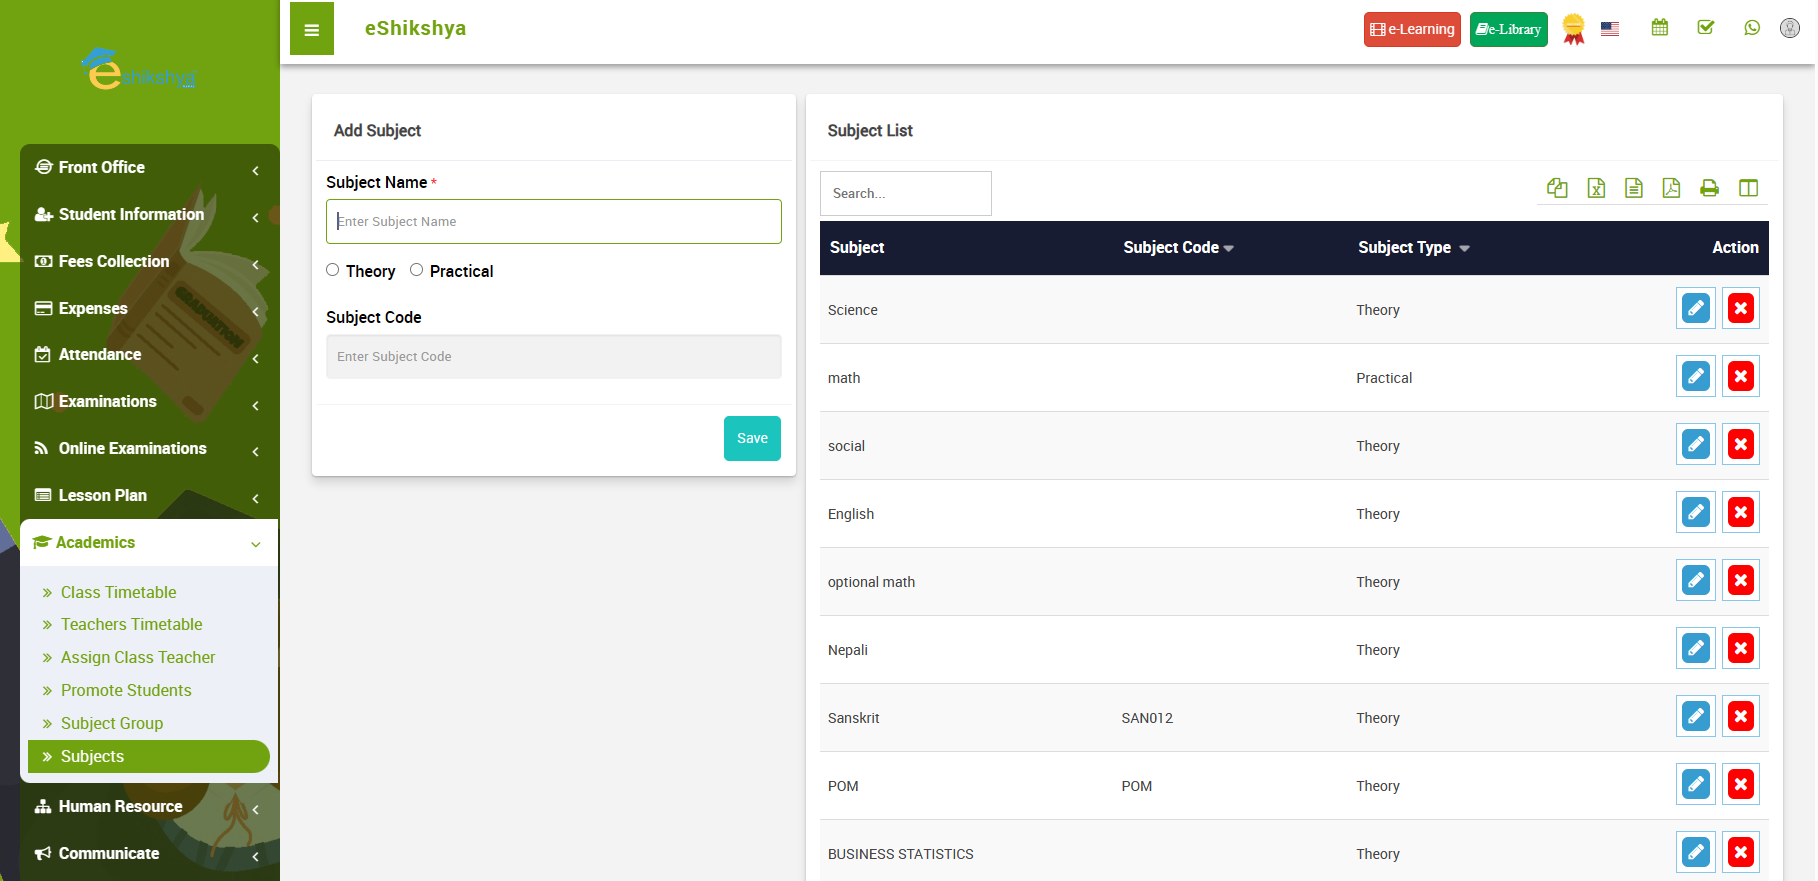 Image 77
Department
- To define the different departments in your instituion, go to department under Human Resources.
- The image in image 78 should appear.
- On the left side of the page, you should see an option to enyter the Department name.
- Enter the name and click on save.
- The created department should appear on the list shown in the right side of the page.
 Image 78
Designation
- To define the different designations in your instituion, go to designation under Human Resources.
- The image in image 79 should appear.
- On the left side of the page, you should see an option to enter the Designation name.
- Enter the name and click on save.
- The created designation should appear on the list shown in the right side of the page.
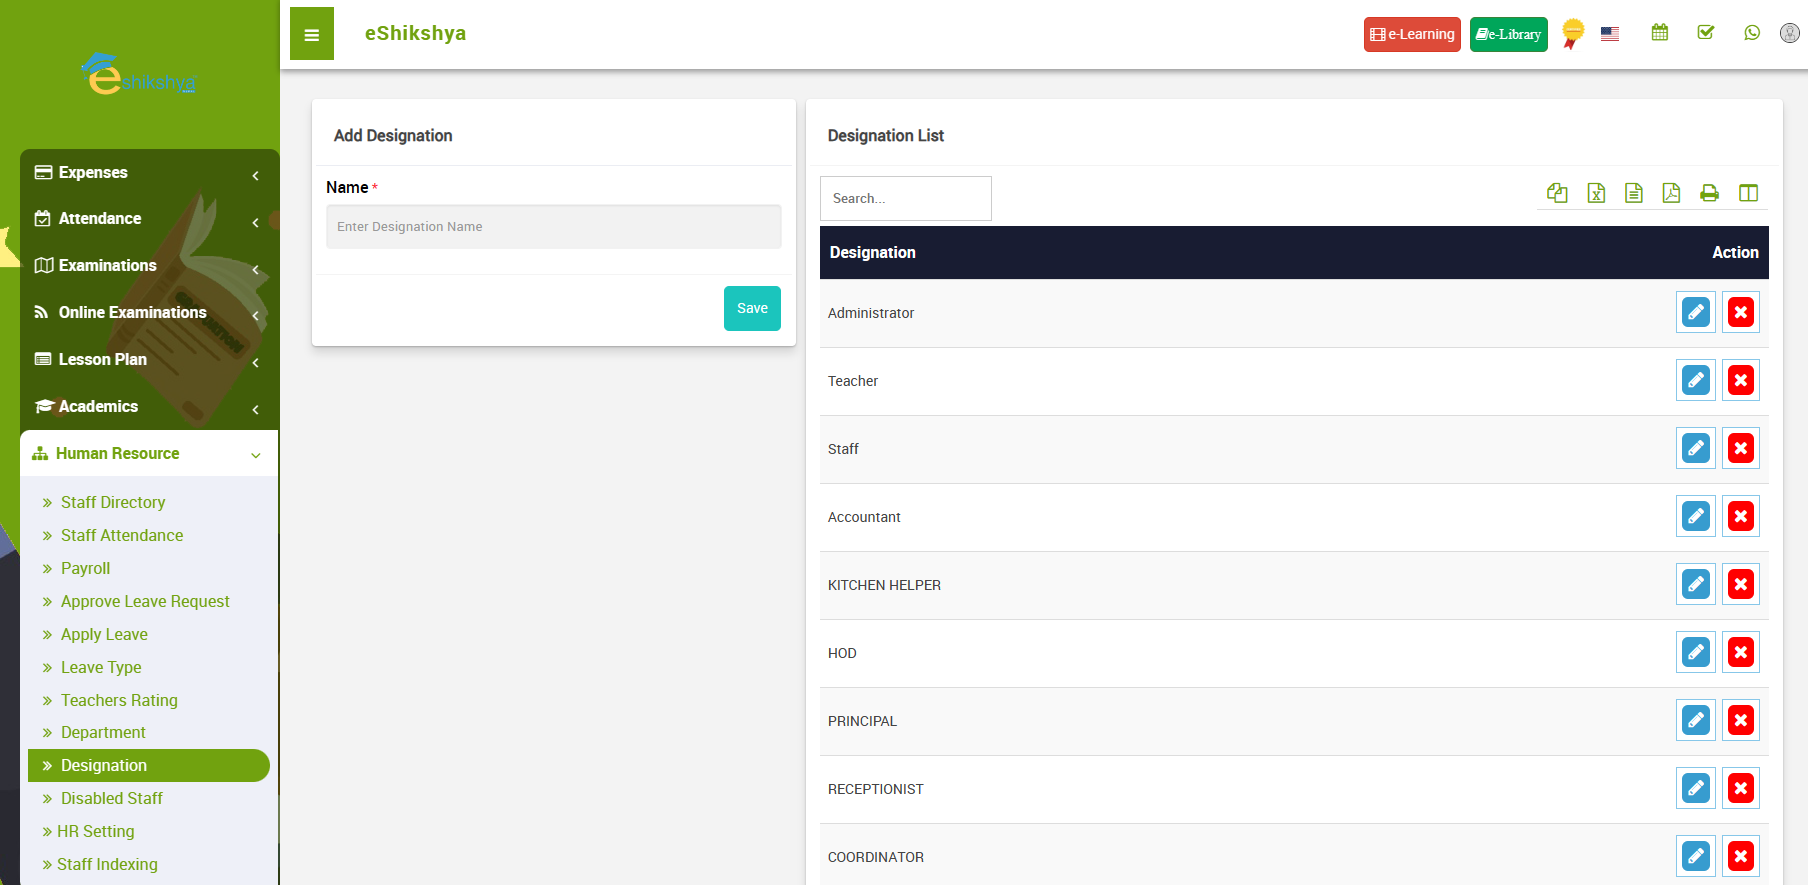 Image 79
Disabled Teachers
HR Setting
Staff Indexing
Communicate
Notice Board
- To customize the notice board for your dashboard, go to Notice board under Communicate on the nav bar.
- The page shown in image 80 should appear.
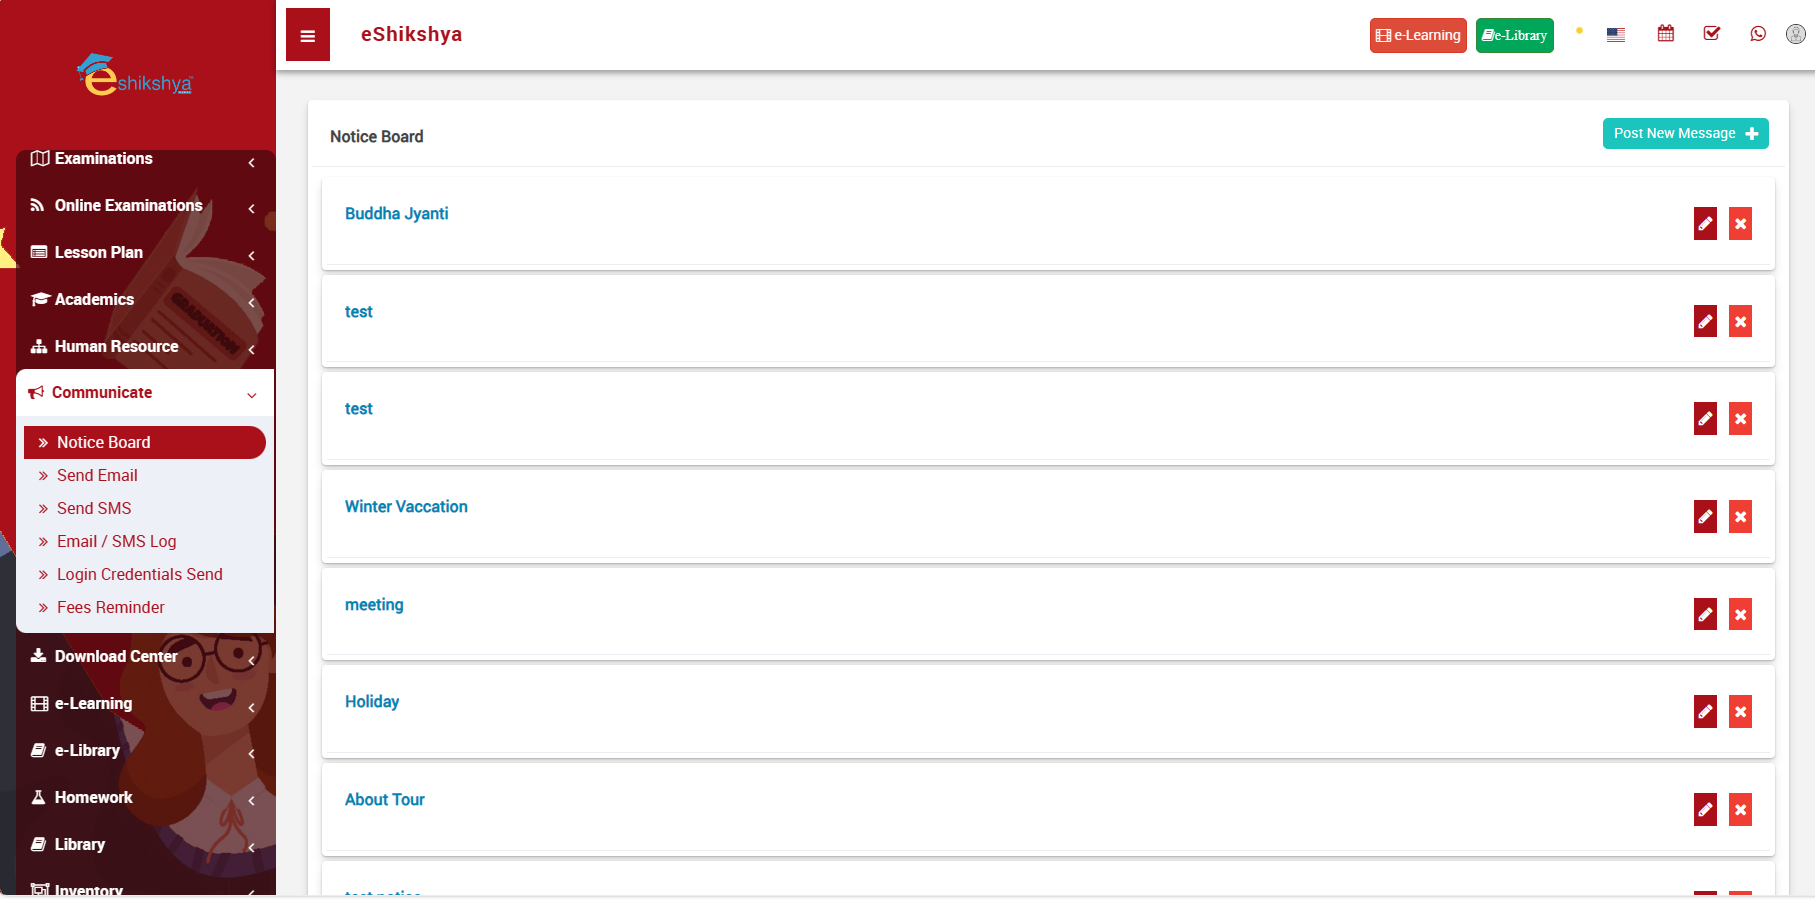 Image 80
- All the exististing created notices should appear here.
- To add new notice, go to Post new message on your top right.
- The page shown in image 81 should appear.
- Enter the details like date of notice publish, Title, description of the notice and who the notice is for.
- Then Click on Send.
- The notice will be displayed on the scheduled date on dashboard on the selected group, i.e., teacher, staff, admin, student etc.
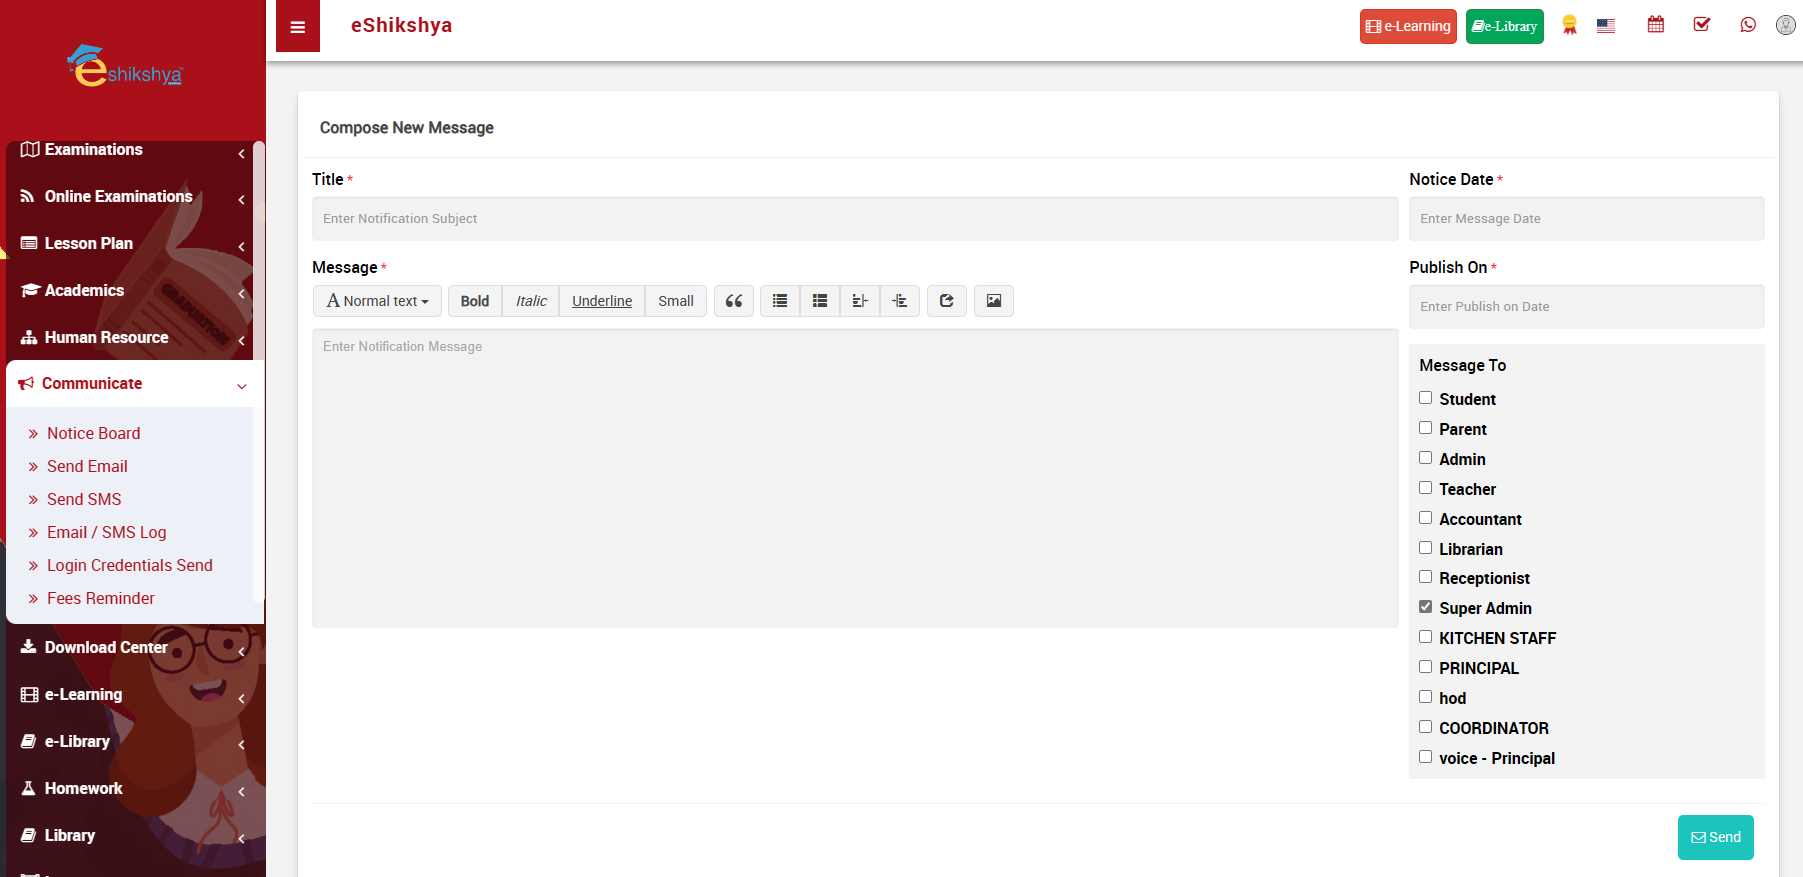 Image 81
Send Email
- To send emails on bulk to selected groups, go to Send Email under communicate.
- Here, you can select the group you want to send email to. e.g., students, guardians, admins, etc.
- If you have an attachment file to send along with the, click on the attachment section.
- Type the message you want to send in the message box.
Image 82
Send SMS
- To send SMS on bulk to selected groups, go to Send SMS under communicate.
- Here, you can select the group you want to send email to. e.g., students, guardians, admins, etc.
- Type the message you want to send in the message box.
Image 83
Email/ SMS Log
- To view Email/ SMS logs, go to Email/ SMS logs under communicate.
- Here, you can view the list of Emails/ SMS categorized on basis of who they are sent to. e.g., Group, individual etc. and their sending date.
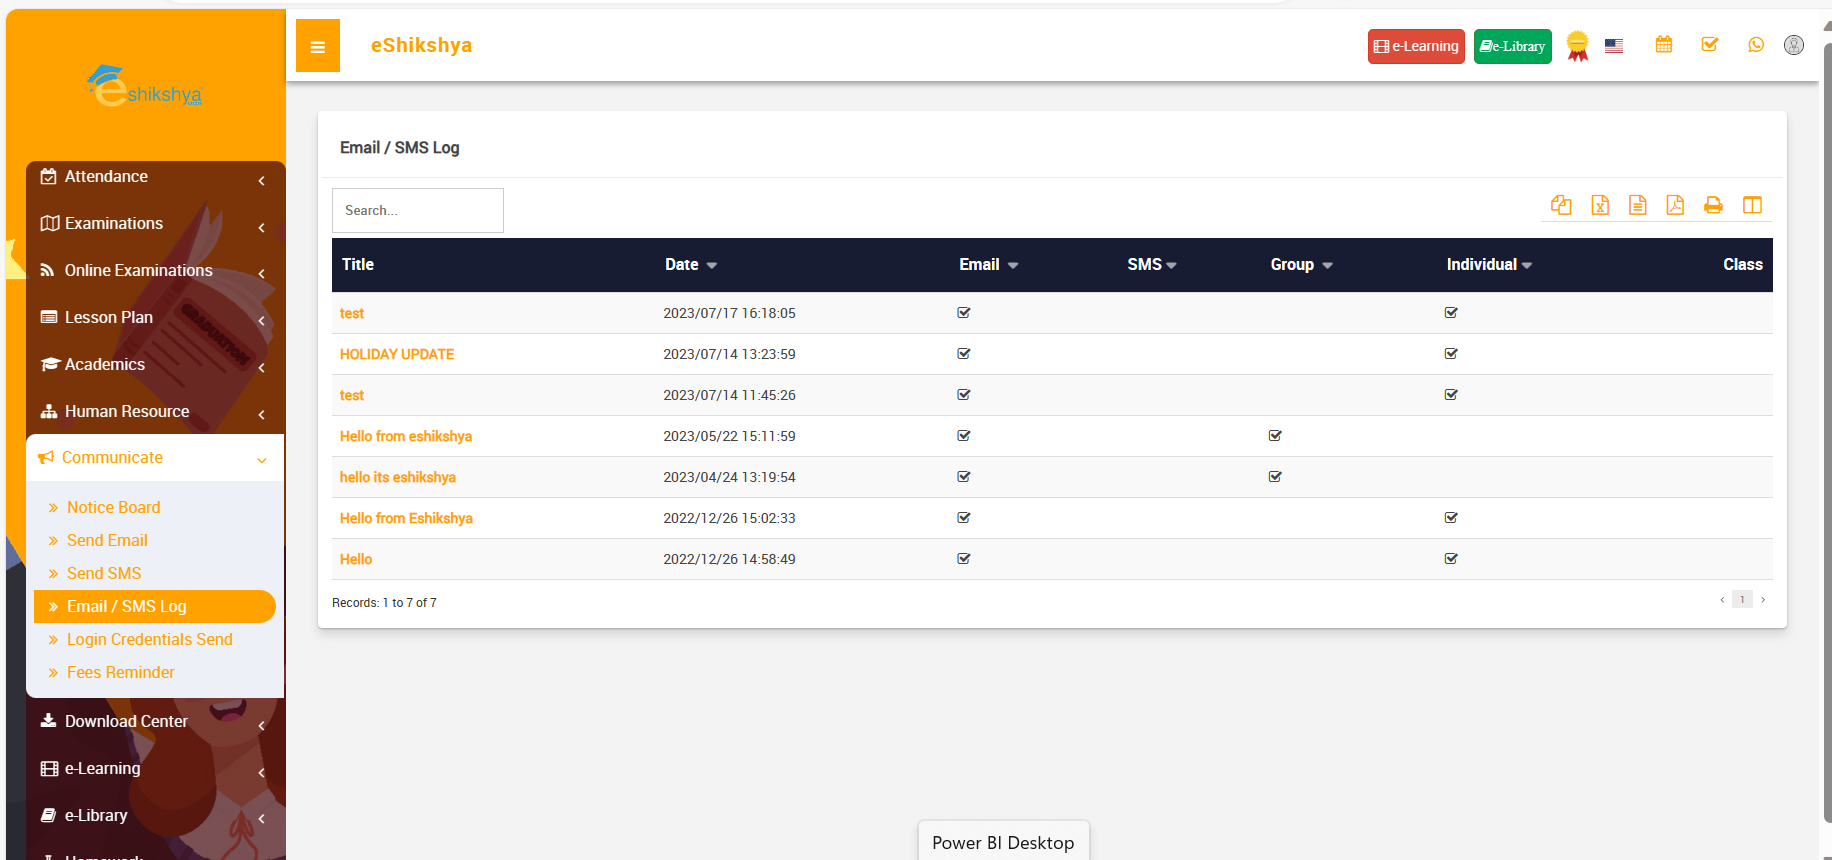 Image 84
Library
Book List
- To add new book to the library, go to Book List under Library.
- On this page, you should see a list of existing books, book title, book number and publisher.
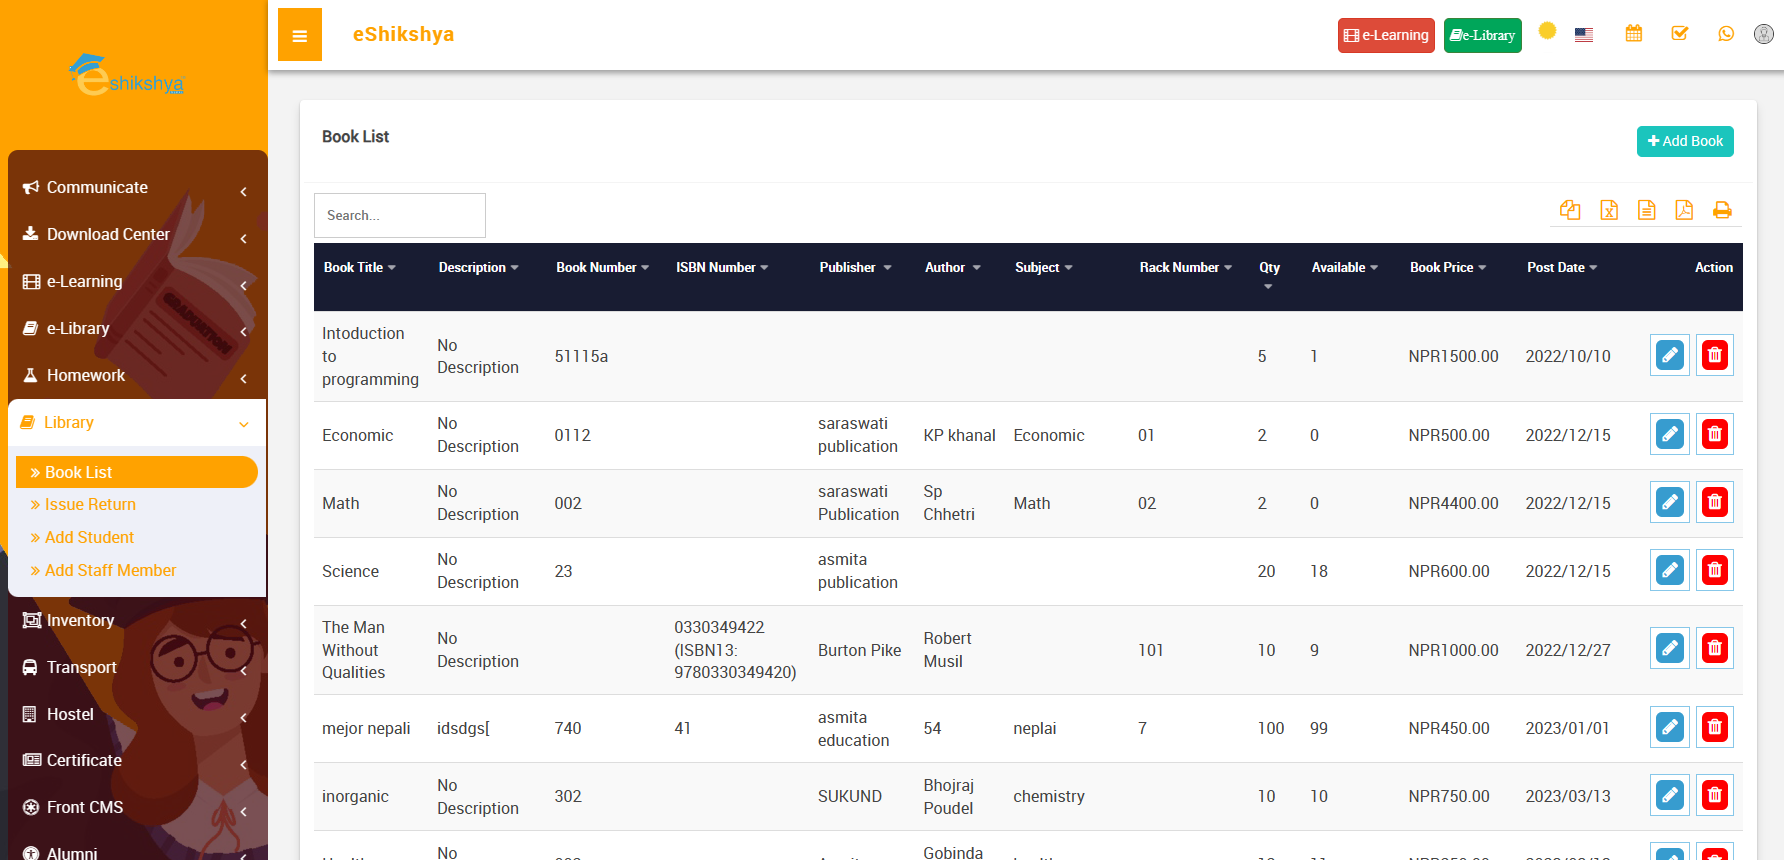 Image 85
- On the top right, there is a + Add book button.
- Click on that to add new book, the following page should appear.
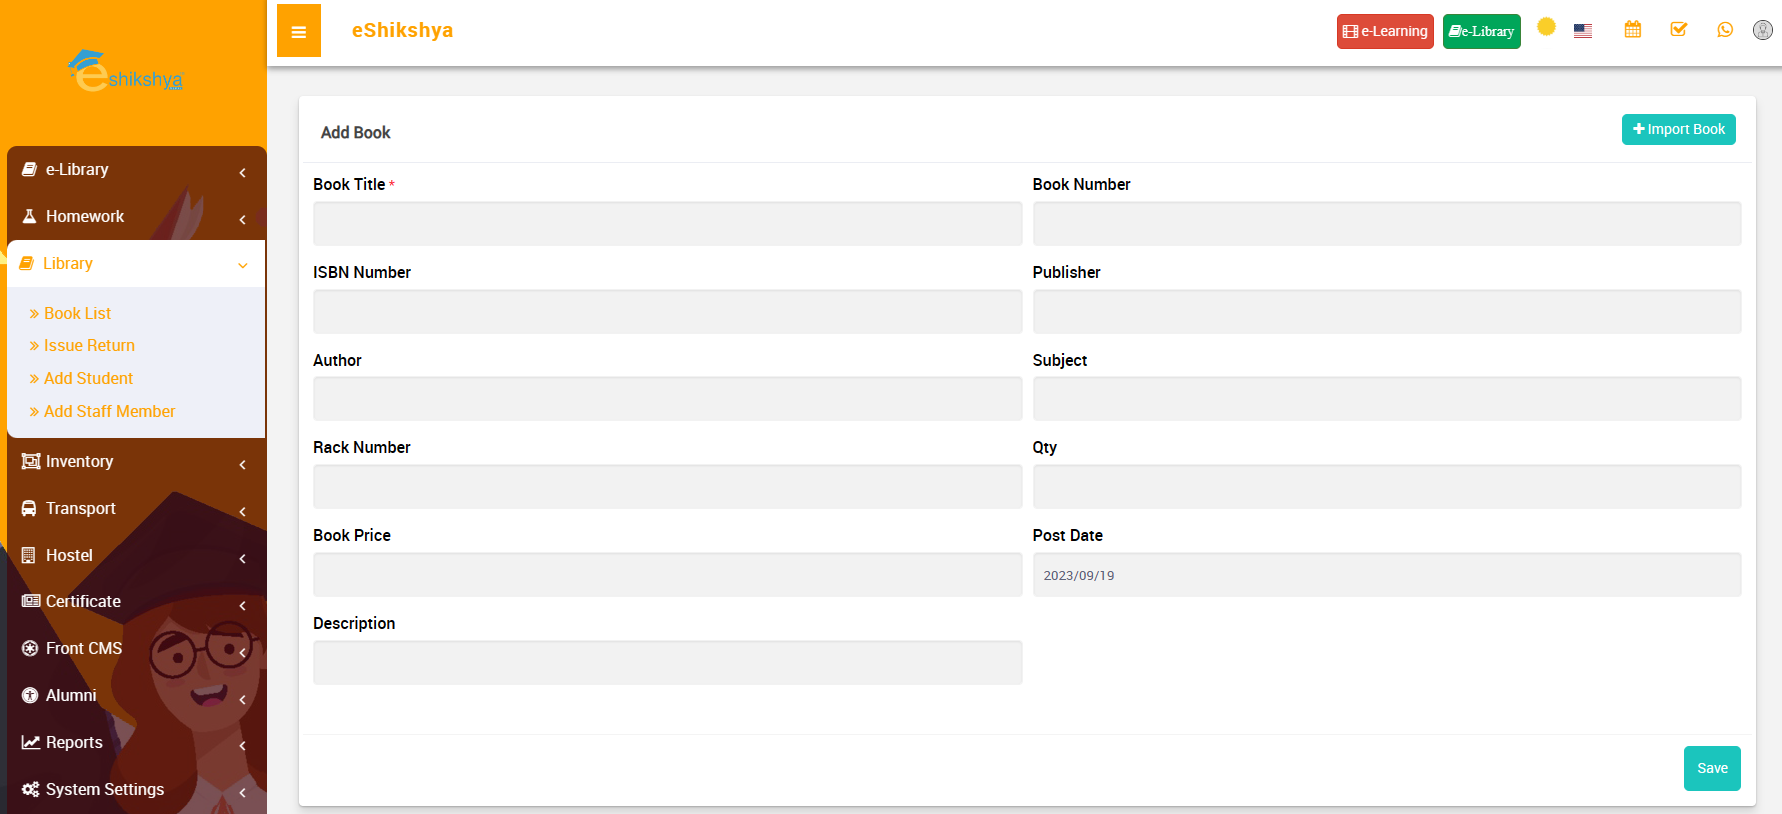 Image 86
- Enter all the necessary fields like book name, number, etc and click on save.
- If you want to upload CSV file containing book details, click on Import book on the top right of the page, the following page should appear.
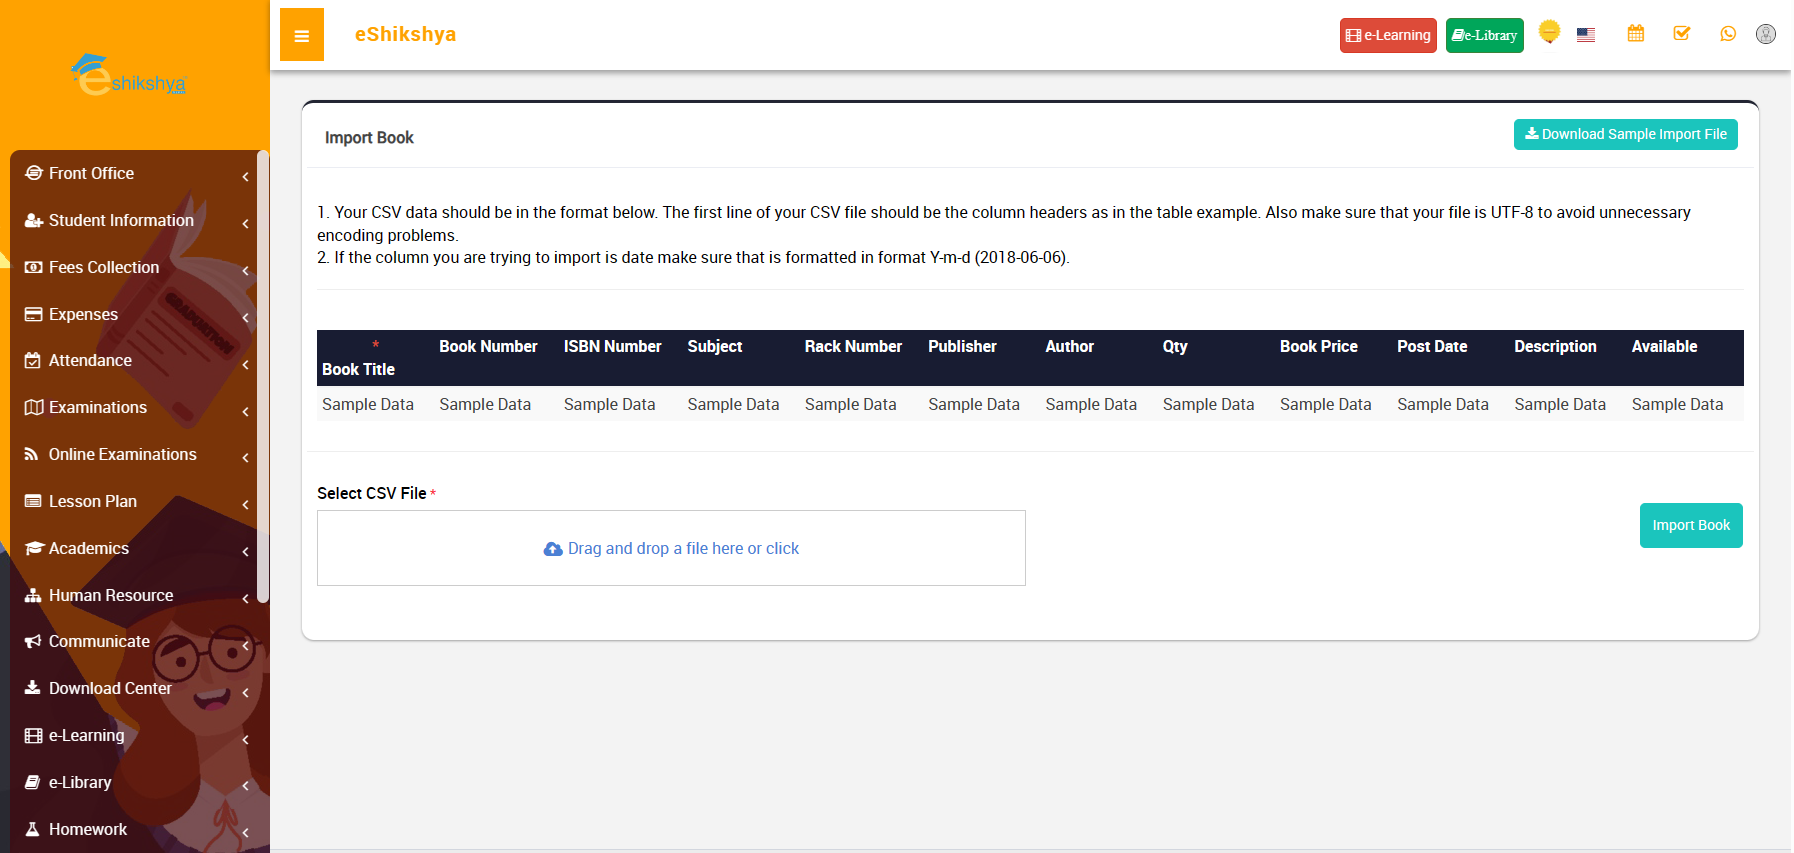 Image 87
- On the top right of the page, you should see should see a Download sample import file.
- Click there to download the format to input data in a readable CSV file.
- On the CSV enter the book details and save.
- Now, upload this file on the Import book page.
Issue/Return
The Issue/ Return feature ensures you keep track of all the books in the library.
- To issue or return books, go to Issue/Return under Library. The following page should appear.
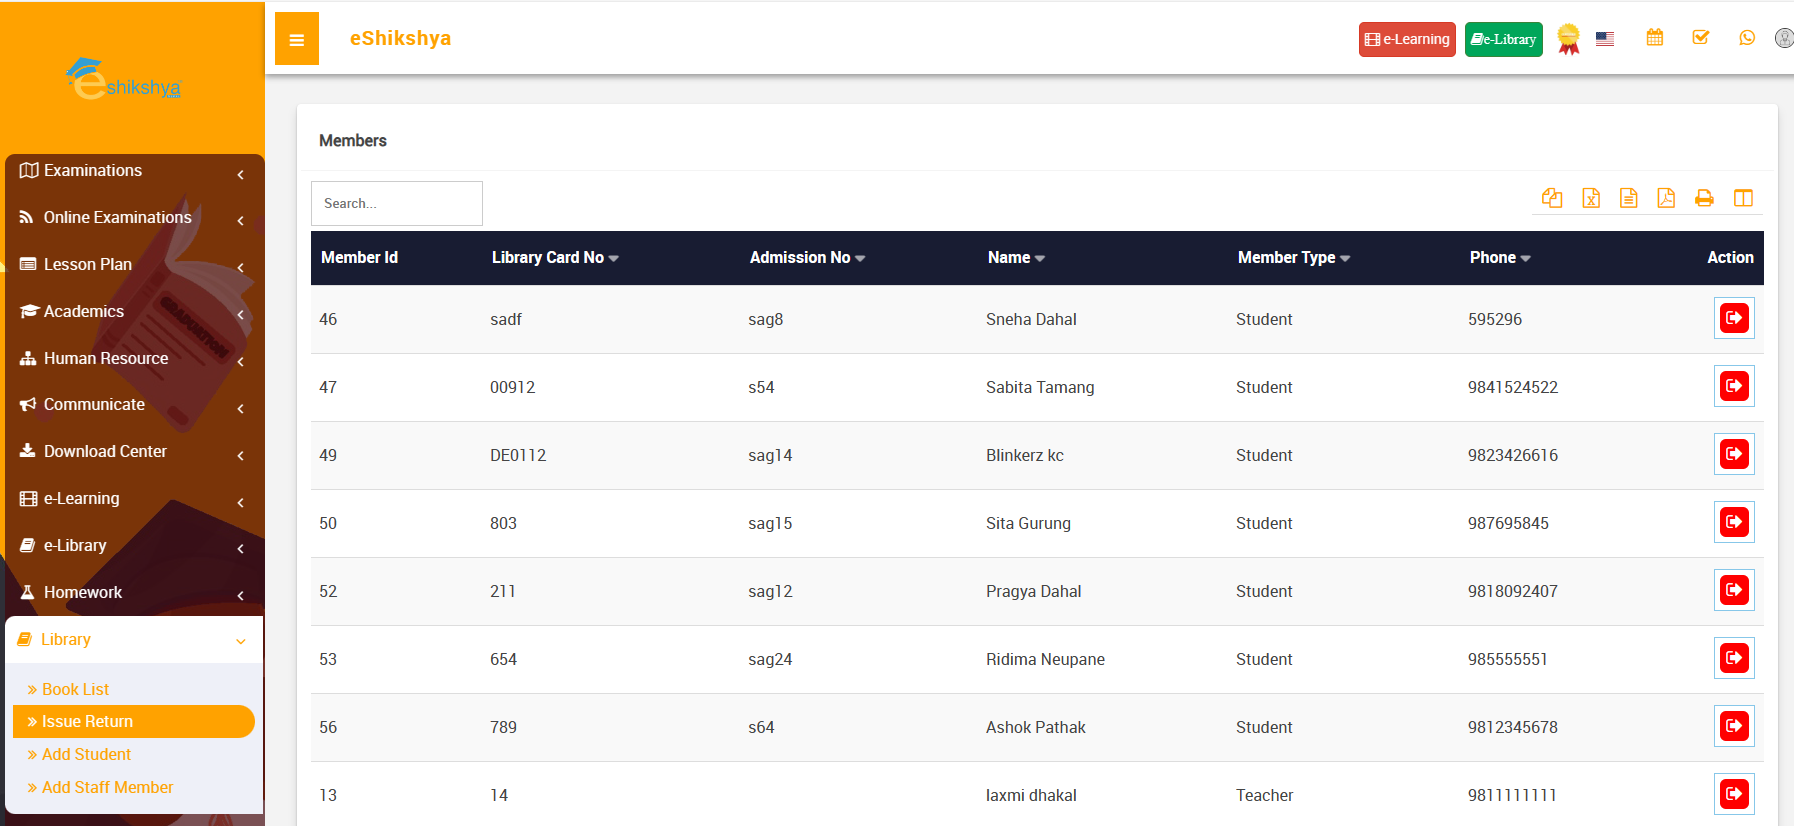 Image 88
- The list of all library members should appear with an action button the right corner.
- Click on the action button next to the person you want to issue/ return the book to. The following page should appear.
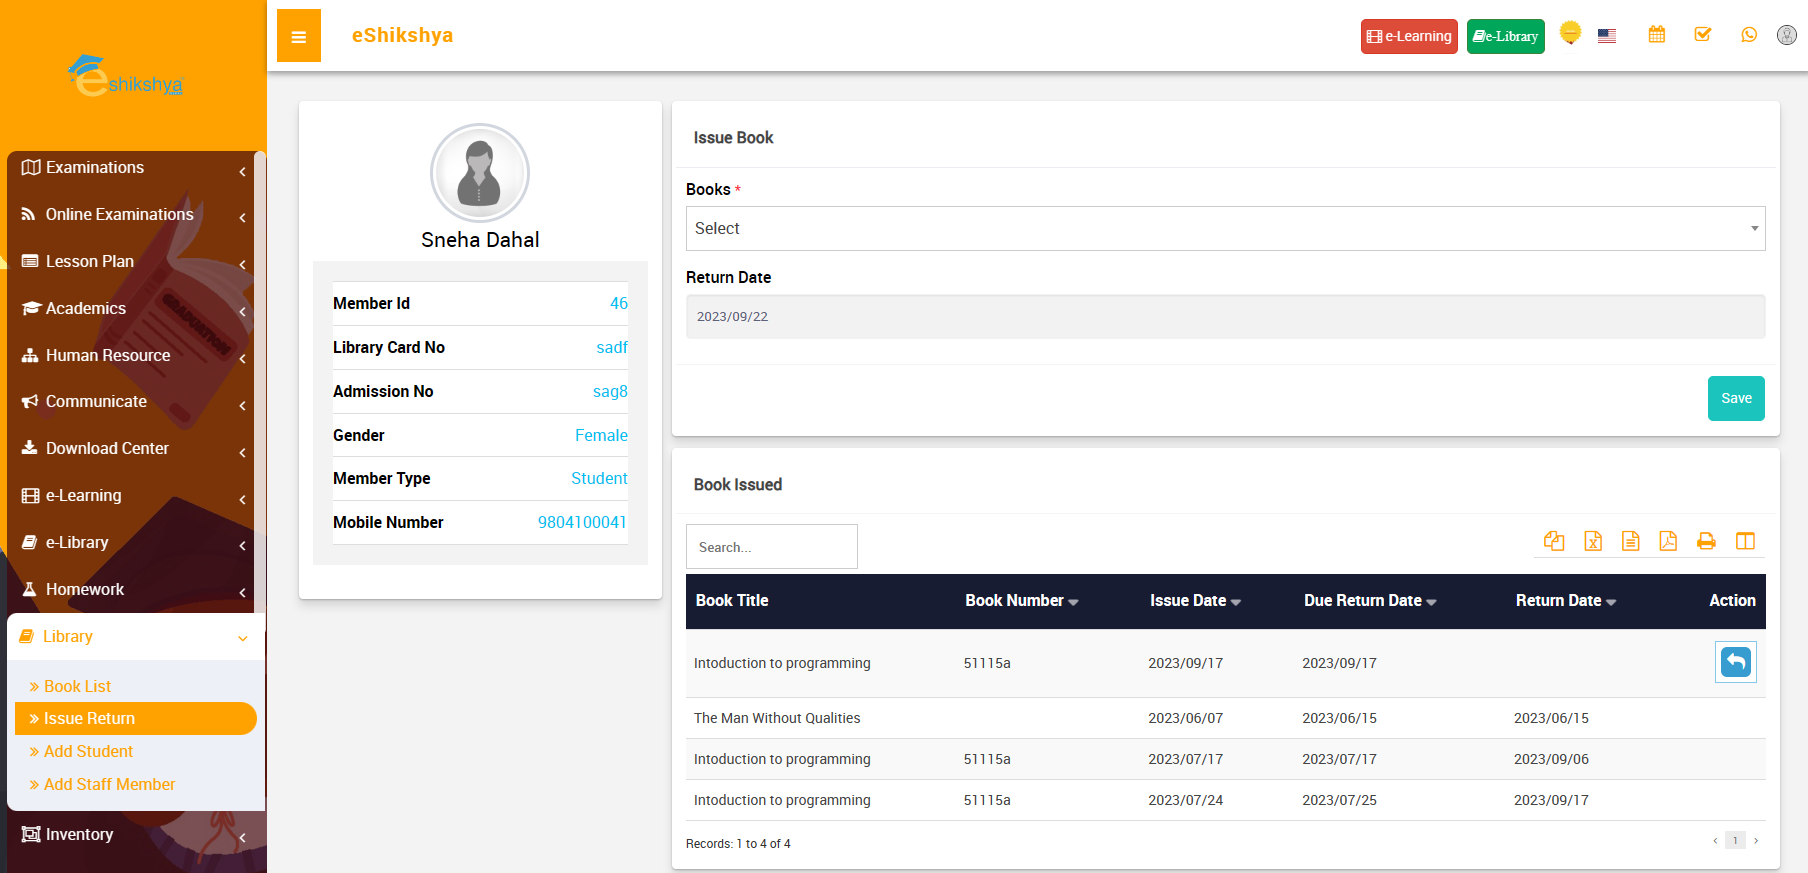 Image 89
- To issue a book to this member, select book from list selection on Books.
- Enter the return date for the book and click on save.
- The issued book should appear on the list of Issued books on the same page.
- On the list of issued books, If the book has not been retured yet, There should be an action button to return book.
- Click on the Return book action button to return the book.
Add Student
- To Add Students to library membership, go to Add Student. The following page should appear.
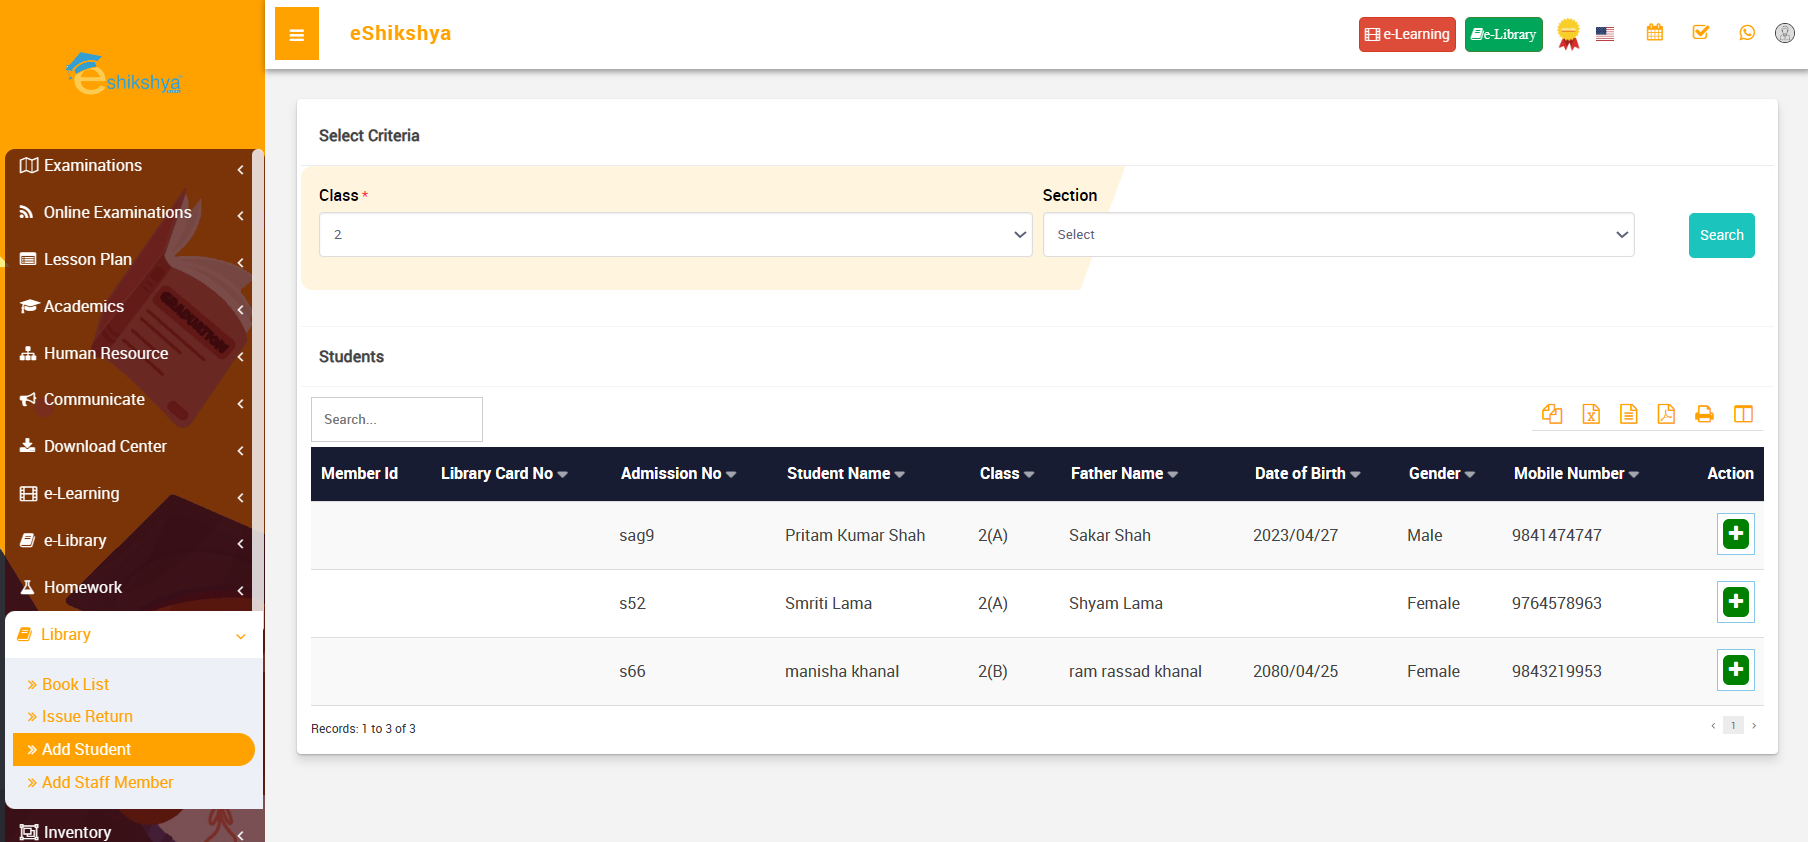 Image 90
- Click on + Action button next to the name of the student you want to add.
- A pop up to enter library card number as shown in the image below should appear.
 Image 91
- Enter the library card number and click on save.
Add Staff
- To Add Staff to library membership, go to Add Staff. The following page should appear.
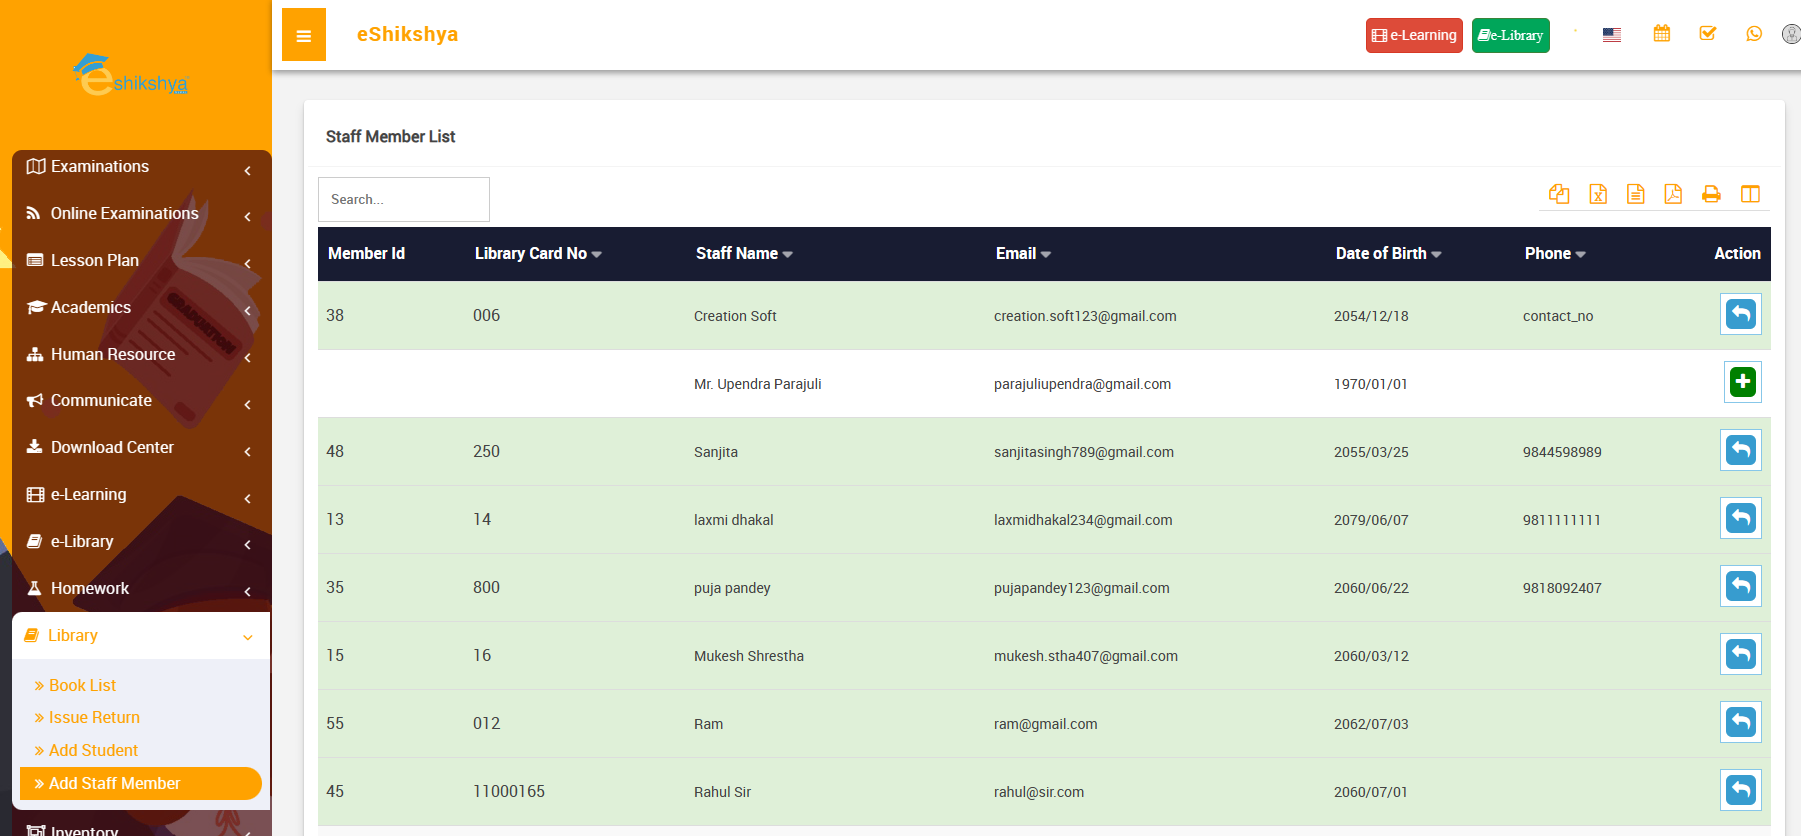 Image 92
- Click on + Action button next to the name of the student you want to add.
- A pop up to enter library card number as shown in the image below should appear.
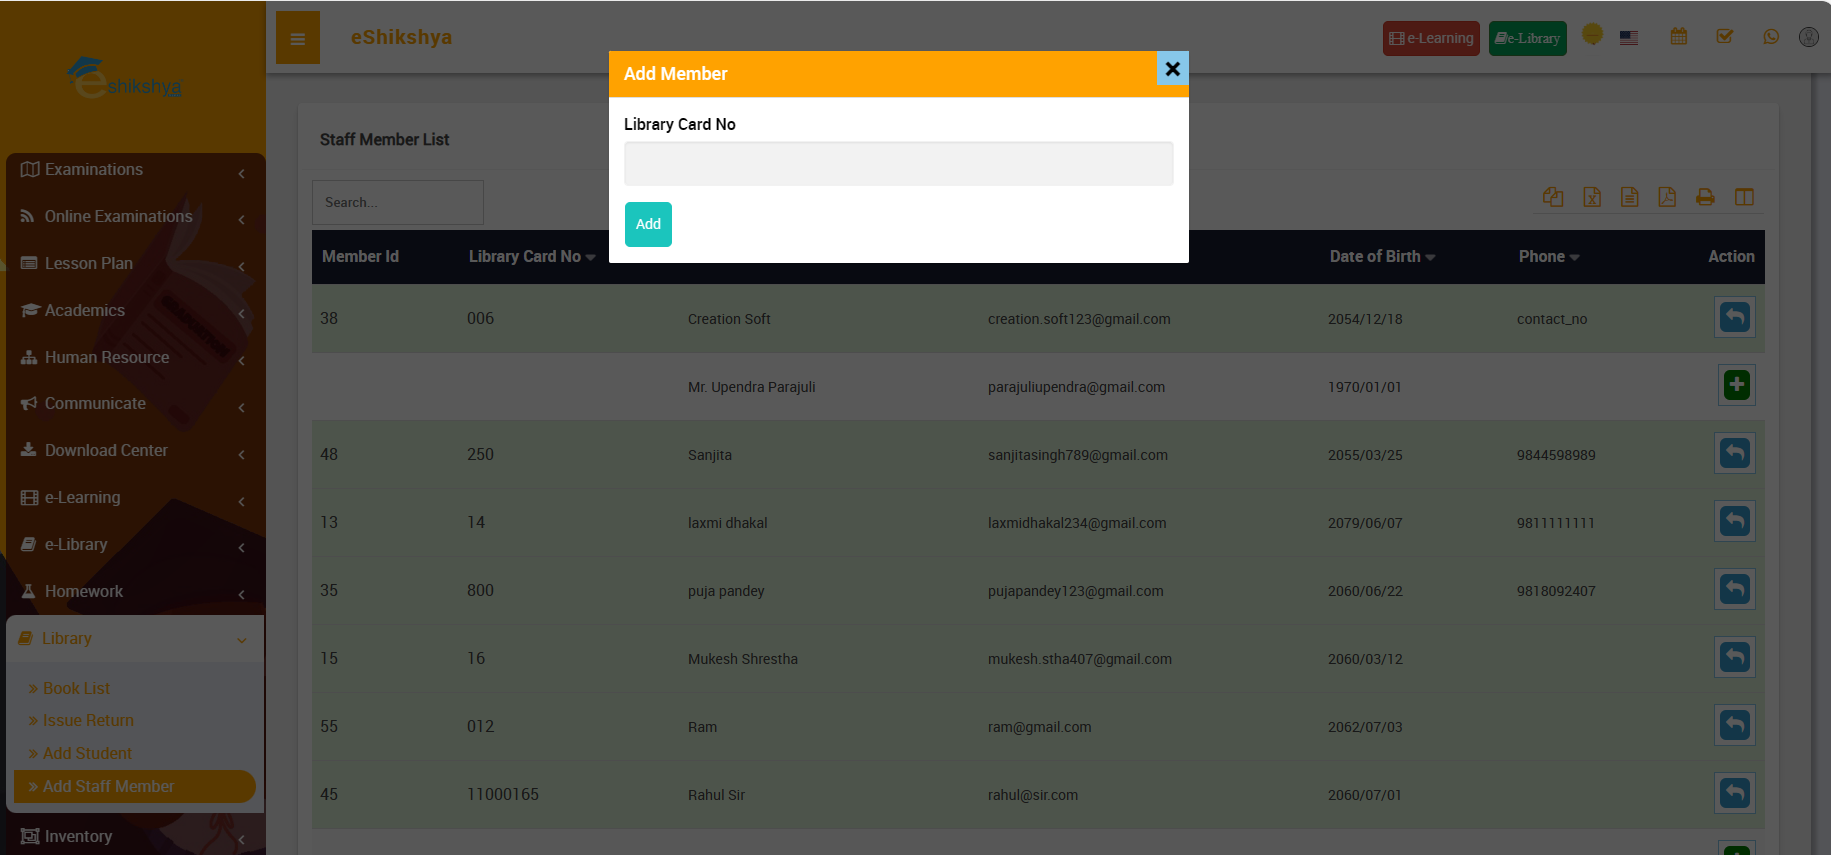 Image 93
- Enter the library card number and click on save.
Inventory
Issue item
You can keep the track of all the issued items and their details such as when they were issued and who they were issued by. This helps you keep an updated data in a managed format.
- To issue item or view the list of issues items, go to Issue item under Inverntory. The following page should appear.
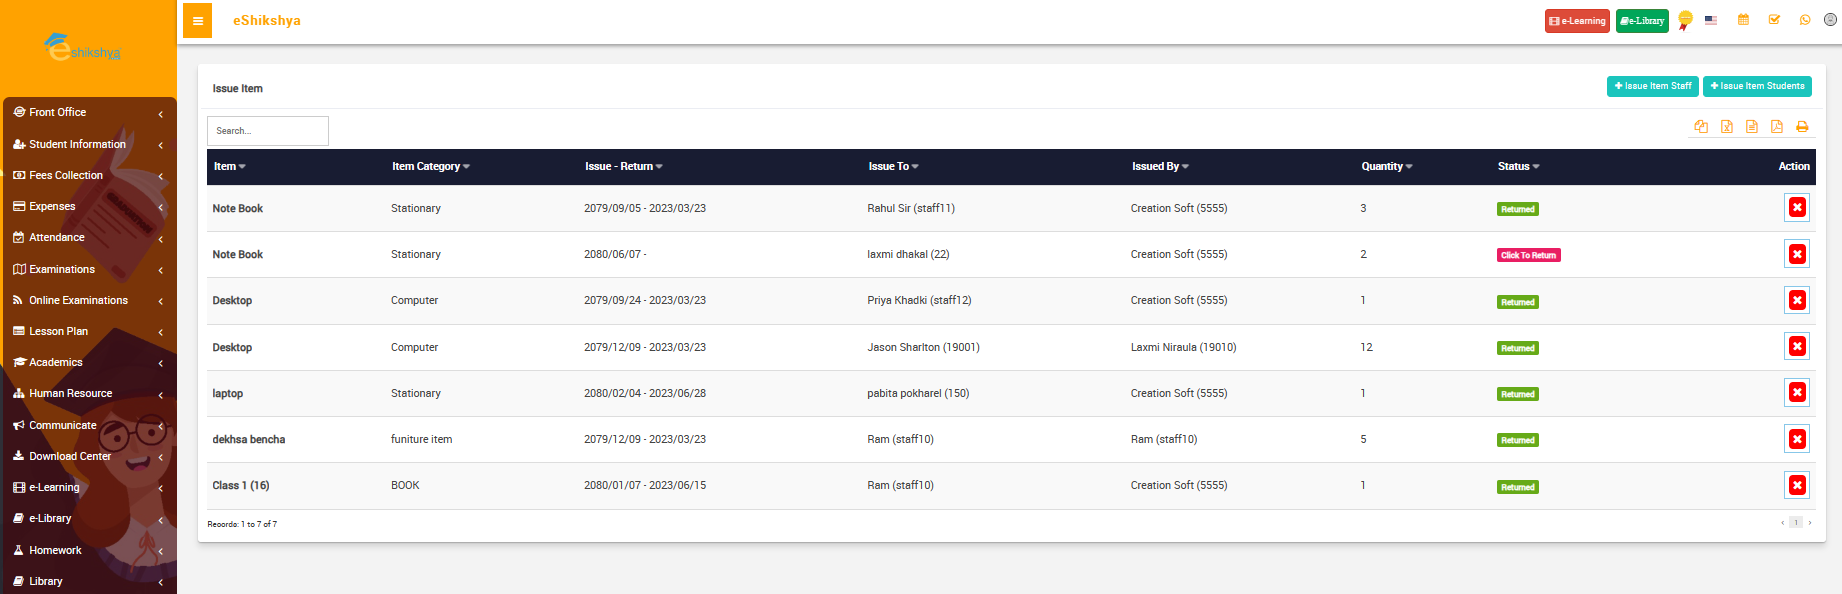 Image
Image
- As you can see on the image, there's a list of issued items with details such as when they were issued, who they were issued by and the quantity.
- On the top right of the page, there are two options, Issue Item Staff and Issue Item Students.
- If you want to add Staff issued item them click on Issue item Staff. The following page should appear.
 Image
Image
- Fill the fields of required information such as:
- User type: Type of staff that issued an item e.g., Librarian, Receptionist, Teacher, etc.
- Issued to: Name of the person who issues the item.
- Issued by:
- Issue date:
- Return Date:
- Note:
- Item Category: e.g., book, stationary, etc.
- Item: e.g., a4 paper, pencil, notebook, etc.
- Quantity: Number of the items issued.
- After you have filled up everything, click on save.
Add Item Stock
To update the items available in the inventory, go to Add Item Stock. The following page should appear.
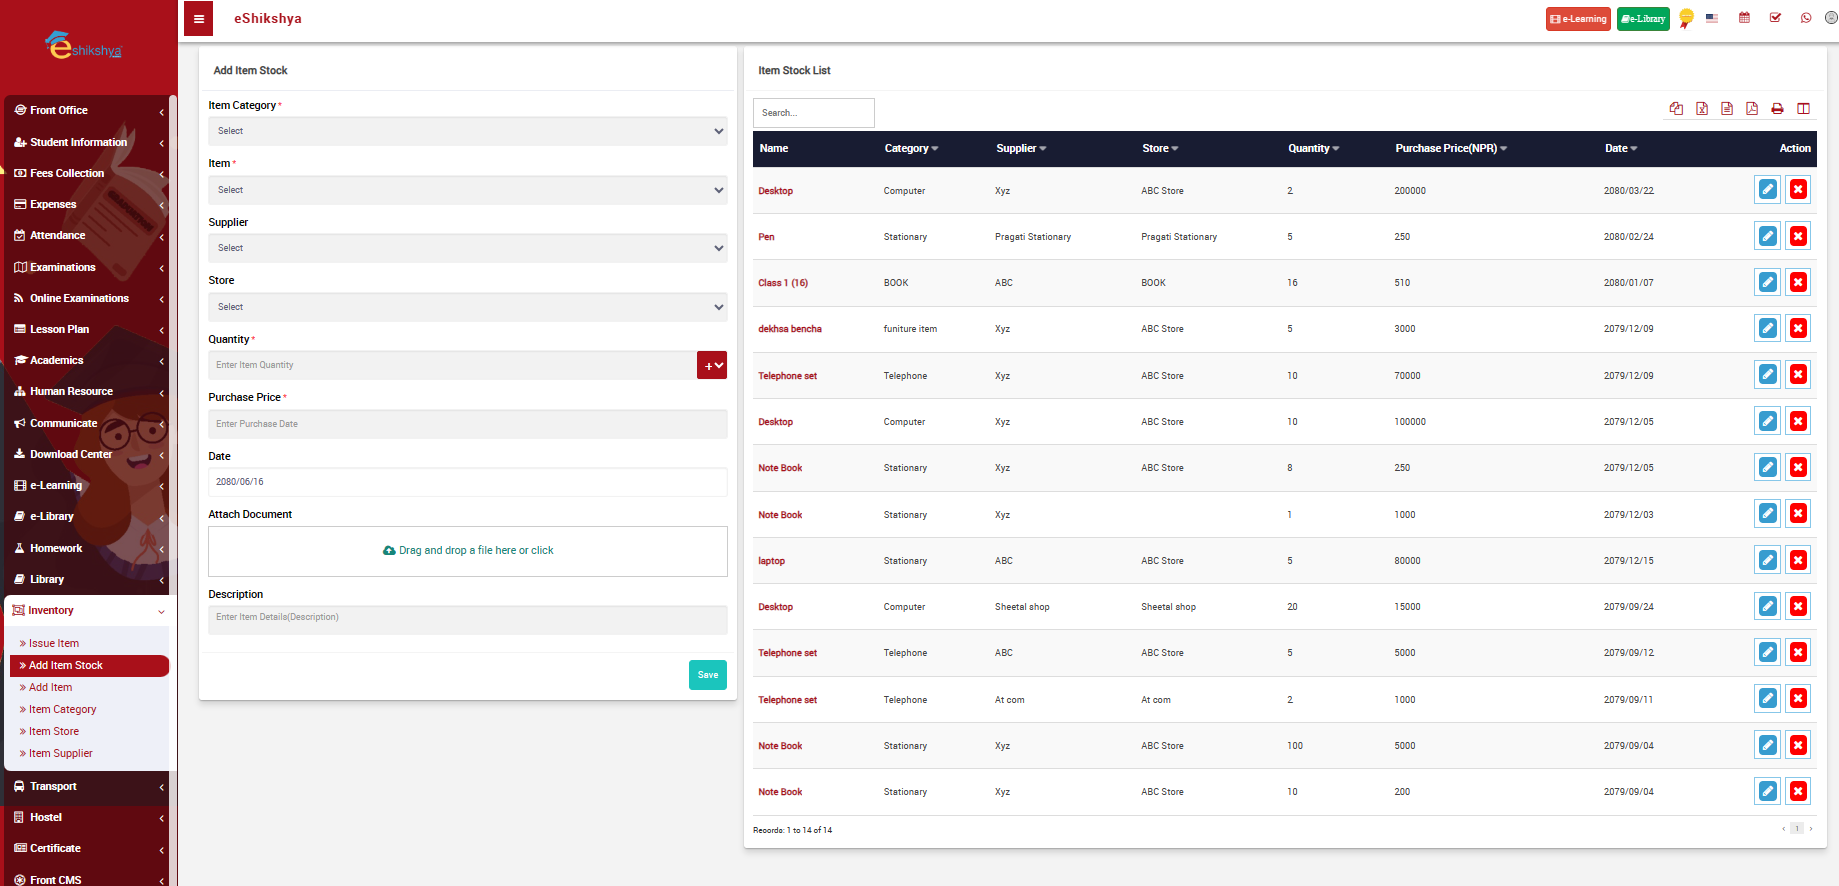 Image
Image
- The left side of the page contains a form to Add Item stock.
- You are required to fill details regarding the item such as
- Item Category: List selection
- Item: List selection
- Supplier: List selection
- Store: List selection
- Quantity
- Purchase price
- Date
- Once you click on save.
- The created item stock should appear on the list shown on the right side of the page.
Add Item
- Add Item stock requires you to select item from a list. The list can be set up in Add Item under Inventory. The following page will appear.
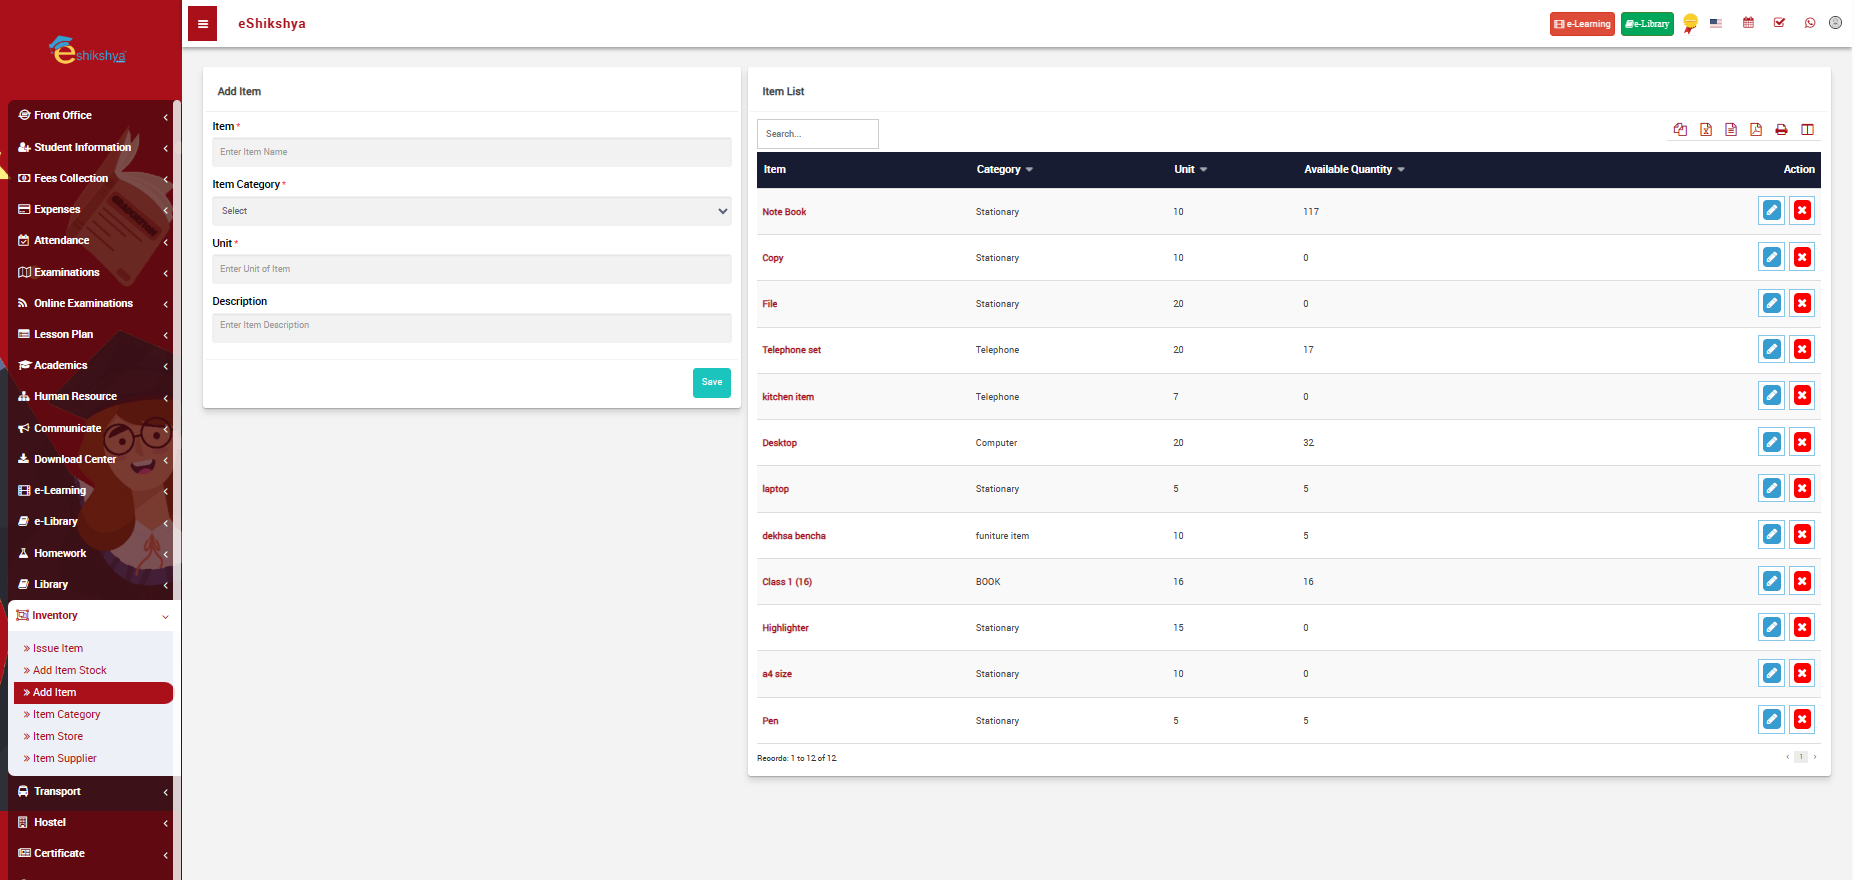 Image
Image
- On the left side of the page, you can see a form to add items. It requires you to add the following details:
- Item: Name of the Item
- Item category: List selection of what category the item falls in; i.e., stationary, kitchen, etc.
- Unit:
- Description: Give a desciption or side note if needed.
- After you fill in the details, click on save.
- The added Item should appear on the list of Items on the right side of the page with item details such as Item name, category, unit and quantity.
Add Category
- Add Item category requires you to select category from a list. The list can be set up in Add Category under Inventory. The following page will appear.
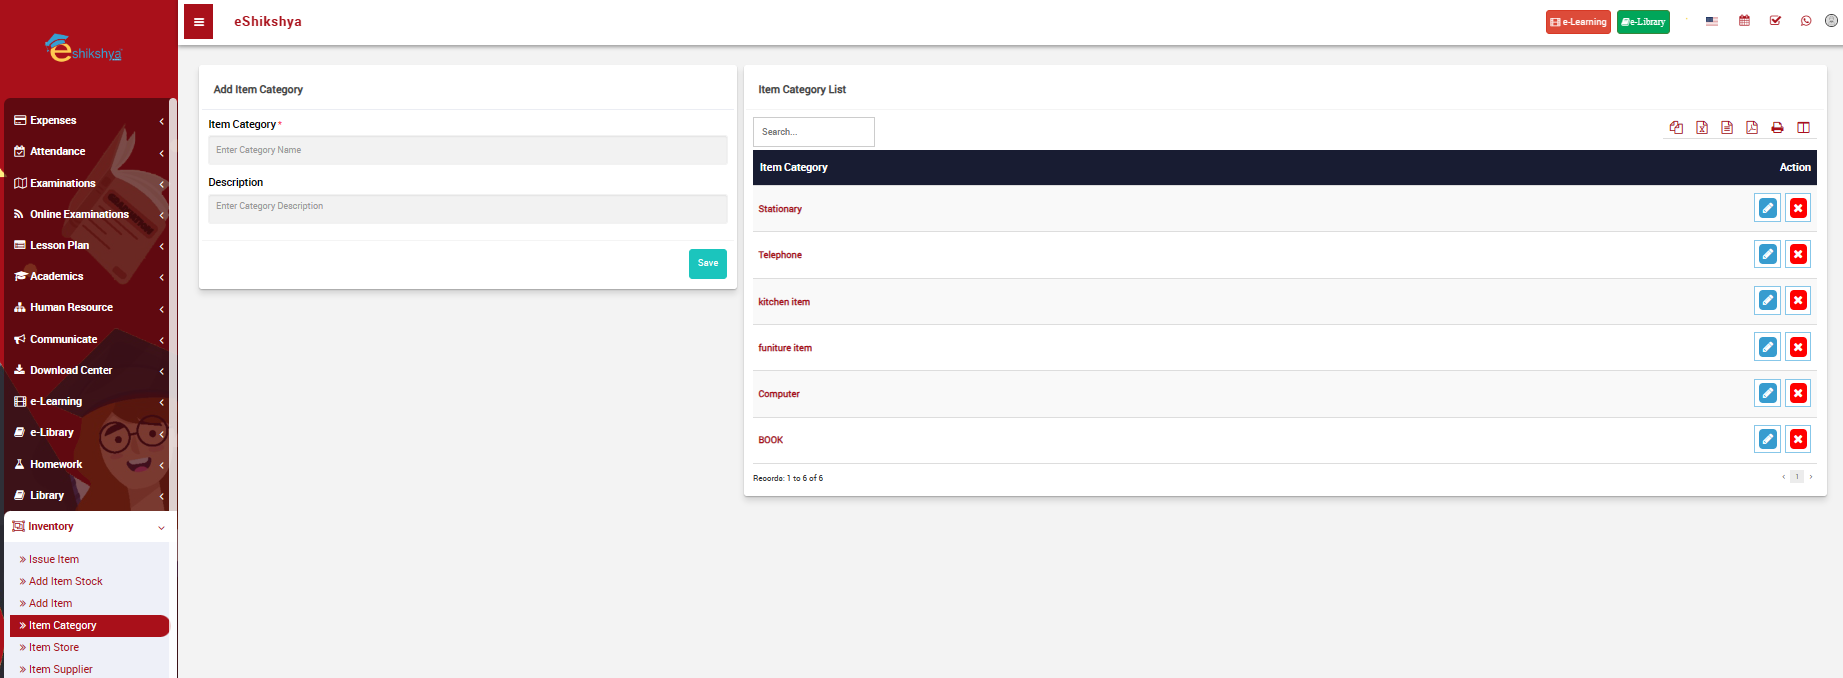 Image
Image
- On the left side of the page, you can see a form to add category. It requires you to add the following details:
- Item Category: Name of the Category
- Description: Give a desciption or side note if needed.
- After you fill in the details, click on save.
- The added Category should appear on the list of Categories on the right side of the page.
Item Store
- Add Item store requires you to select category from a list. The list can be set up in Add Category under Inventory. The following page will appear.
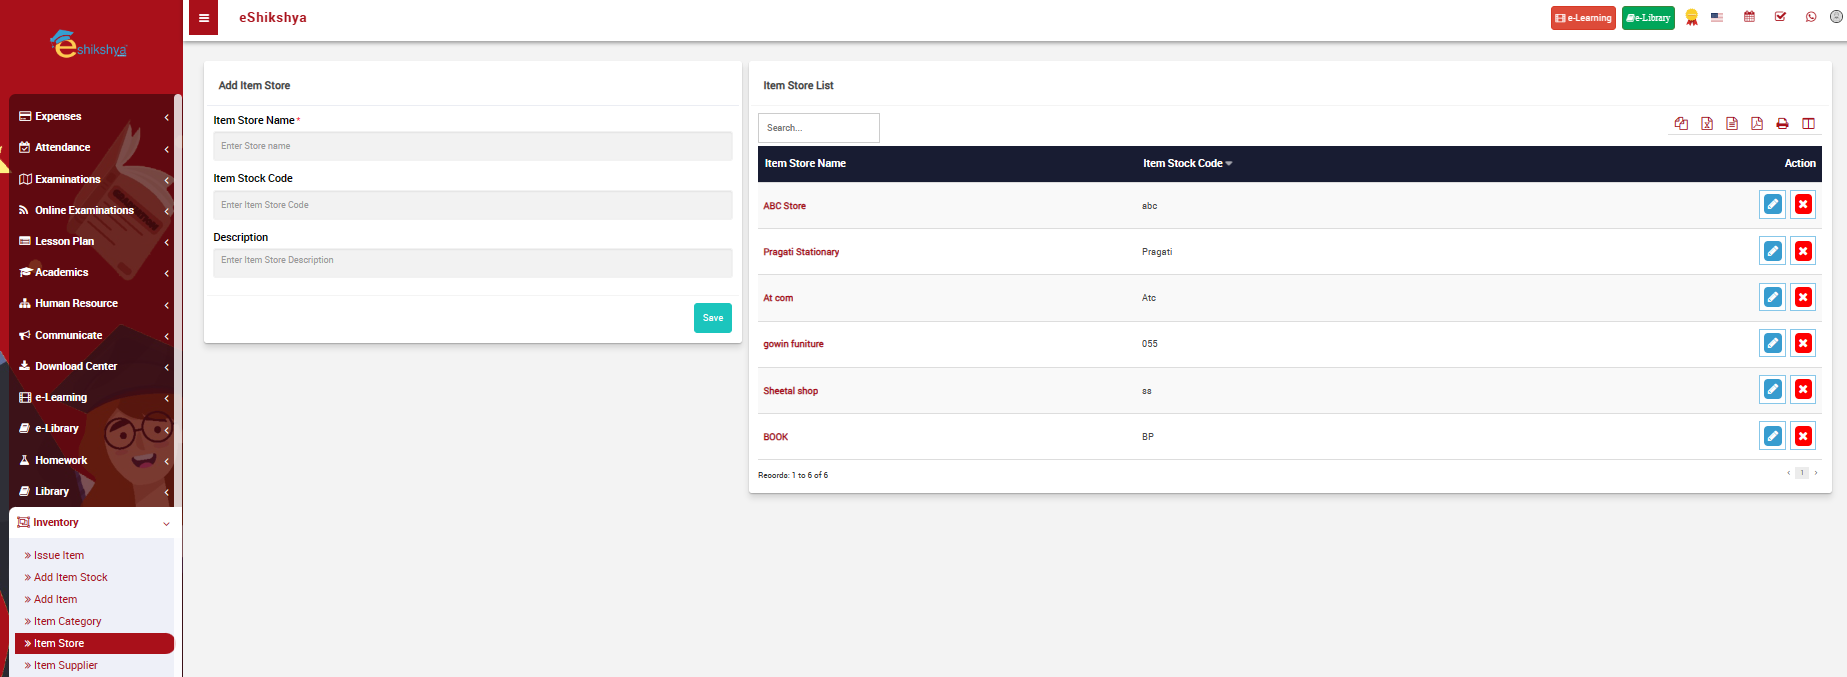 Image
Image
- On the left side of the page, you can see a form to add Item Store. It requires you to add the following details:
- Item Store Name: Name of the Category
- Item Stock code:
- Description: Give a desciption or side note if needed.
- After you fill in the details, click on save.
- The added Item Store should appear on the list of Item Store on the right side of the page.
Item Supplier
- Add Item supplier requires you to select category from a list. The list can be set up in Item Supplier under Inventory. The following page will appear.
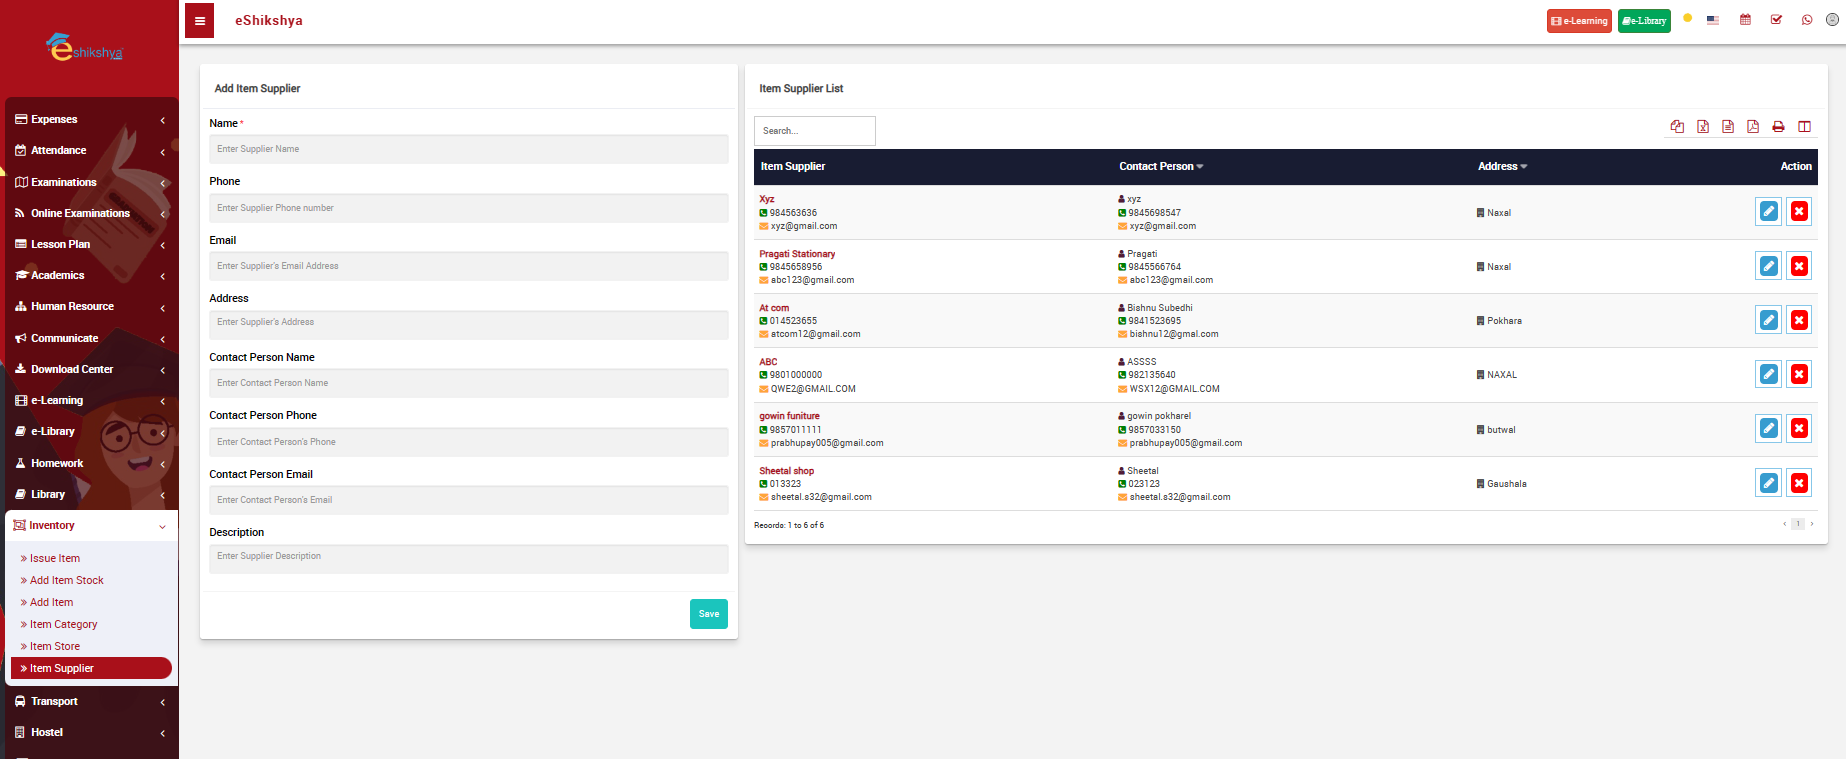 Image
Image
- On the left side of the page, you can see a form to add Item Supplier. It requires you to add the following details:
- Name: Name of the Supplier
- Phone: Supplier Phone number
- Email: Supplier email
- Address: Supplier address
- Contact person name: Contact person of the supplier
- Contact person phone: Giver person's phone number
- Contact person Email: Given person's email
- Description: Give a desciption or side note if needed.
- After you fill in the details, click on save.
- The added Item Supplier should appear on the list of Item Suppliers on the right side of the page.
Transport
Routes
- In order to define the school bus routes, go to Route under Transport. The following page should appear.
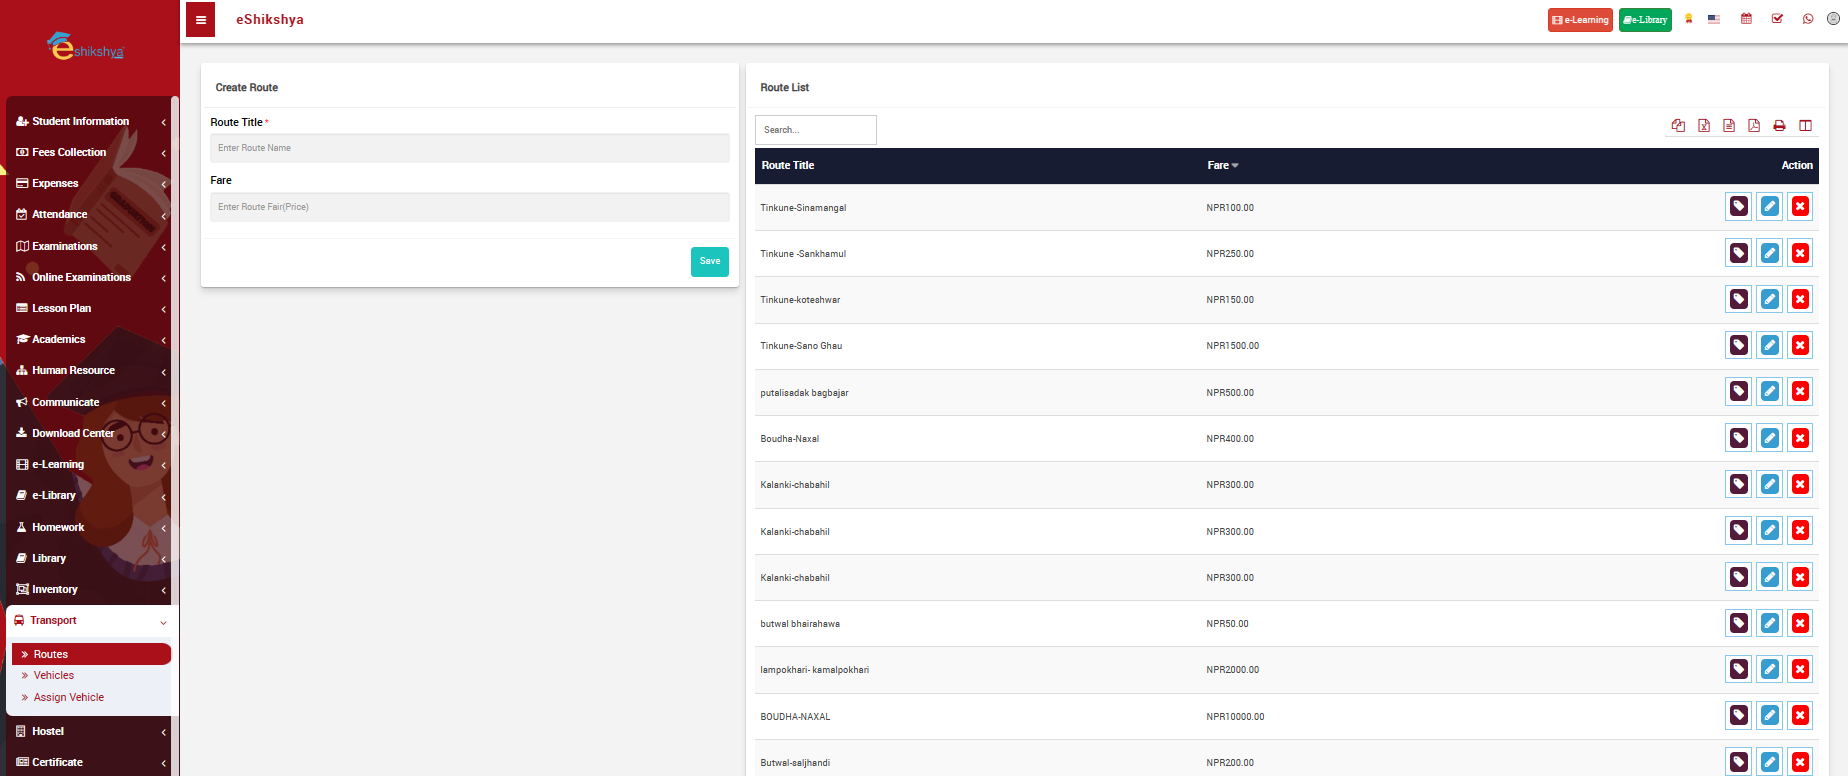 Image
Image
- The form on the left side of the page requires you to fill the following details:
- Route title: Name of the route
- Fare: Fare for the route
- Click on safe after you've filled up the form.
- The created route title should appear on the right side of the page as shown in the image below.
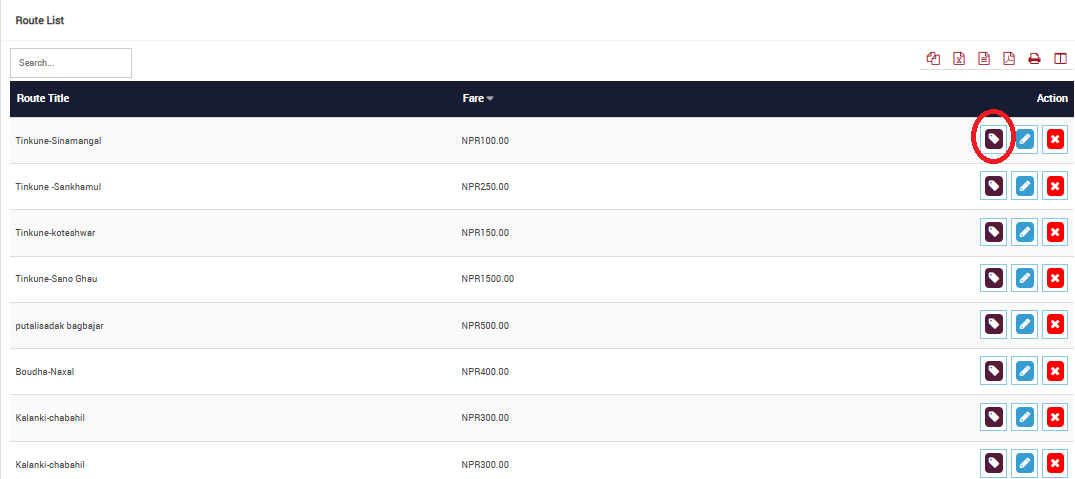 Image
Image
- The red circles option is an option that allows you to assign vehicle to students.
Vehicle
Vehicle details need to be added to the system in order to assign them to students and manage school bus record. In order to add vehicle go to Vehicles under transport. The following page should appear.
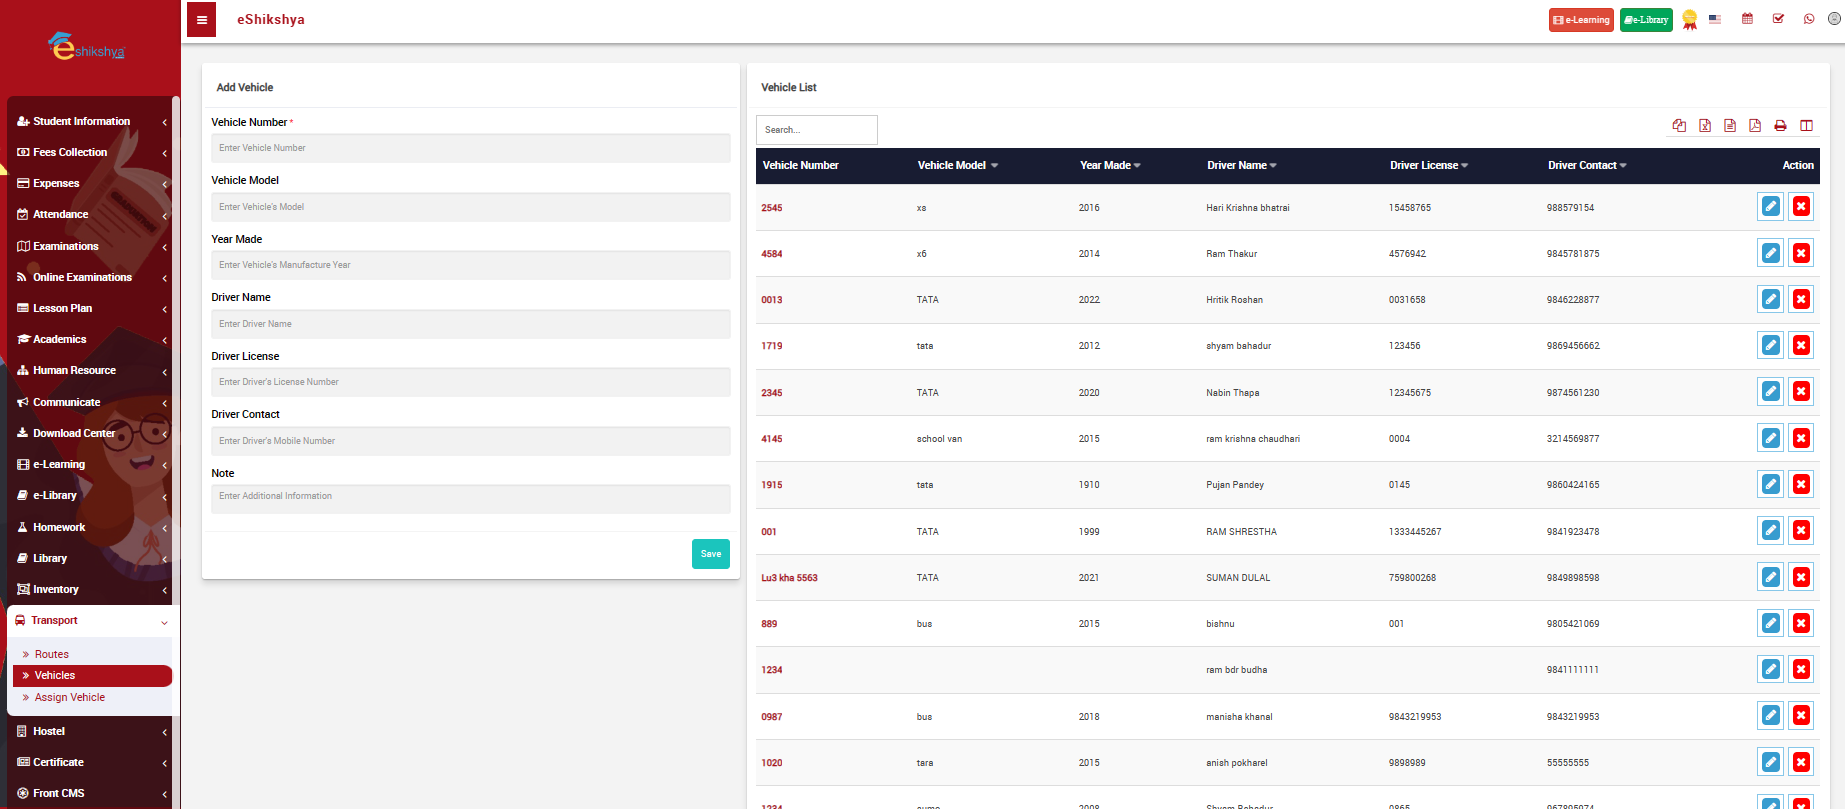 Image
Image
- On the left side of the page, you can see a form ti add vehicle details like Vehicle number, model, Driver name, Driver lucence, contact.
- Enter all the required details and click on save.
- The created Vehicle detail should appear on the right side of the page as shown in the image.
- Next to the Vehicle you have created, there's an action button where the blue button allows you to edit vehicle details and the red cross button allows you the delete vehicle details.
Assign Vehicle
Here you can assign vehicle according to Routes. Go to Assign vehicle under Transport, the following page should appear.
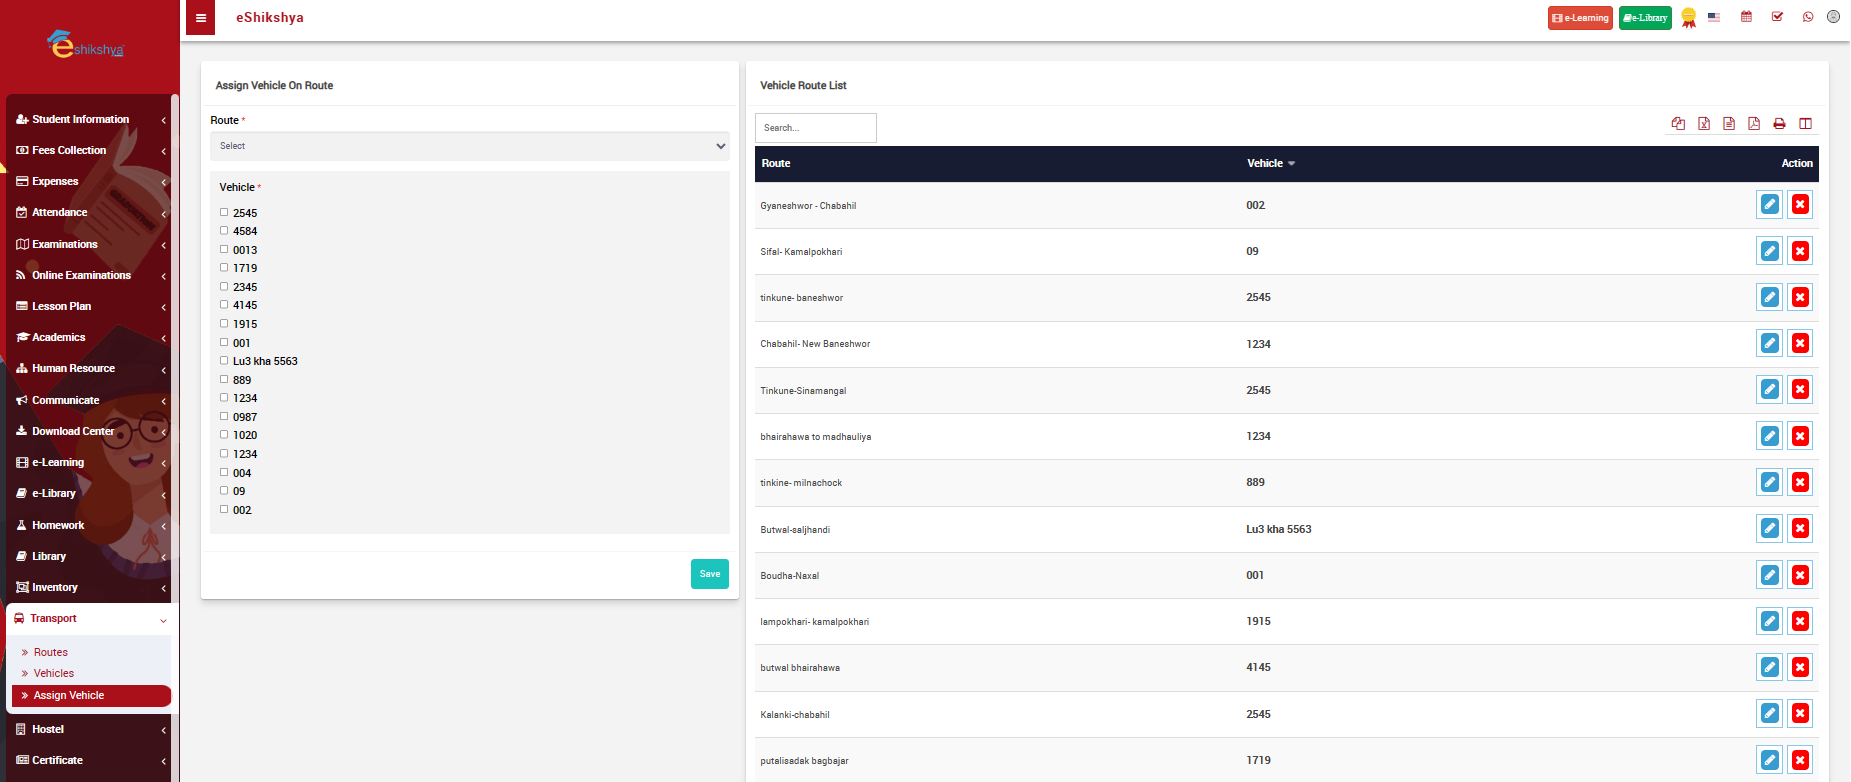 Image
Image
- On the lest side of the page there's Assign Vehicle on Route form.
- It requires you to select Route from a list.
- You are required to select vehicle number and click on save.
The assigned vehicle with its route should appear on a list on the right side of the page.
Hostel
Hostel Rooms
To add Hostel room details with cost, go to Hostel Rooms under Hostel. The following page should appear.
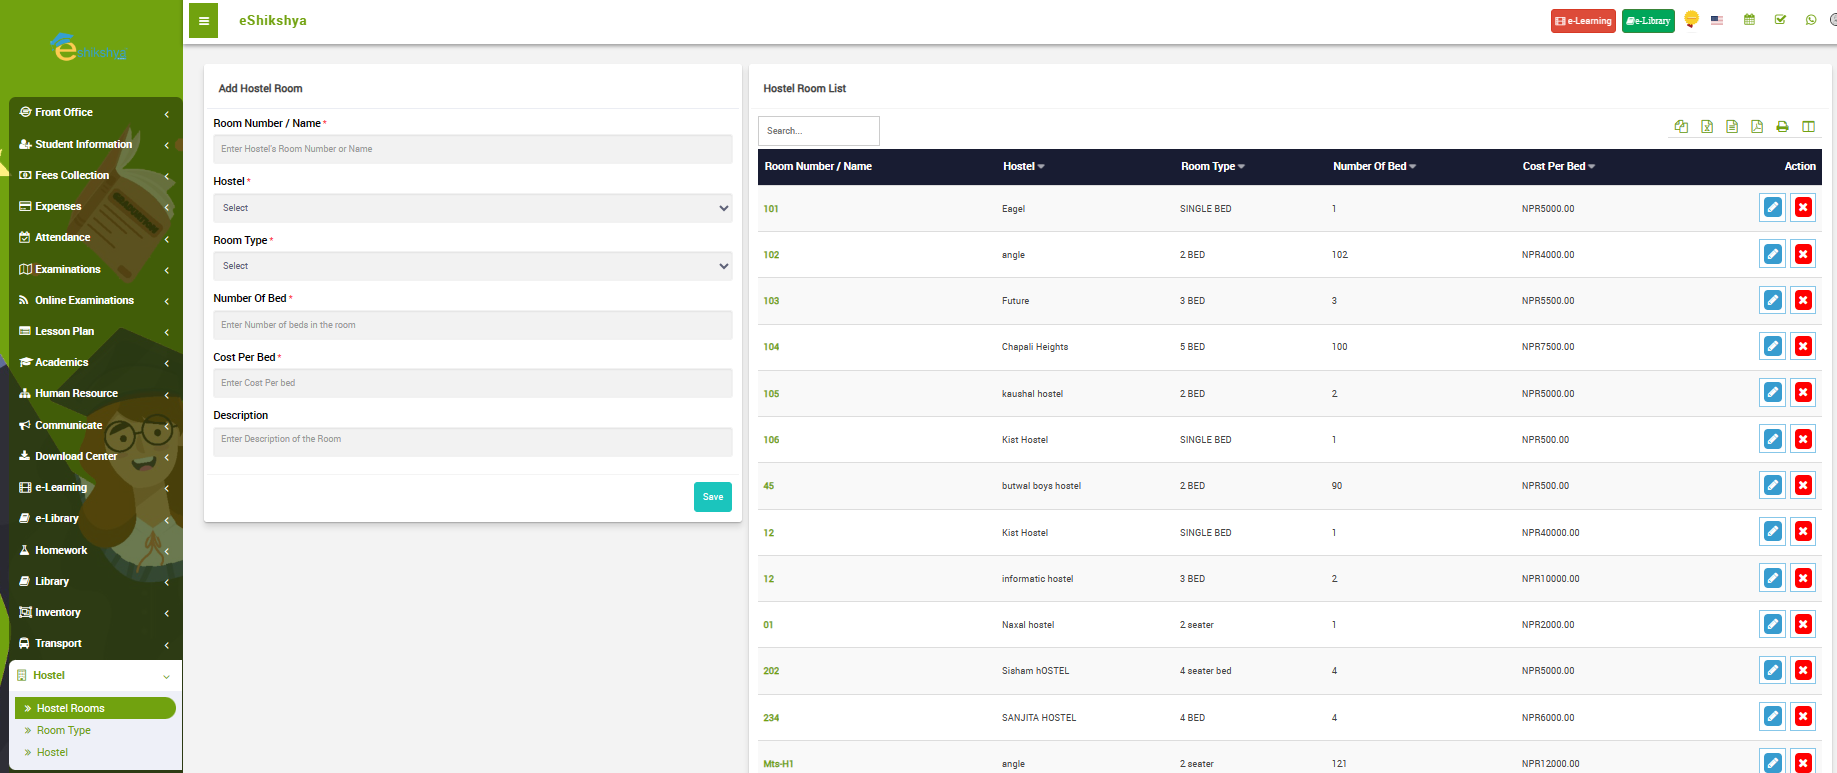 Image
Image
- On the left side of the page there's a form to add Hostel room which requires you to add the following details:
- Room Number/ Name: Allocate Room Number
- Hostel: Select name of the hostel from the list.
- Room Type: Select room type from the list (single sharing, double sharing, triple sharing)
- Number of bed: Assign number of beds to the room.
- Cost Per Bed: Assign cost per bed.
- After entering all the required details, click on save.
- The created Hostel Room should appear on the list on the right side of the page.
Room Type
In order to define the type of room; e.g, Single room, Double sharing room, etc. Go to Room type under Hostel. The following page should appear.
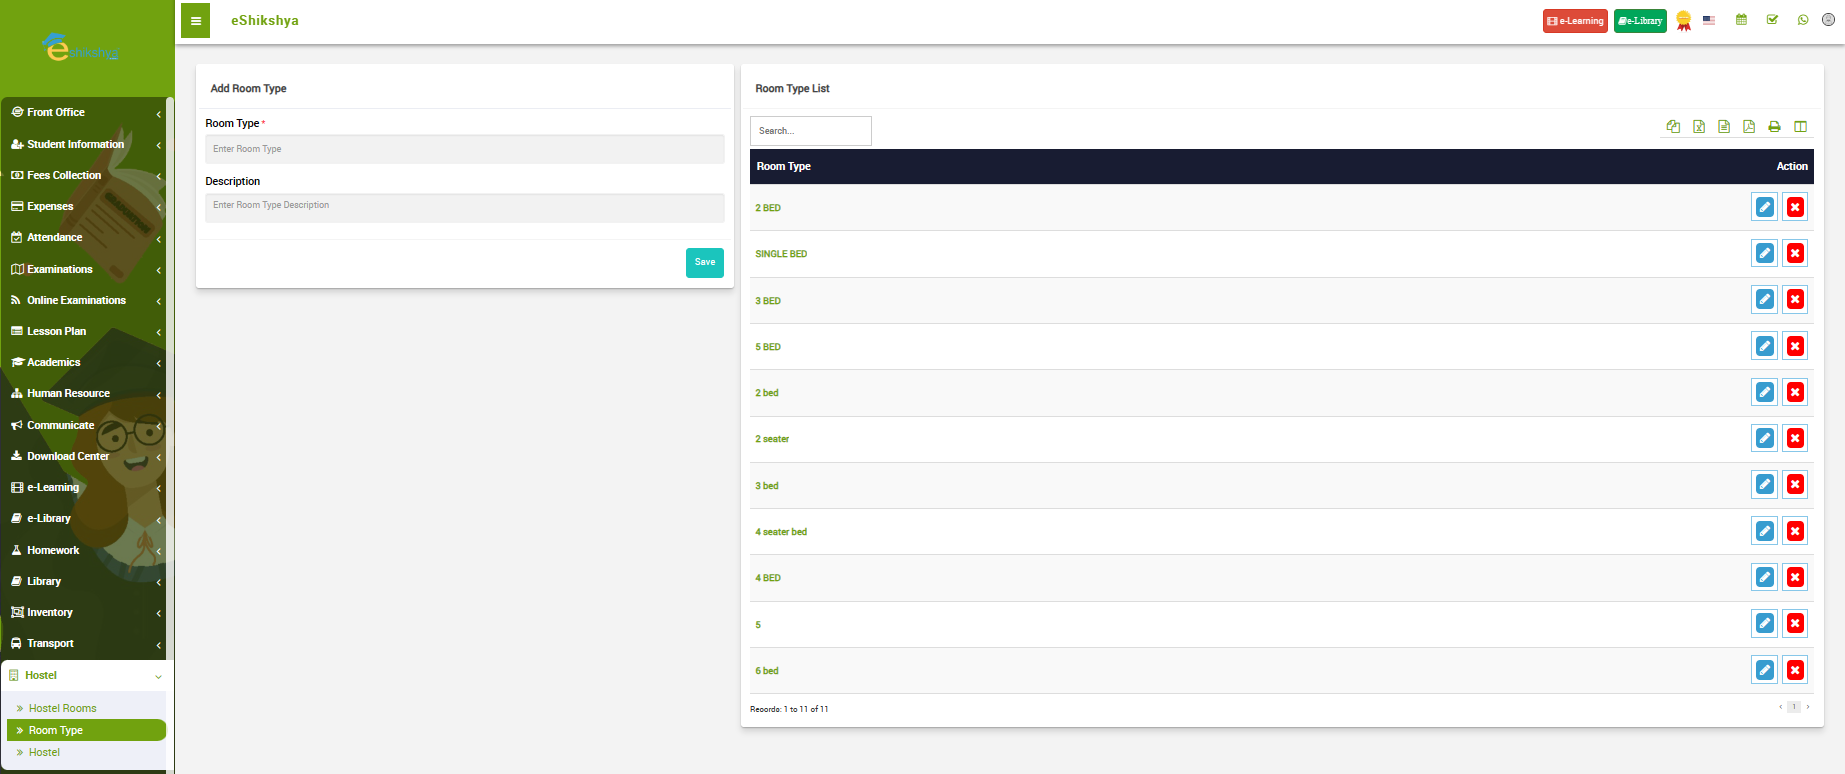 Image
Image
- On the left side of the page, ypu can see a Form to define room type.
- Fill the form and click o save.
- The created Room type should appear on the right side of the page as shown in the image above.
Hostel
In order to Add Hostel details, go to Hostel under Hostel on the nav bar. The following page should appear.
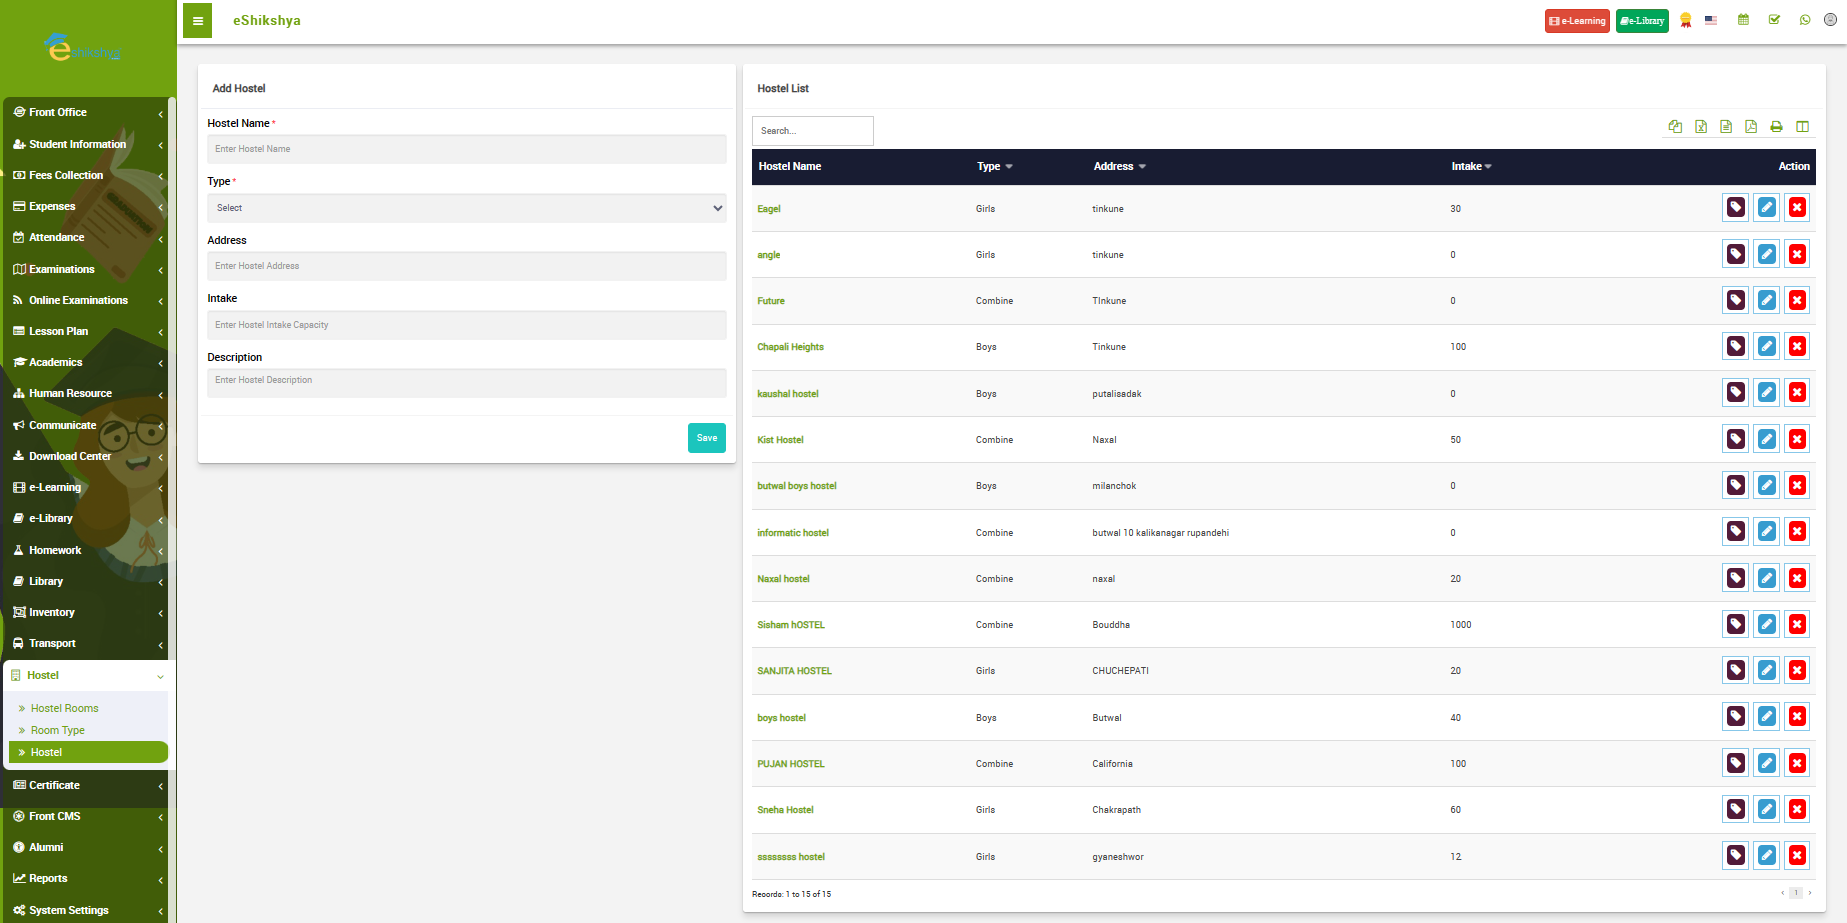 Image
Image
- On the left side of the page, there is a form to enter the follwing:
- Hostel name: Name of the hostel
- Type: List select hostel type boys or girl
- Address: Address of the hostel
- Intake: Capacity of the hostel.
- Click on save after entering the required details.
- The created hostel appears on the list on right side of the page as shown in the Image below.
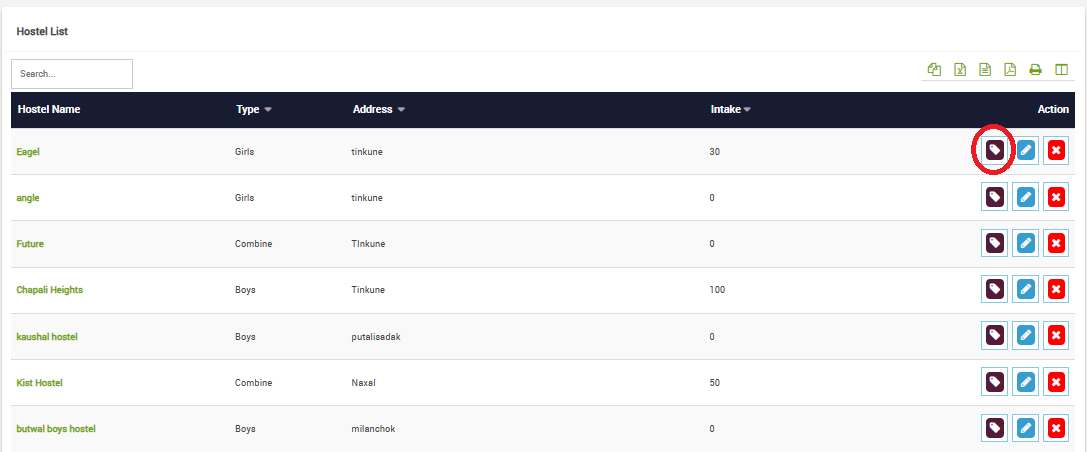 Image
Image
- Below the action button, there is an Assign student button as shown in the red circle.
- Clicking on that button redirects you to the page where you can Assin students to the hostel.
Certificate
Student Certificate
This is the section where you can customize student certificates for different occasions. To add new certificate, go to Student certificate under Certificate. The following page should appear.
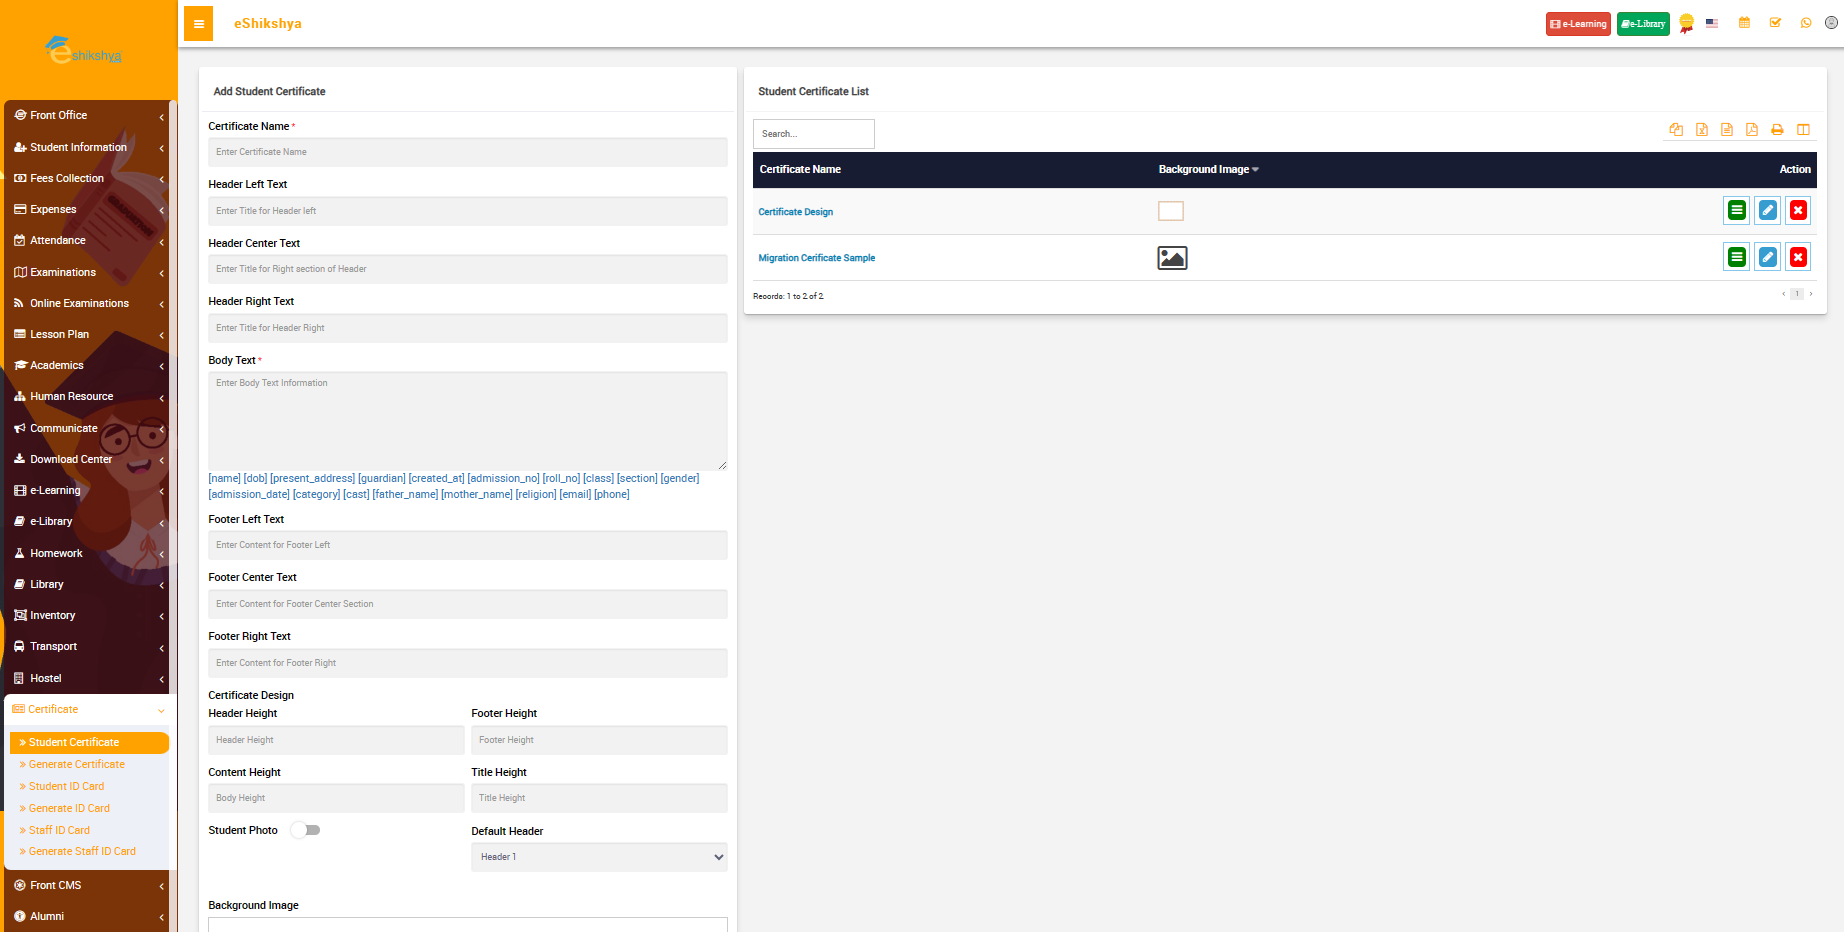 Image
Image
- As seen on the image, there is a form on the left side of the page to add new certificate which asks for the following details.
- Certificate name: This is the name of the certificate, which helps in identifying the purpose of the certificate, for example, "Attendance Certificate", "Achievement Certificate", etc.
- Header Left Text: The text that appears on the left side of the header.
- Header Center Text:The text that appears on the center of the header.
- Header Right text: The text that appears on the right side of the header.
- Body Text: This is the main content of the certificate. It includes details such as the recipient's name, the reason for the award, date, and any other relevant information.
- Footer Left text: The text that appears on the left side of the footer.
- Footer center text: The text that appears on the center of the footer.
- Footer Right Text: The text that appears on the right side of the footer.
Certificate Design - Header Height: The height of the header section.
- Footer height: The height of the footer section.
- Contents Height: The height of the body content section.
- Title Height: The height of the title text
- Background Image: Here you can upload the background image for the certificate.
- The created certificate should appear on a list on the right side of the page.
With these customization options, a school can create a variety of certificates for different occasions and ensure that they look professional and are tailored to the event or achievement they are recognizing.
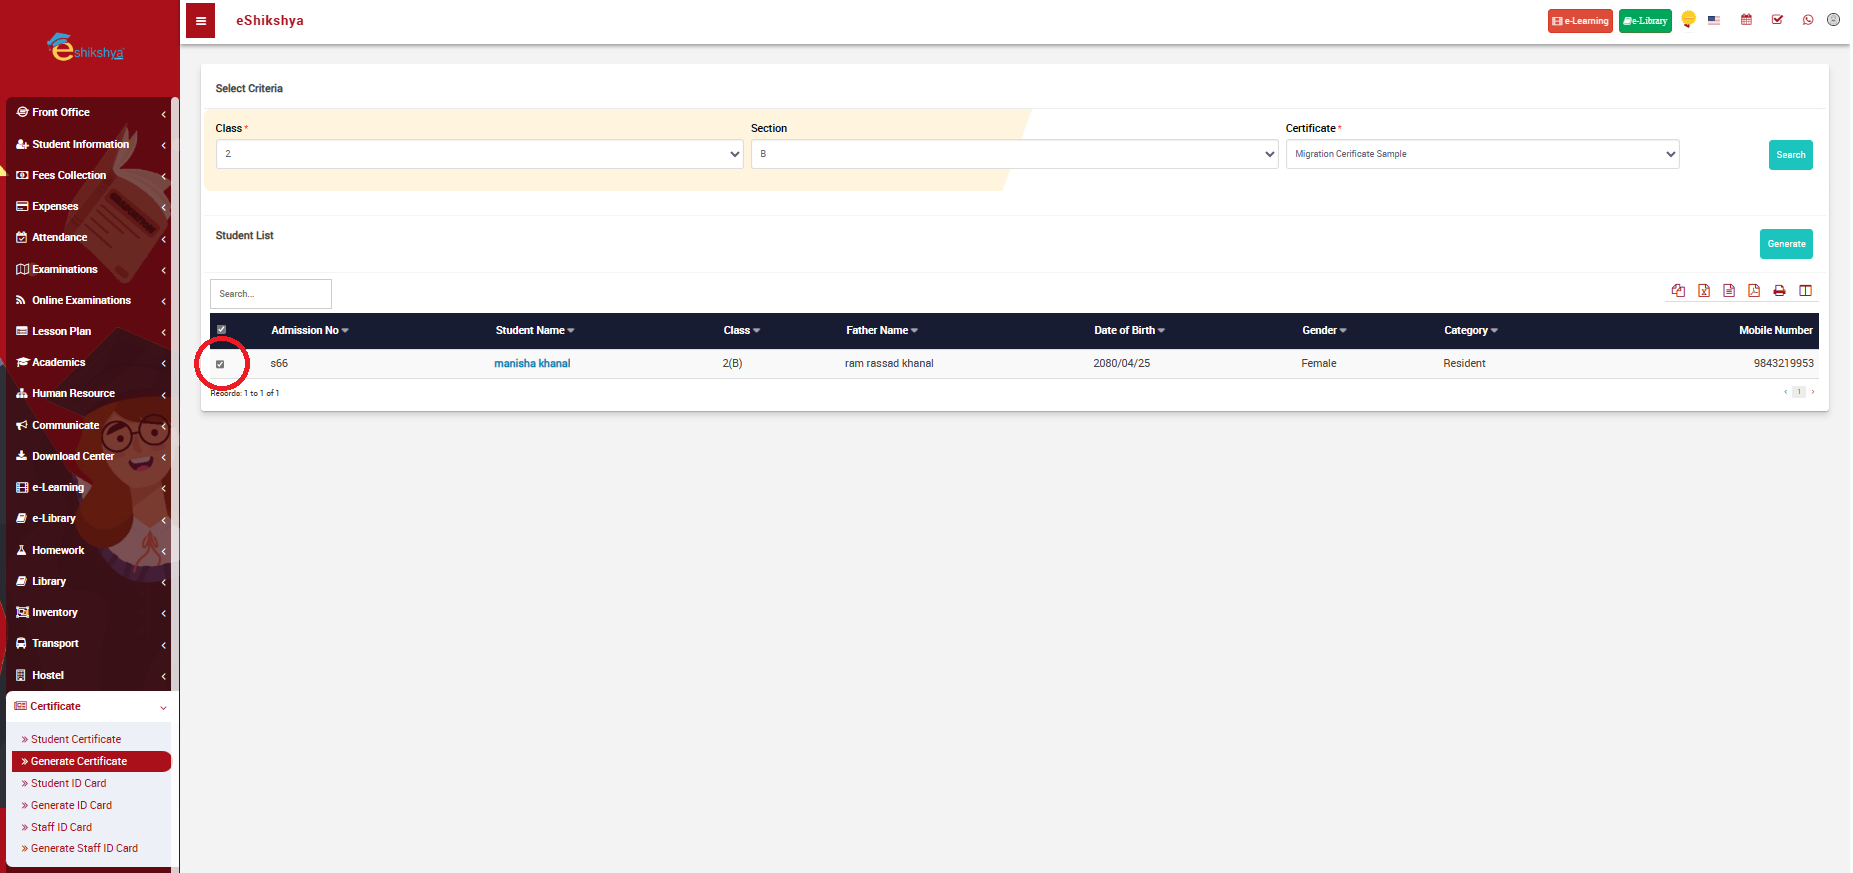
Generate Certificate
To generate certificate for specific students, go to generate certificate under Certificate. The following page should appear.
 Image
Image
- On the top of the page, there's a filter to select criteria i.e, Class, Section and The type of certificate you want to generate.
- Once you click on search, A list of students for the classs you've selected will appear.
- On the image, you can see that on the filter, I have chosen students of class 2, section B and Cetificate type is Migration.
- On the list below, Select the student you want to generate the certificate for.
- Then click on generate.
- The following page should appear once you click on generate.
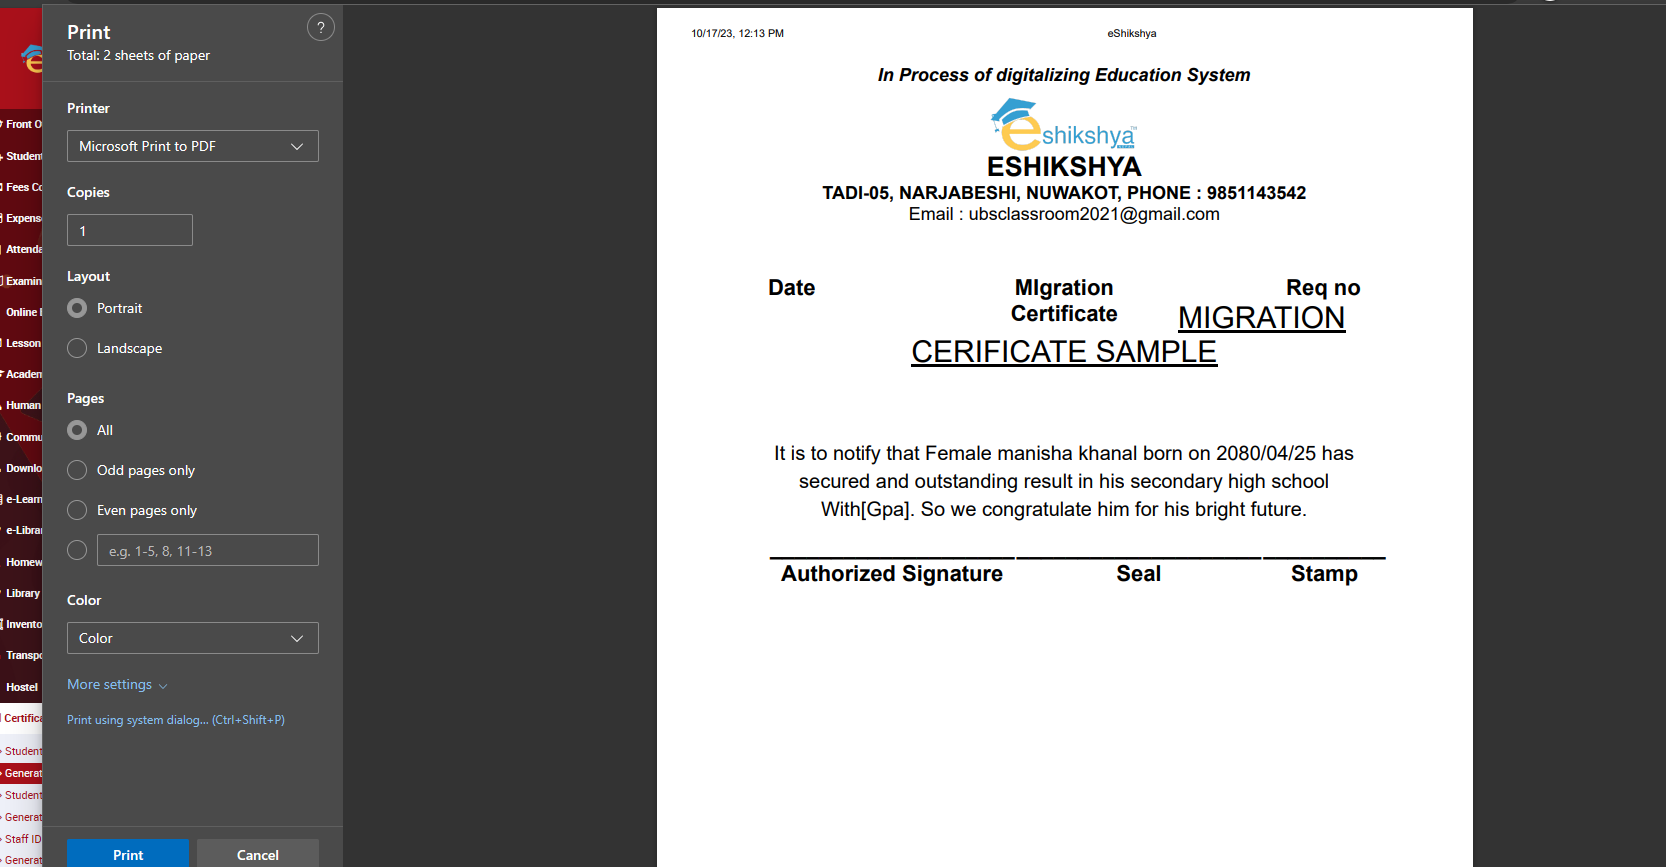 Image
Image
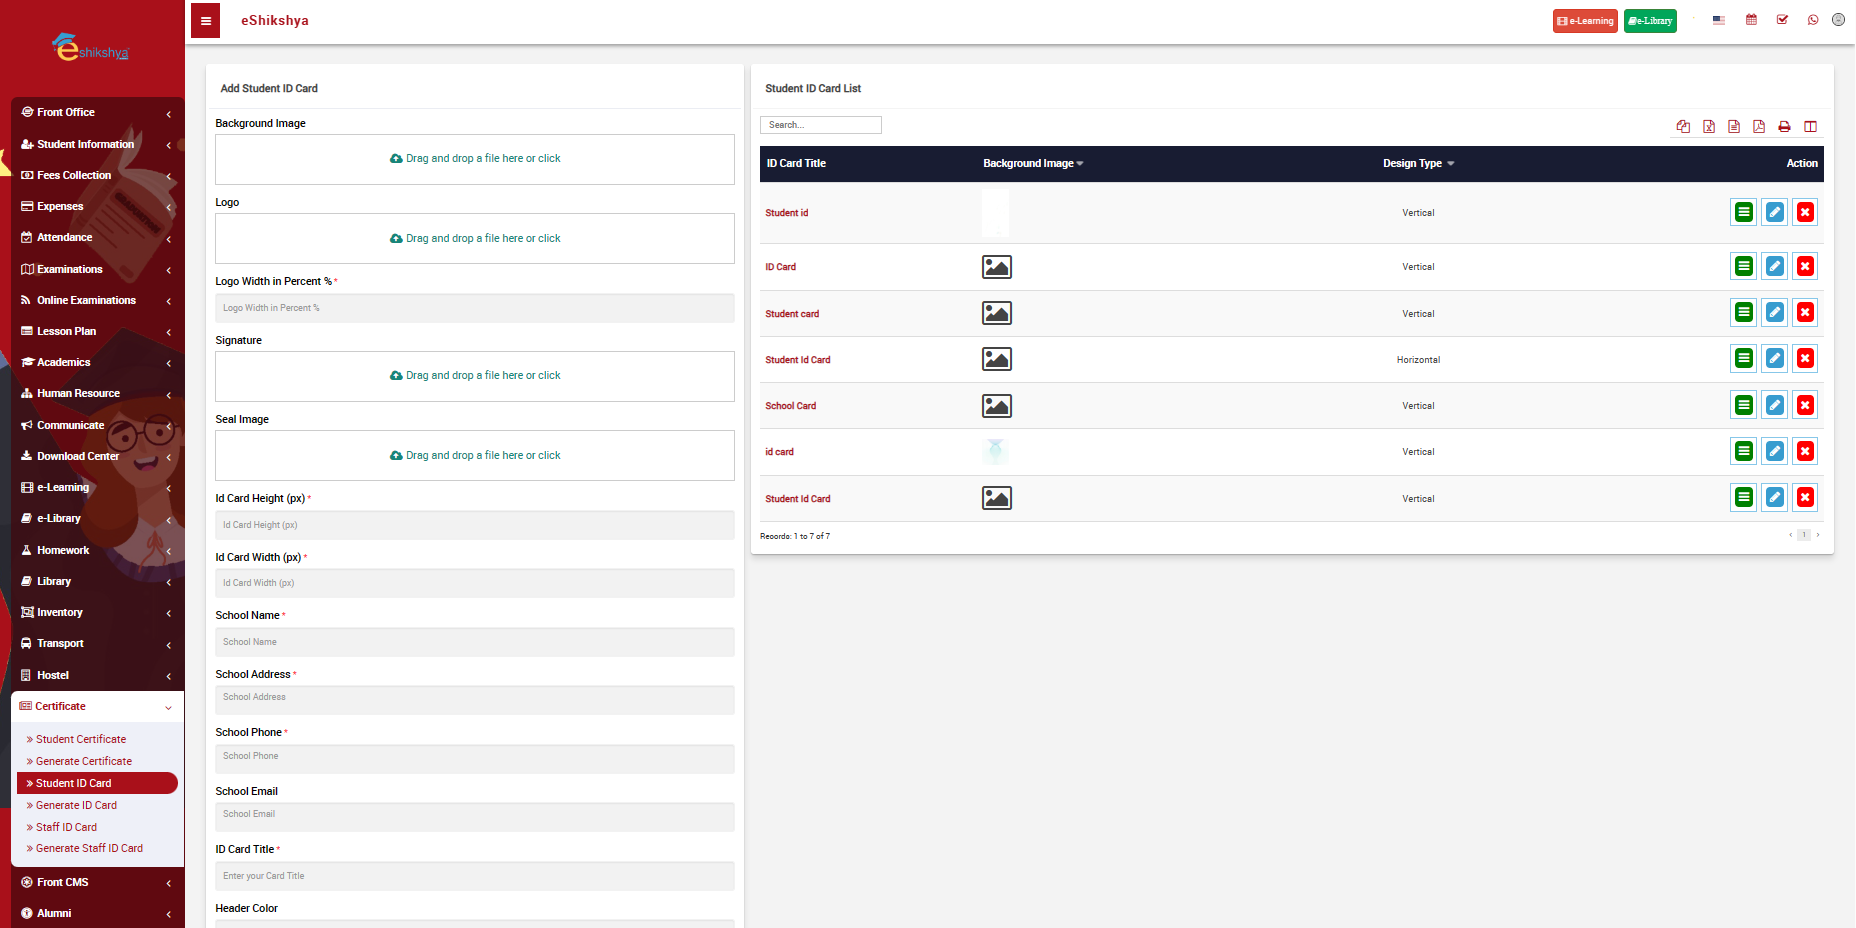
Student ID Card
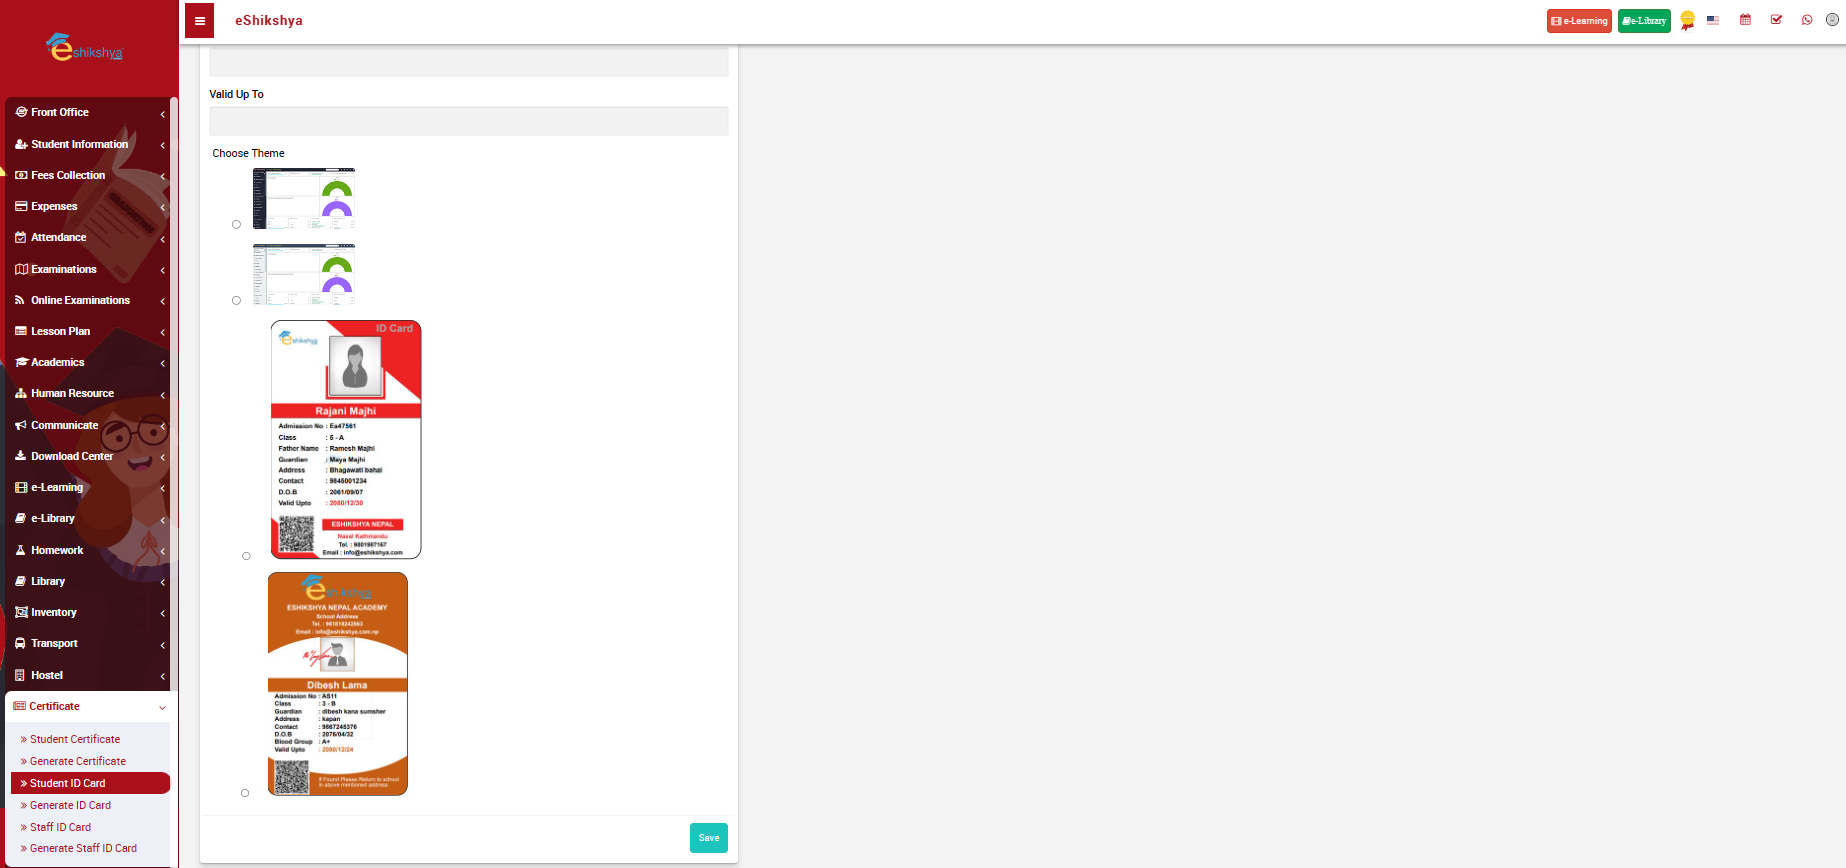
To design ID card for students, go to Student ID card under Certificate. The following page should appear.
 Image
Image
 Image
Image
 Image
Image
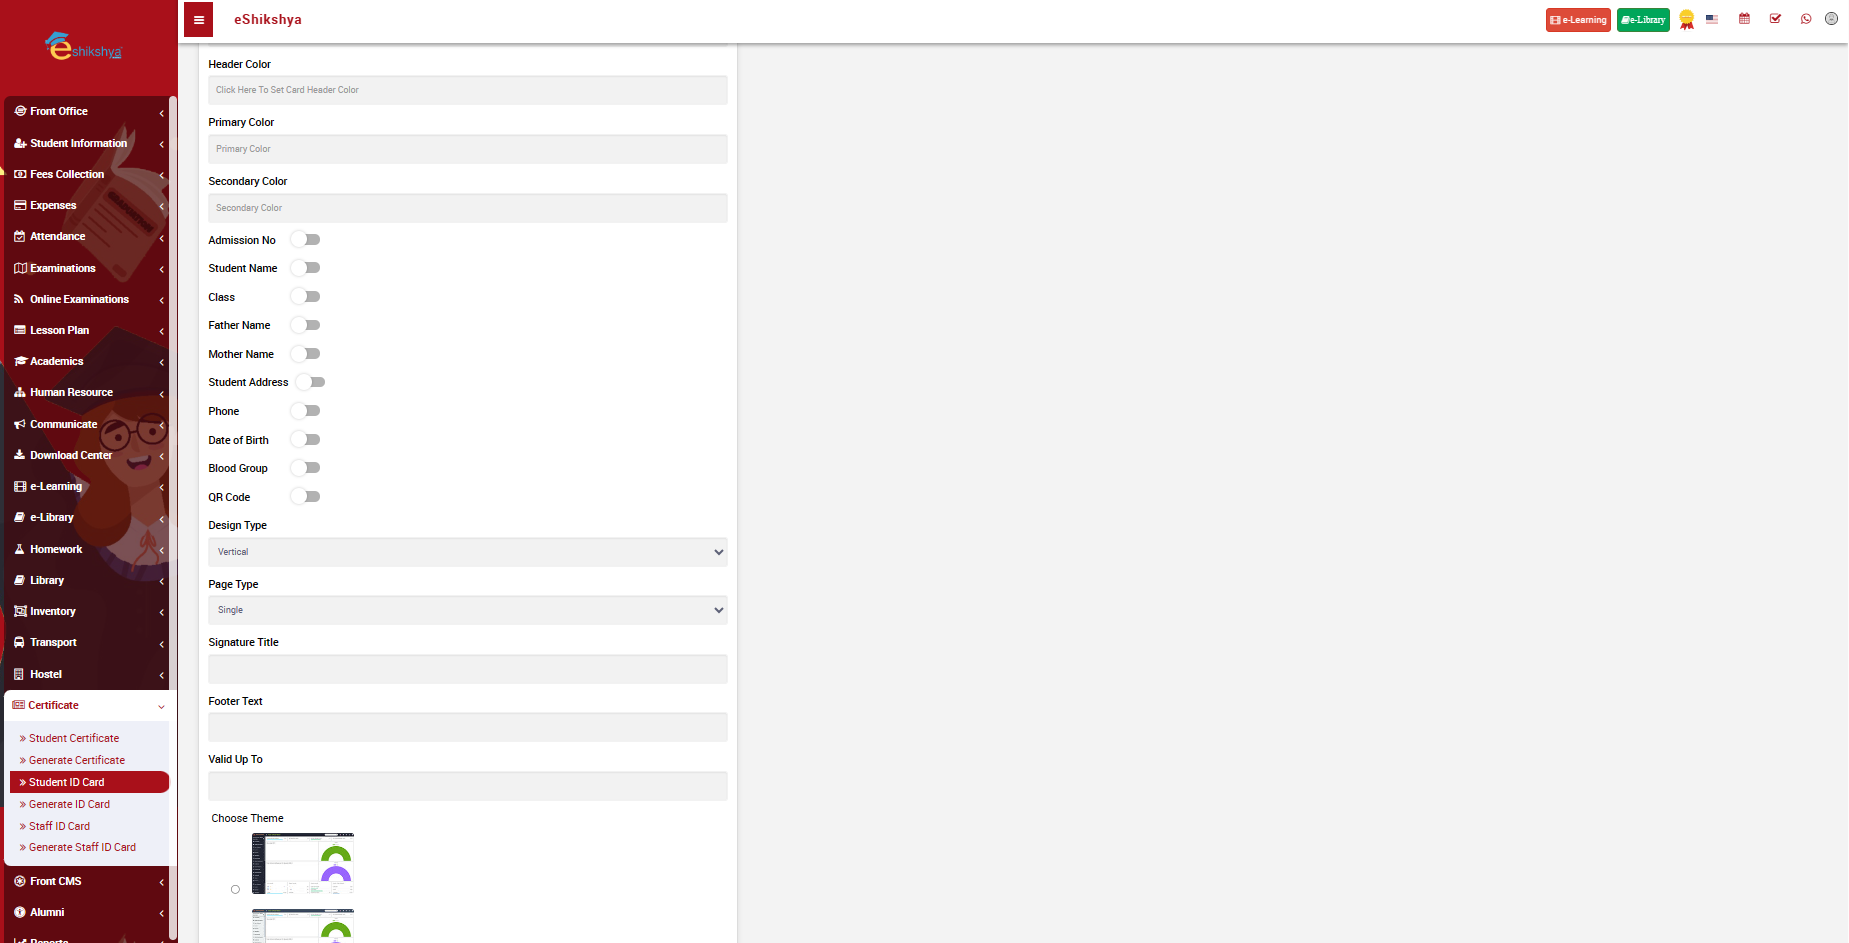
- As seen on the images above, this page allows you to customize your page.
- You are required to fill in the details such as; Background image, school logo, Signature, Id card height, width, school name, validity etc.
- Click on safe after you enter all you card design details, images.
- The created sample you created should appear on a list on the right side of the page.
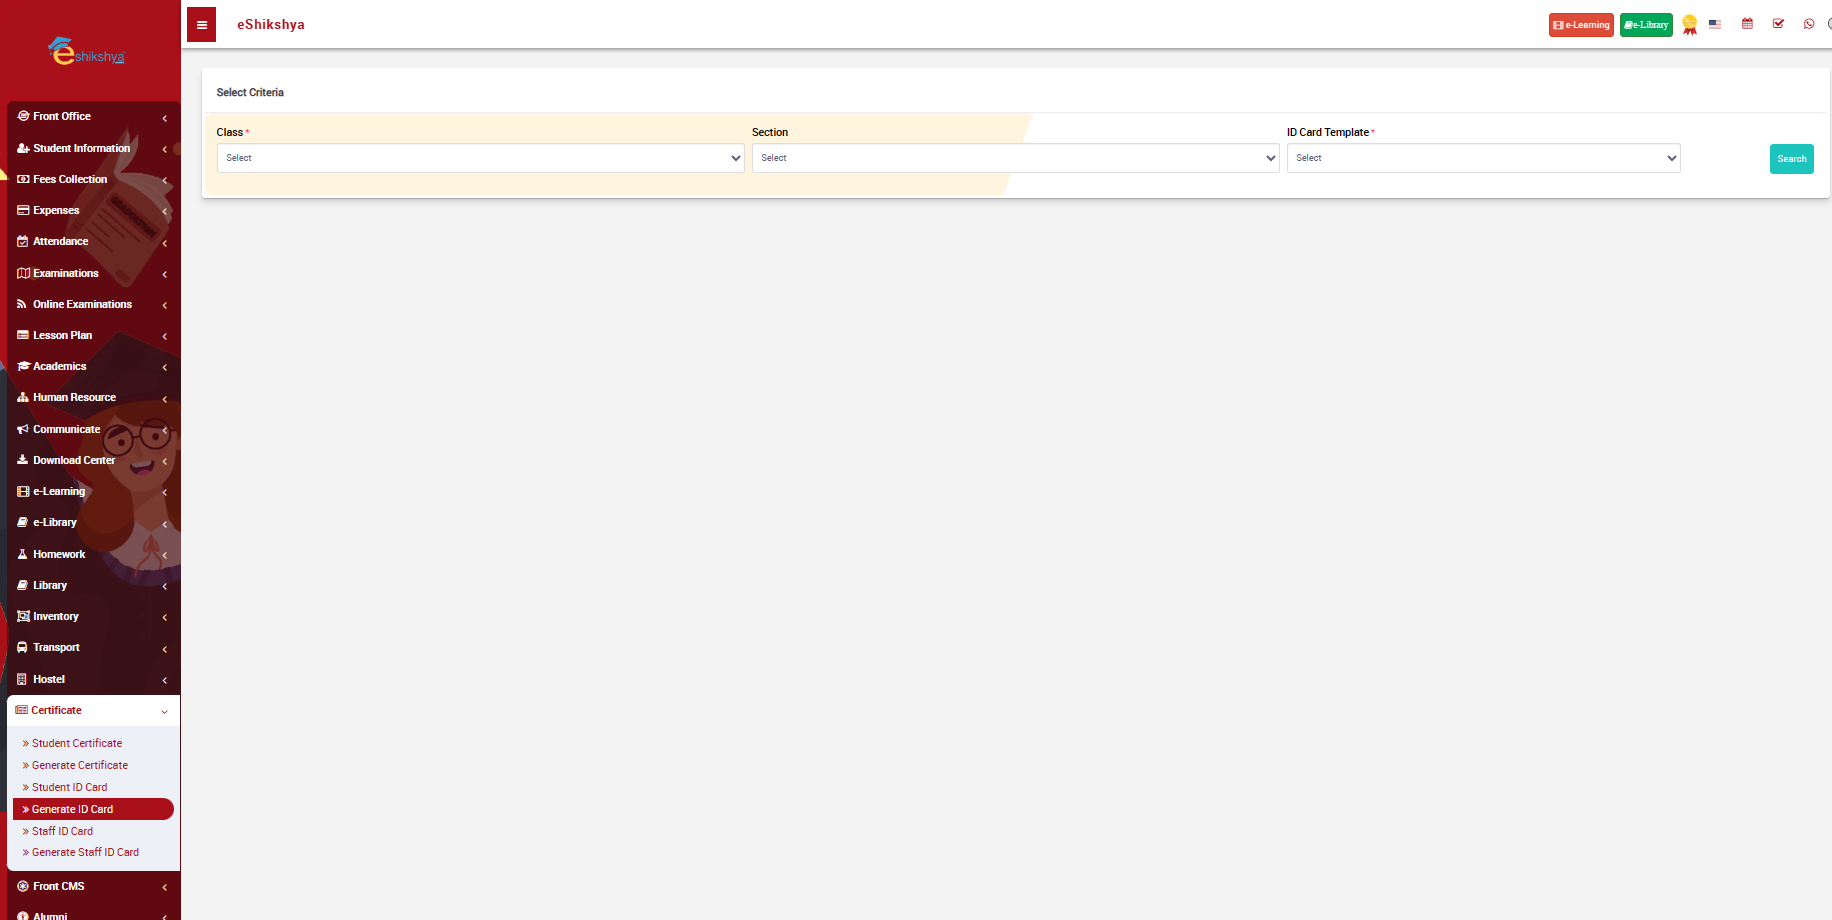
Generate ID Card
This is where you can Generate ID card for students. You should see the following page once you click on Generate ID card.
 Image
Image
- On the select criteria filter, you can select the class, section and ID card template.
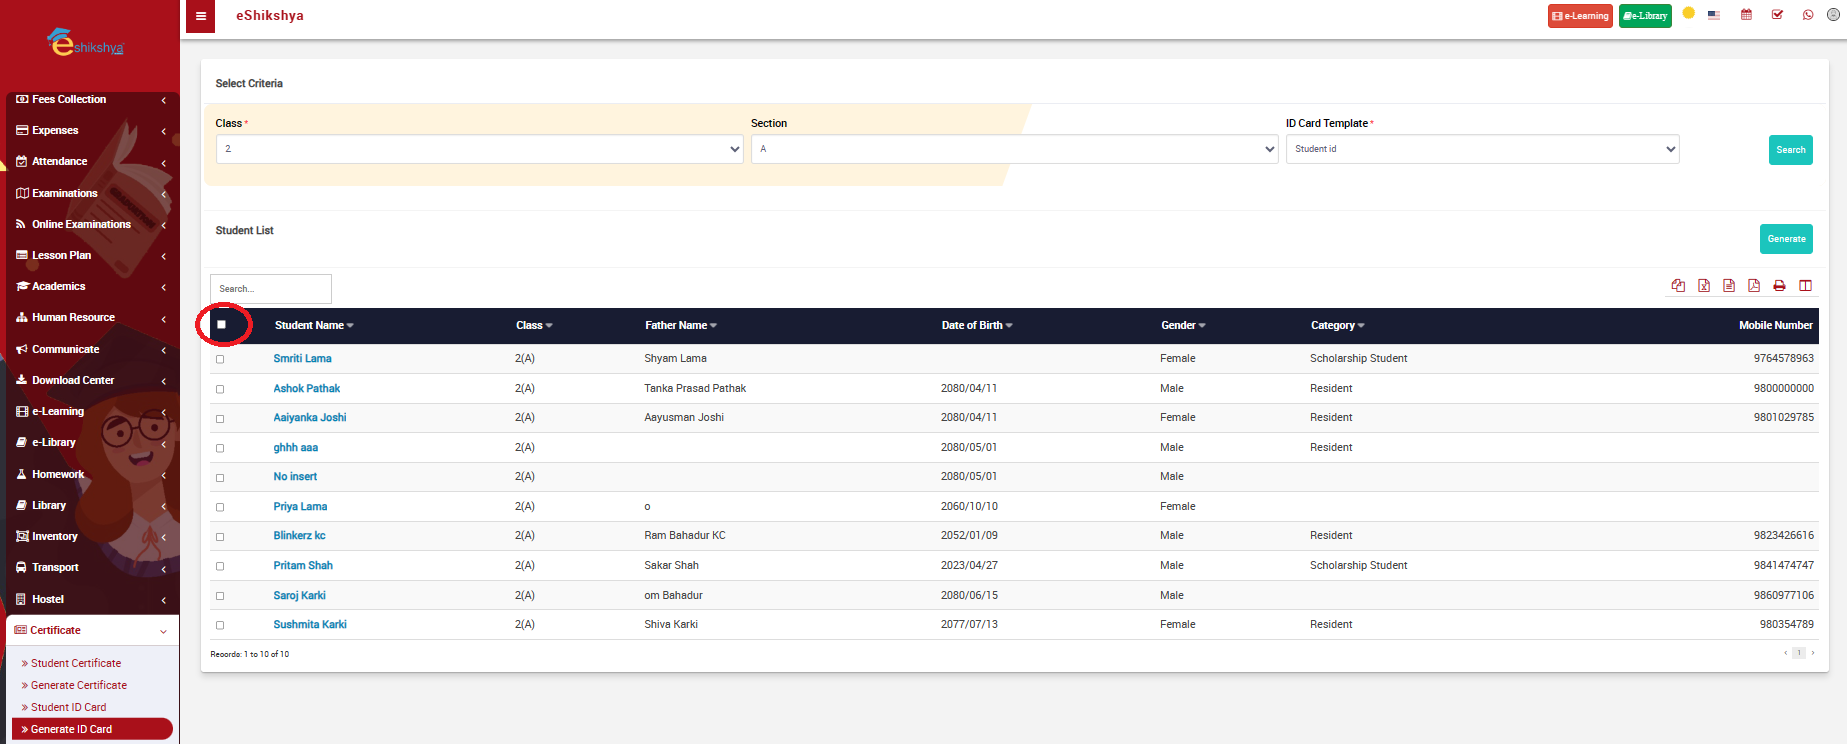
- Once you click on search, the student list on the selected class should appear as shown in the image below.
 Image
Image
- If you want to generate ID cards for all of the students, click on the check box as circled in the image above and click on the generate button.
- If you want to generate Id cards for selective students, click on the checkbox next to the name of the students and click on generate.
- Once you click on generate, you will be shown a page that allows you to print the ID card.
Staff ID Card
To design ID card for staffs, go to staff ID card under Certificate. The following page should appear.
 Image
Image
- As seen on the images above, this page allows you to customize your page.
- You are required to fill in the details such as; Background image, school logo, Signature, Id card height, width, school name, validity etc.
- Click on safe after you enter all you card design details, images.
- The created sample you created should appear on a list on the right side of the page.
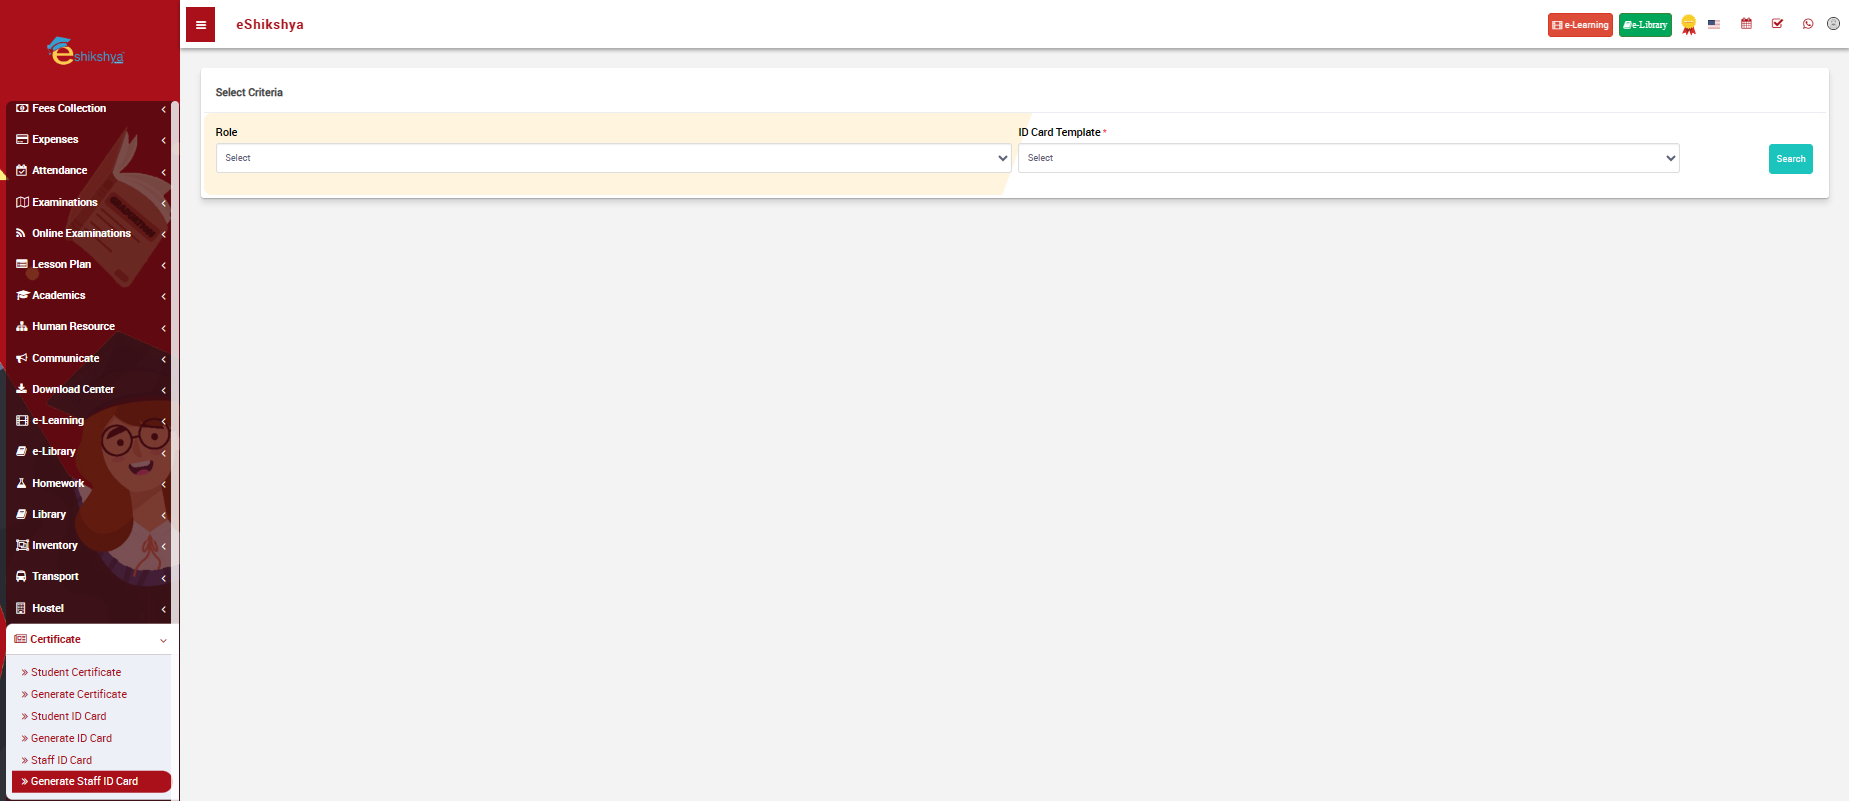
Generate Staff ID
This is where you can Generate ID card for Staffs. You should see the following page once you click on Generate ID card.
 Image
Image
- On the select criteria filter, you can select the Role and ID card template.
- Once you click on search, the staff list on the selected Role should appear as shown in the image below.
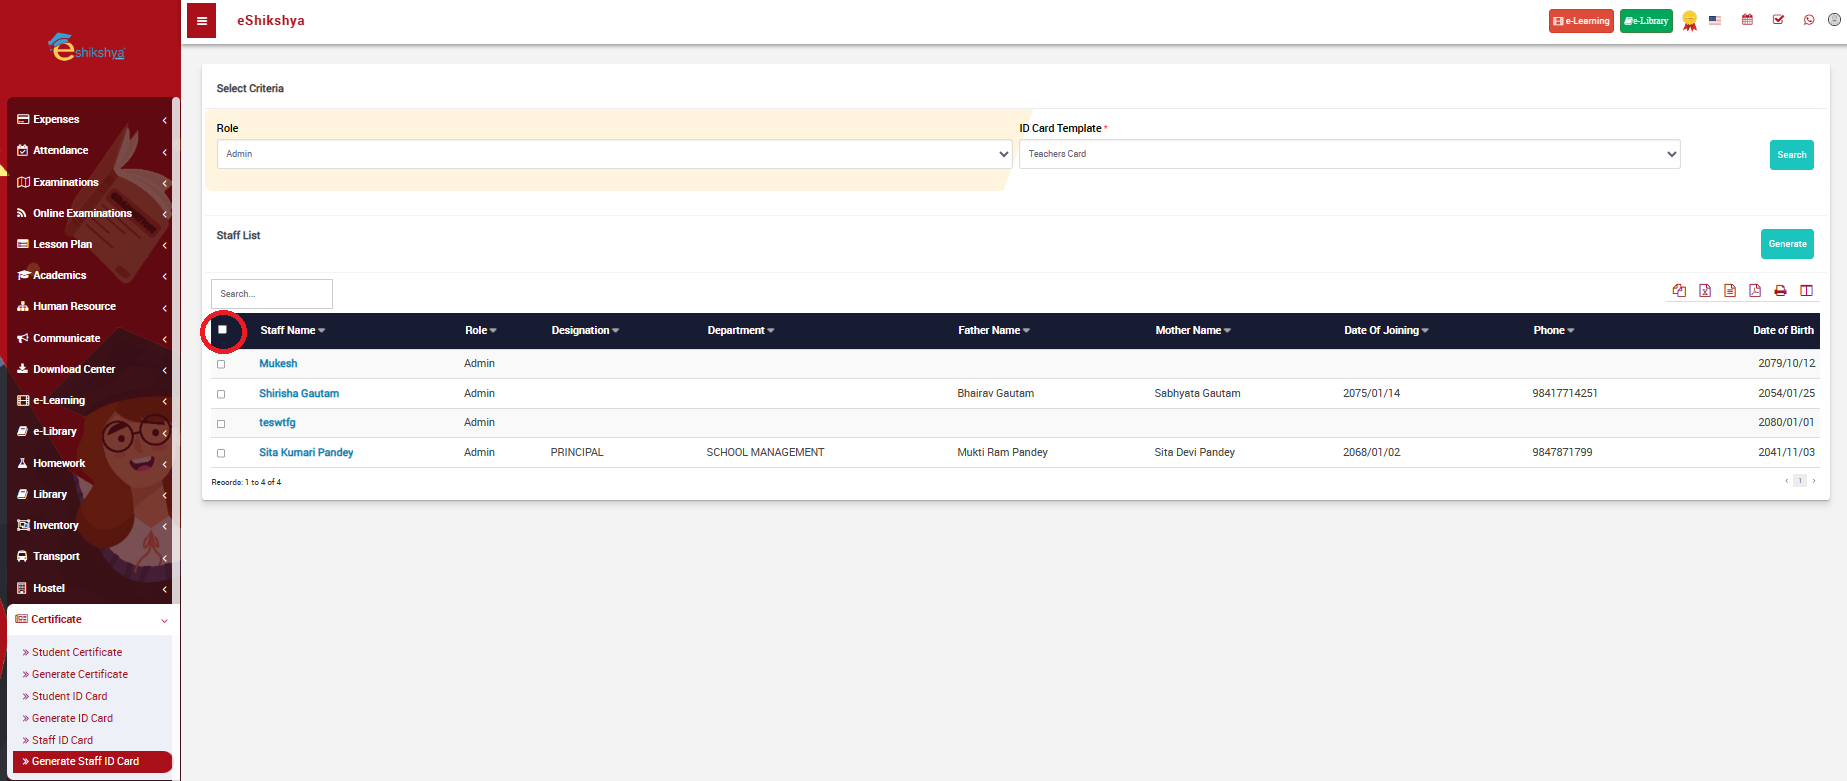 Image
Image
- If you want to generate ID cards for all of the staffs all at once, click on the check box as circled in the image above and click on the generate button.
- If you want to generate Id cards for selective staffs, click on the checkbox next to the name of the students and click on generate.
- Once you click on generate, you will be shown a page that allows you to print the ID card.
Front CMS
Front CMS is the school page where you publish articles, news, event updates, etc. You can setup what you want to display in your school page here.
Event
To add an event to CMS, go to Event under CMS. The following page should appear.
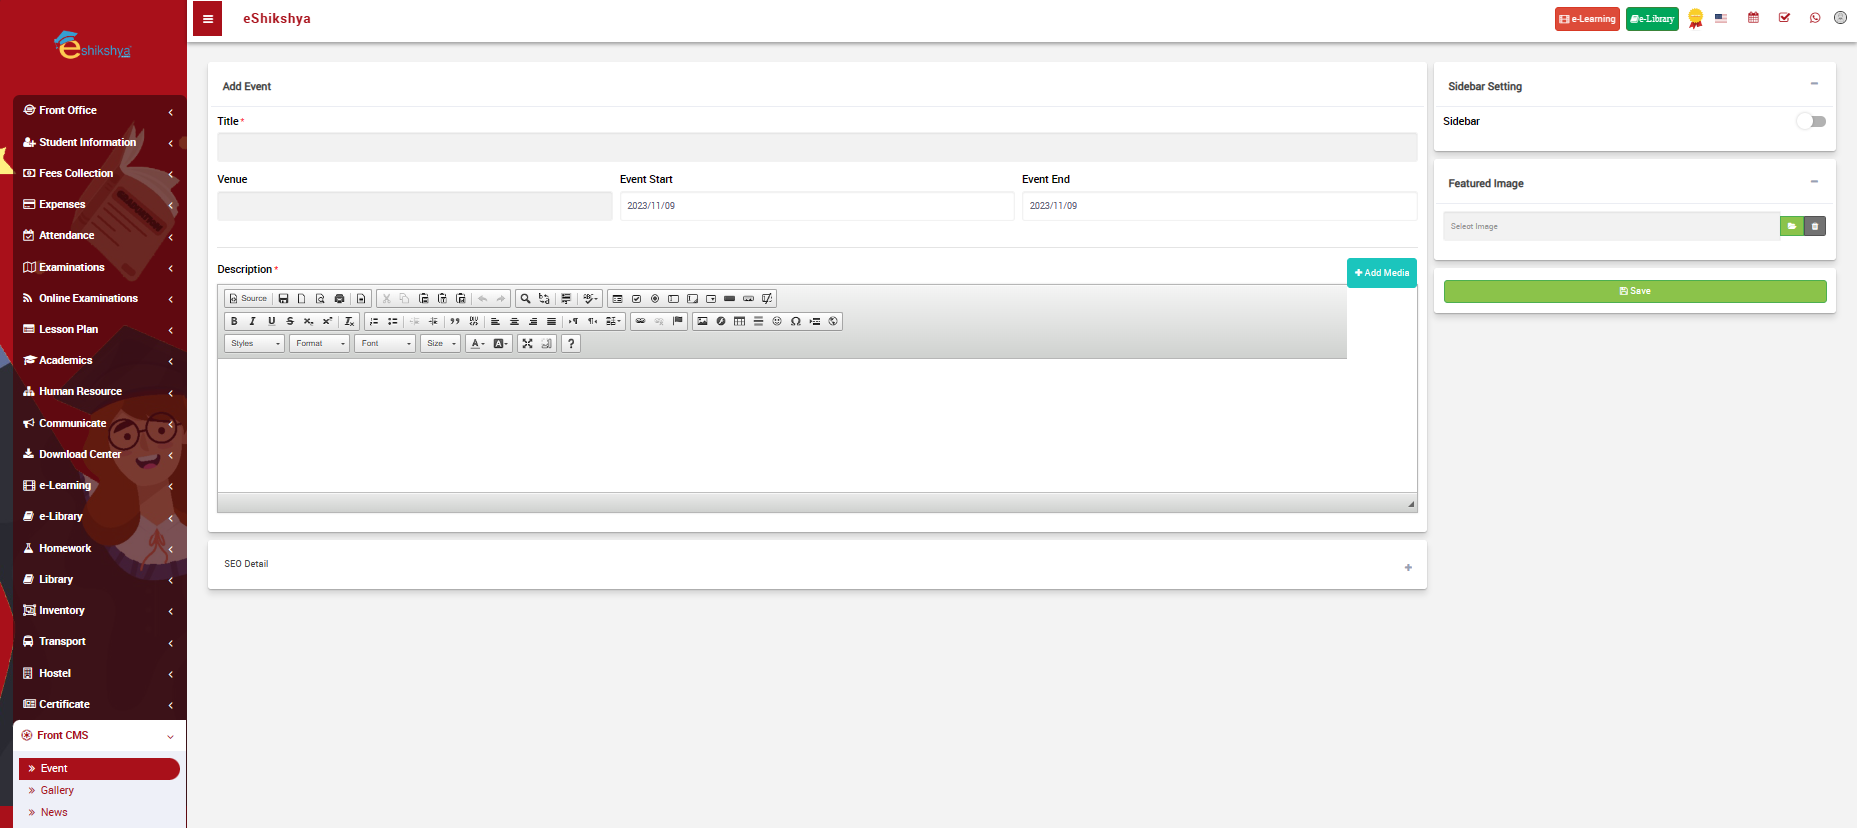 Image
Image
As you can see on the image, you can enter the event title, assign venue, start and end date, and Description. - Title: Name of the Event
-
Venue: Place where the event will take place
-
Event start: Start date of the event.
-
Event end: End date of the event.
-
Description: Here you write the content; e.g., The details abot the event, what the event is about and so on. This section also gives you the flexibility of choosing fonts, font size, bold, italics, underlining fonts, etc.
Gallery
The Gallery section functions as a digital repository where you can upload and organize images. Similar to the gallery on your phone, this feature enables you to manage and showcase a collection of images related to your school's activities and events.
To upload photos to your gallery, go to gallery under Front CMS. the following page should appear.
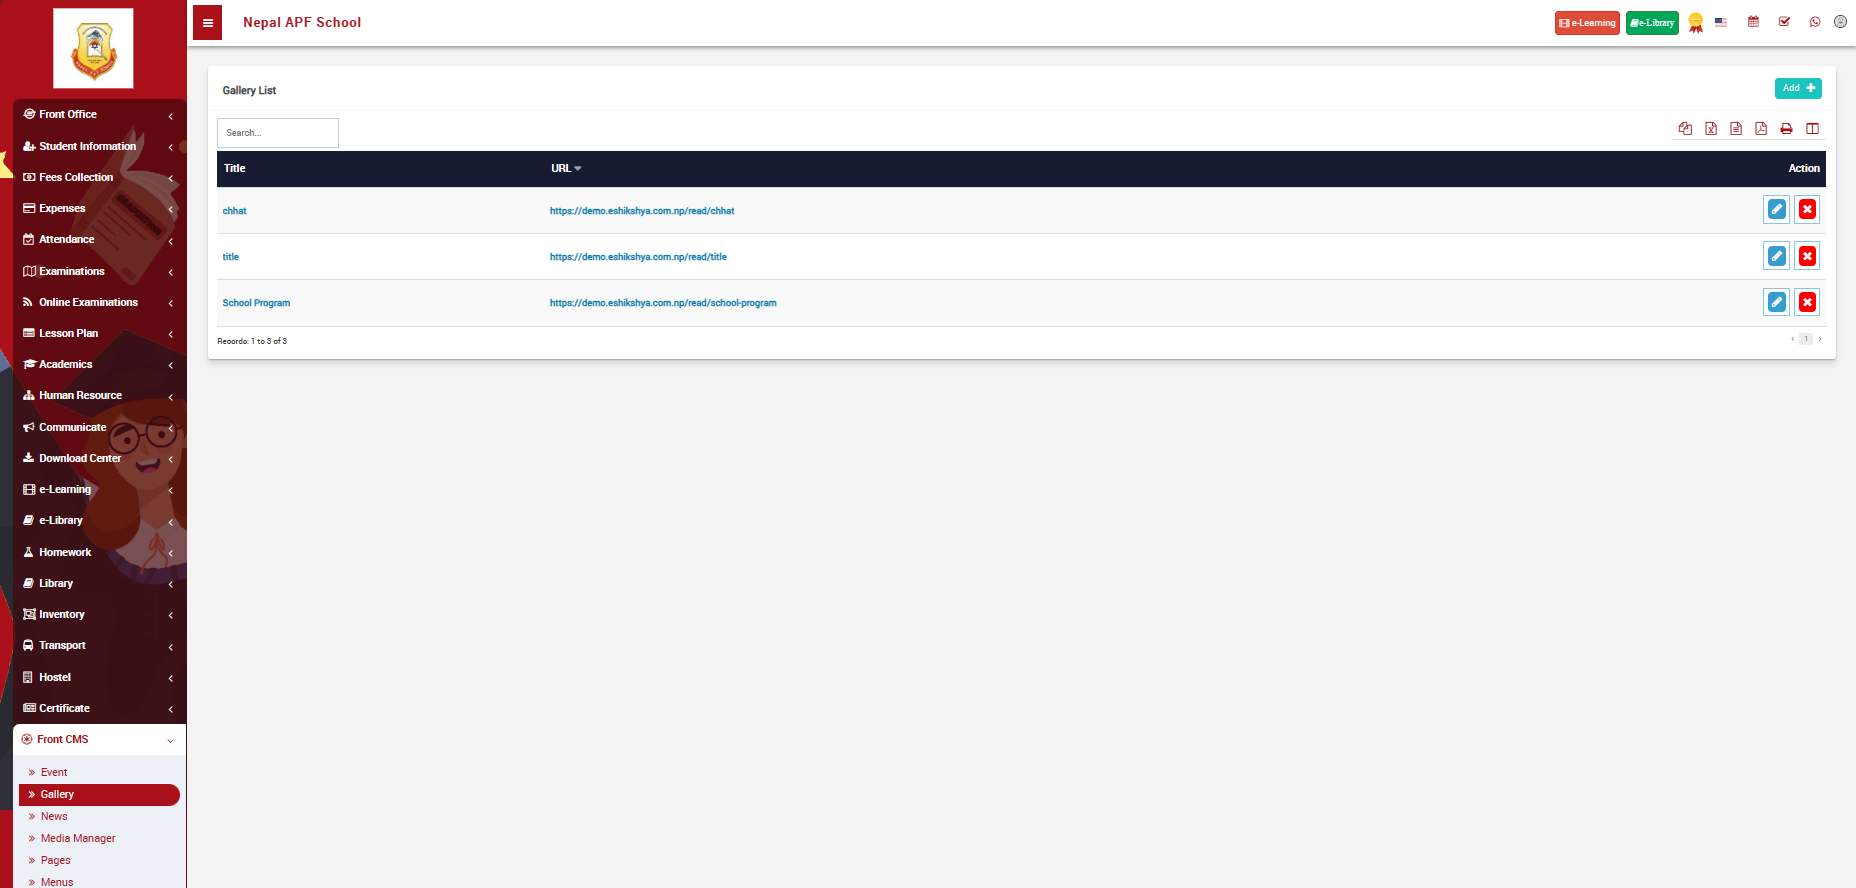 Image
Image
-
You can see that all existing uploaded images can be seen on this page.
-
To add new image, go to Add on the top right of the page. The following page should appear.
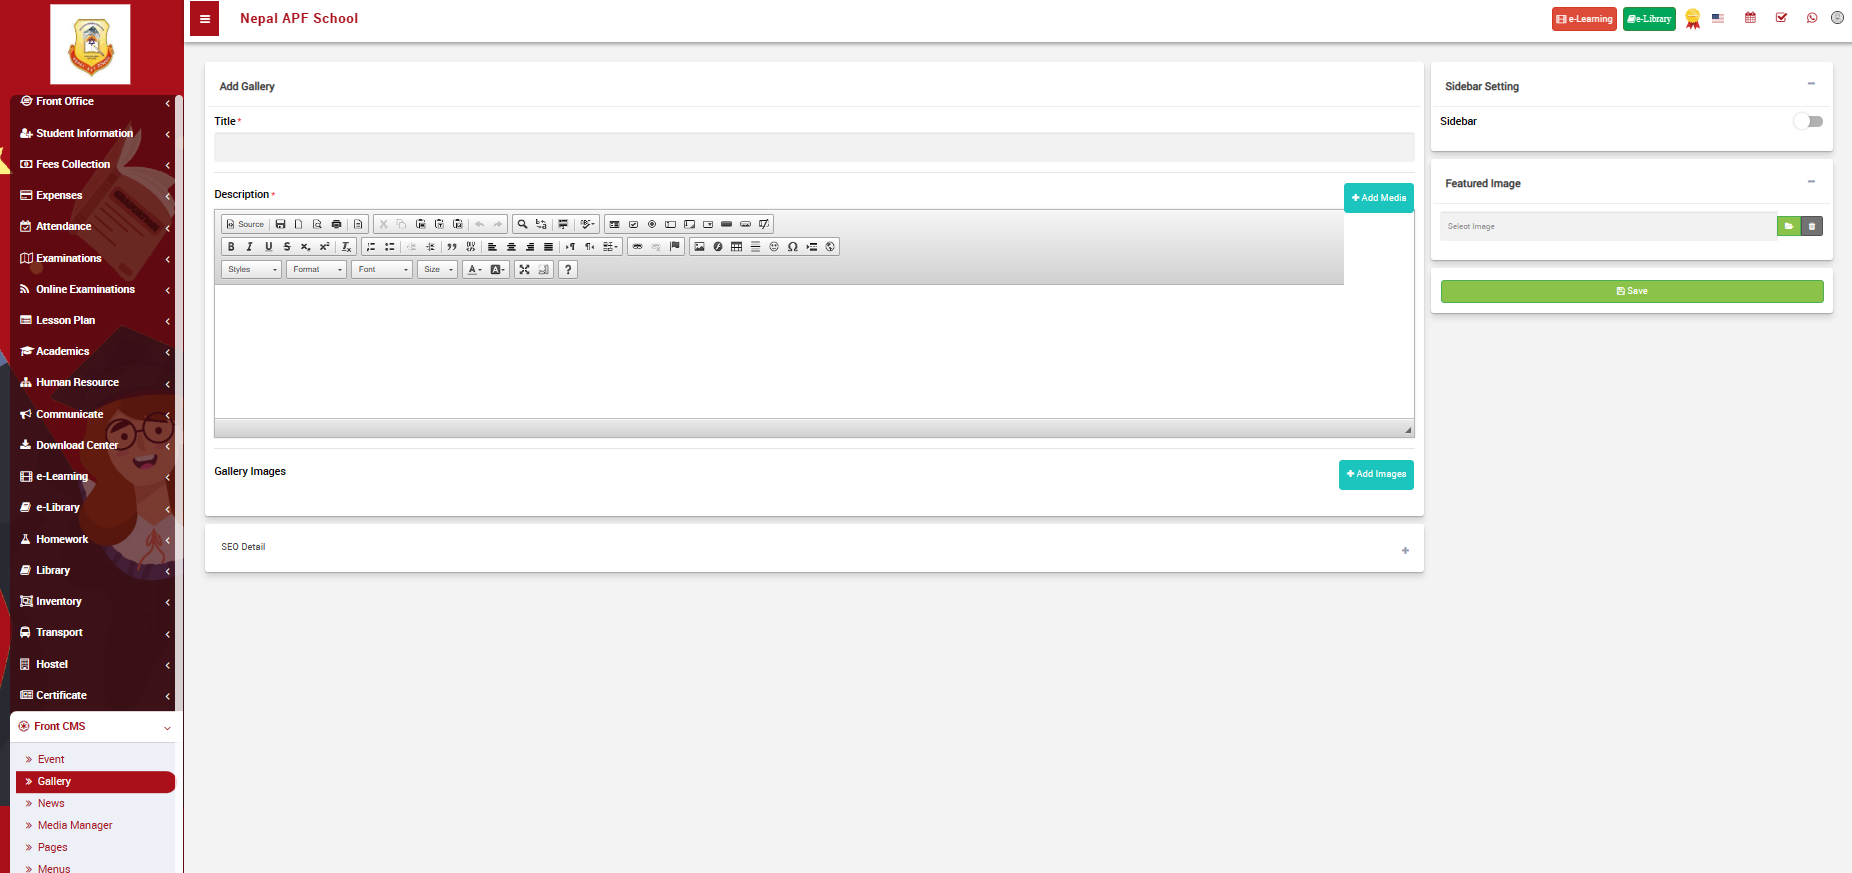 Image
Image
As shown in the image above, you'll be directed to a page where you can input essential details for your content which includes a title, upload media files, provide a description, and attach images. This streamlined process allows you to efficiently organize and enhance your content with relevant information and visuals.
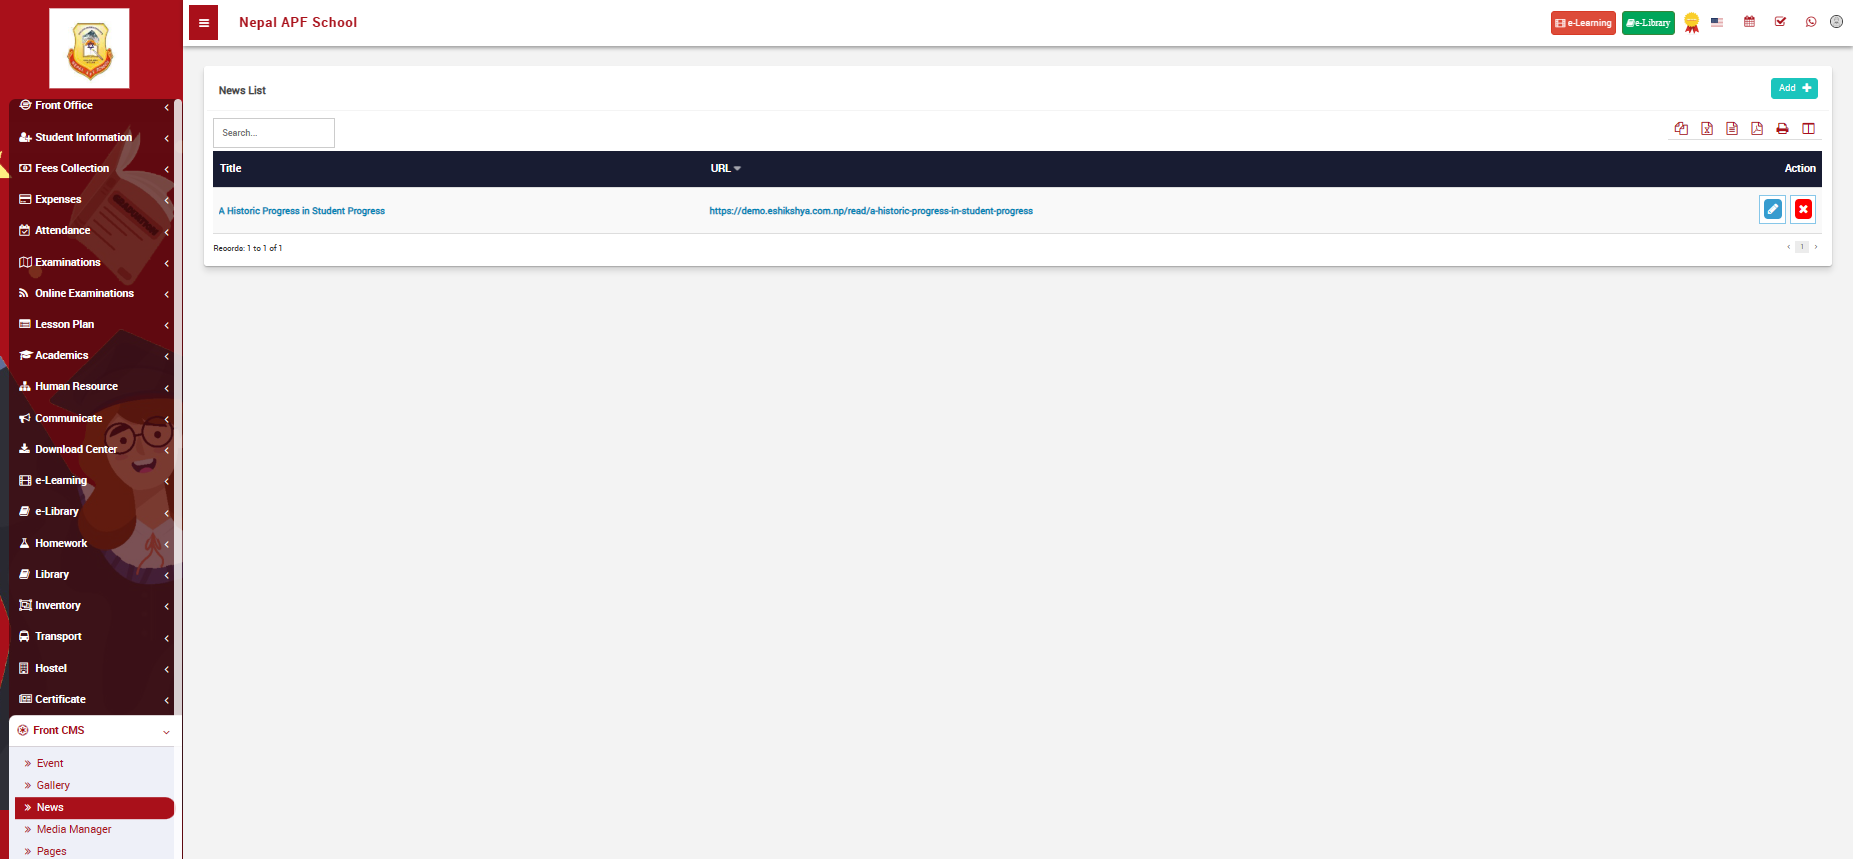
News
"News" is a module designed for creating, managing, and publishing timely updates or articles. It allows users to share announcements, events, and important information with the audience. This feature supports the addition, editing, and deletion of news articles, along with the option to include relevant images. The "News" section serves as a dynamic tool for keeping users informed and engaged with the latest content on the platform.
Click on News under Front CMS. The following page should appear.
 Image
Image
As shown in the images, if there are existing articles, It will appear here.
Editing an Existing News Article:
-
Locate the news article you want to edit in the News section.
-
Click on the "Edit" button.
-
Modify the necessary details.
-
Click "Save" to apply the changes.
Deleting a News Article:
-
Find the news article you wish to delete.
-
Click on the "Delete" button.
-
Confirm the deletion when prompted.
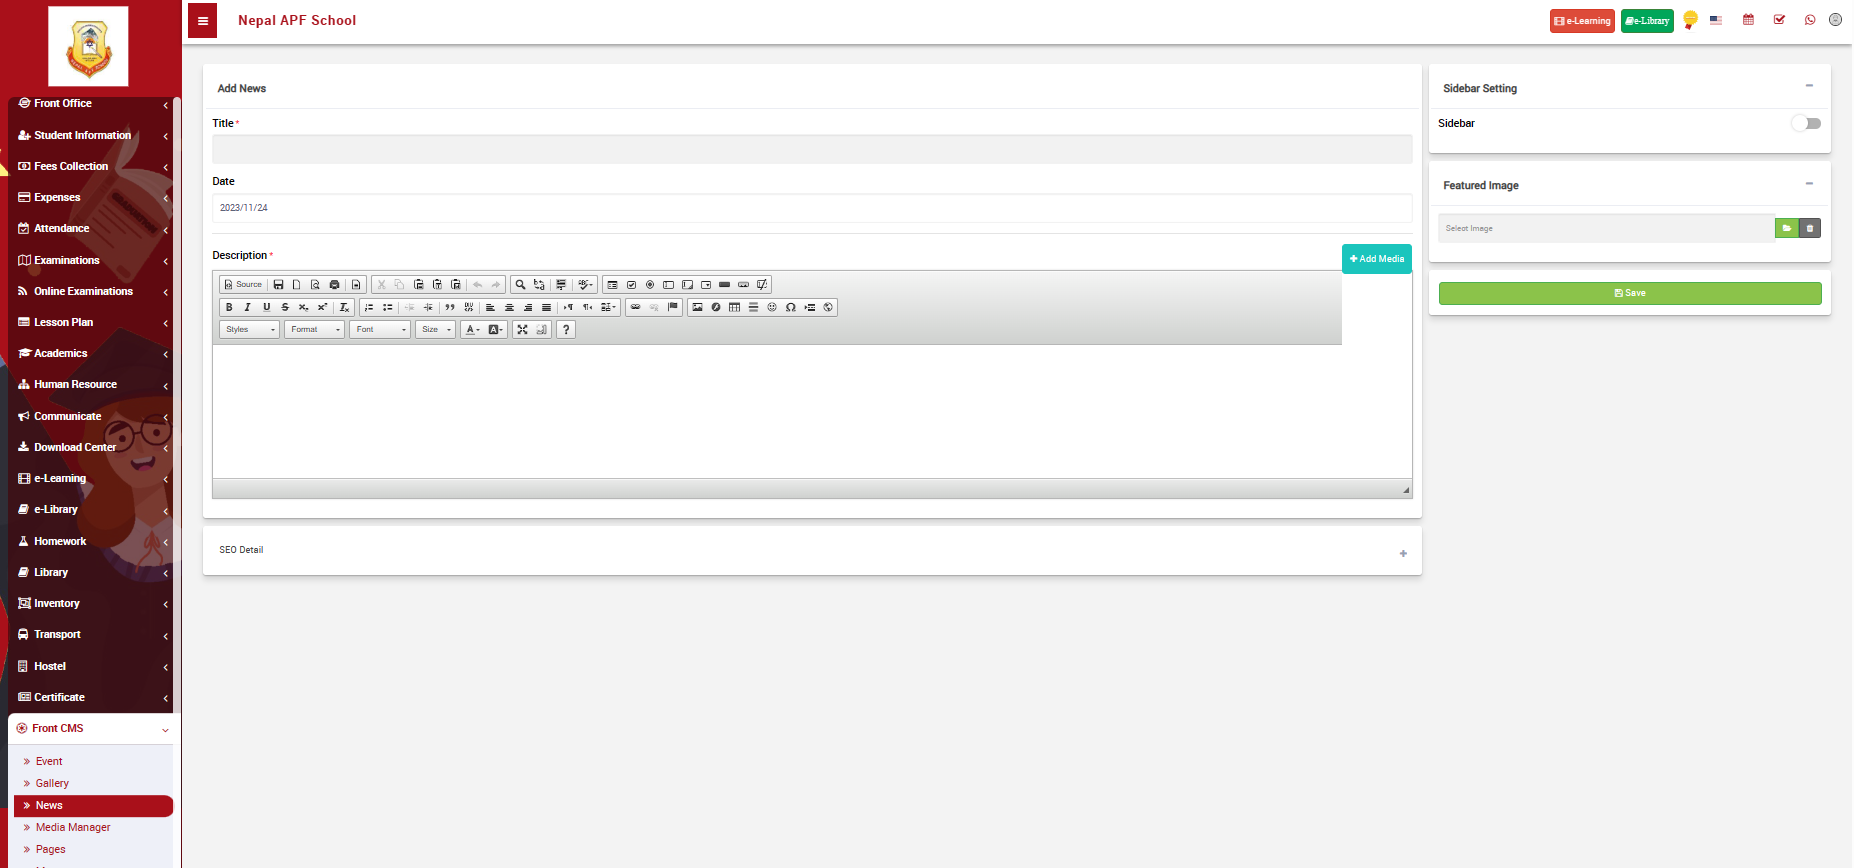
Click on the "Add News" button. The following page should appear.
 Image
Image
Fill in the required details: - Title: Enter the title of the news article.
-
Date: Set the date when the news article should be published.
-
Description: Add the main content of the article.
-
Add media: Upload relevant images to accompany the news article.
-
Click "Save" to publish the news article.
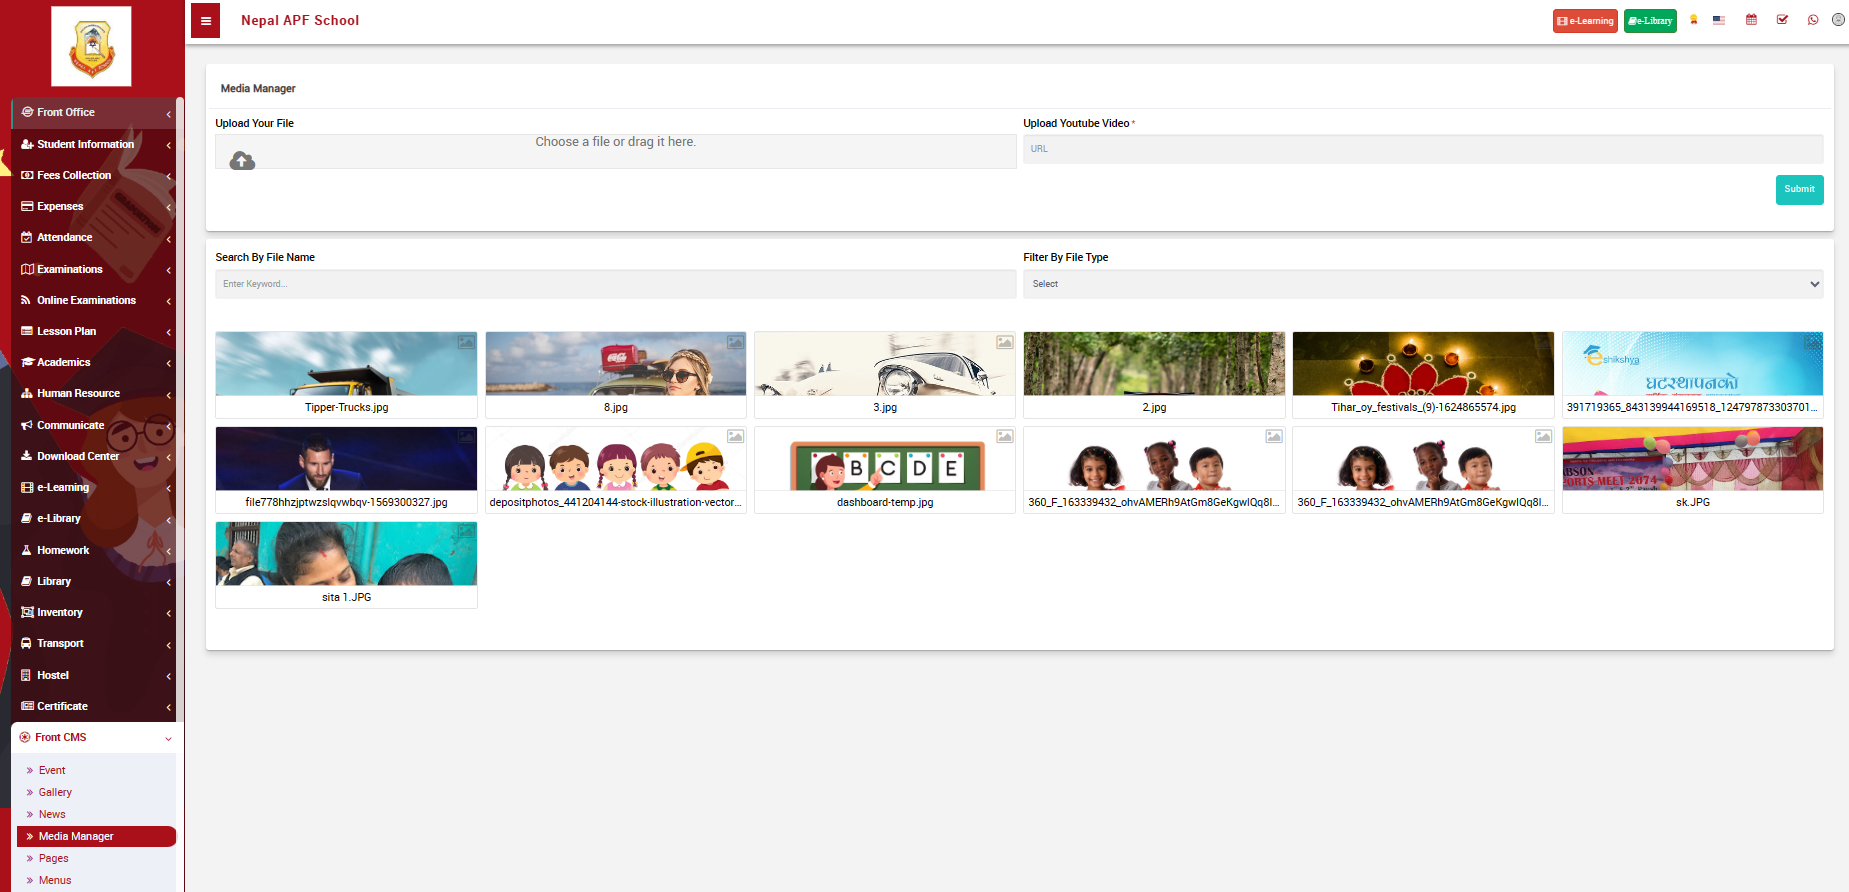
Media Manager
The Media Manager is a tool that enables users to efficiently handle and showcase multimedia content on their website or platform. When you click on Media Manager under Front CMS, the following page should appear:
 Image
Image
- Upload Your File:
This feature allows users to easily upload various types of files, including images, videos, documents, and more. By selecting the "Upload Your File" option, users can seamlessly add their desired media content to the platform.
- Upload YouTube Video:
The "Upload YouTube Video" attribute provides a convenient way to integrate video content hosted on YouTube directly into the platform. Users can simply input the YouTube video link, and the Media Manager will embed the video for seamless viewing.
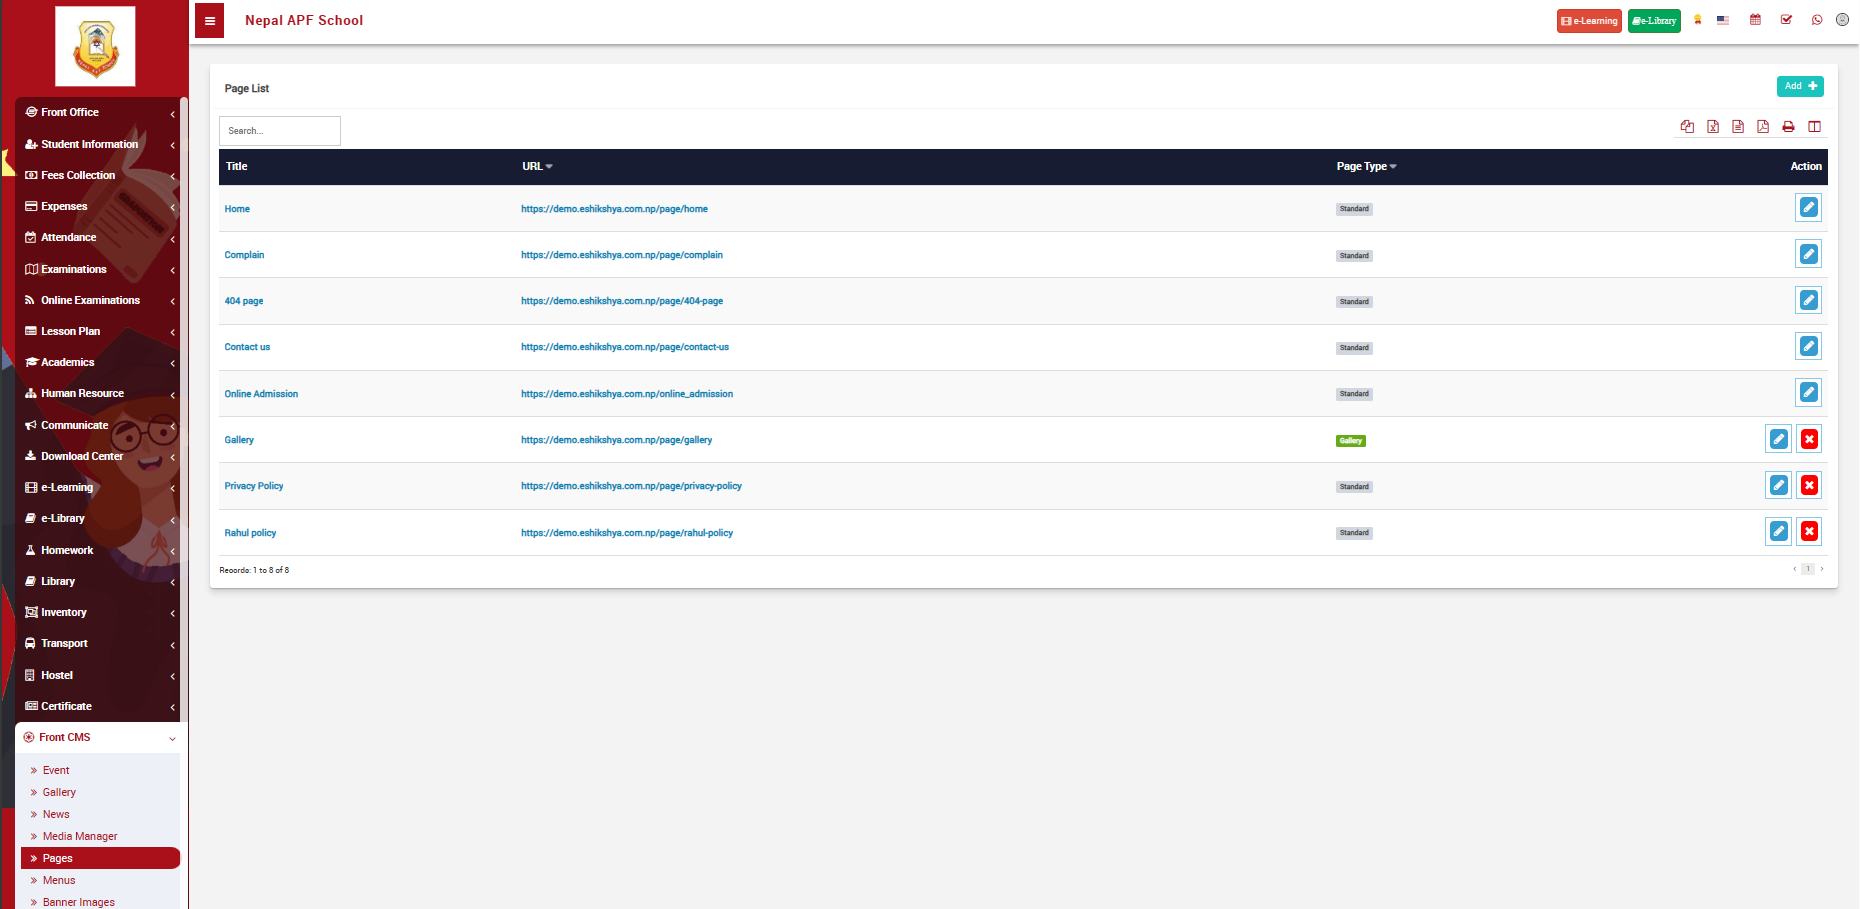
Pages
You can set up your pages redirection here. Like when you click on the home button, you will be directed to the home page.
To setup home page, go to Pages under Front CMS. The following page should appear.
 Image
Image
- Title:
The "Title" attribute allows users to input the name or title of the new page. This title serves as the identifier for the page and is typically displayed prominently on the website.
- Page Type:
The "Page Type" attribute offers users the flexibility to categorize the new page based on its content and purpose. Users can choose from various types, such as Standard, Events, News, or Gallery, tailoring the page to specific functionalities or themes.
- Description:
The "Description" attribute provides a space for users to include a brief overview or description of the page. This description can serve as additional context for visitors and is often displayed alongside the page title.
- Add Media:
The "Add Media" feature allows users to enrich the page by incorporating multimedia content. This could include images, videos, or other media assets that enhance the visual appeal and engagement of the page. Save:
The "Save" button is the final step in the process, allowing users to preserve their page configuration and content. Clicking "Save" confirms the creation of the new page with the specified attributes.
Menus
The "Add Menu" feature in Front CMS allows users to efficiently create and customize navigation menus for their website.
To create menus, go to Menu under Front CMS. The following oage should appear.
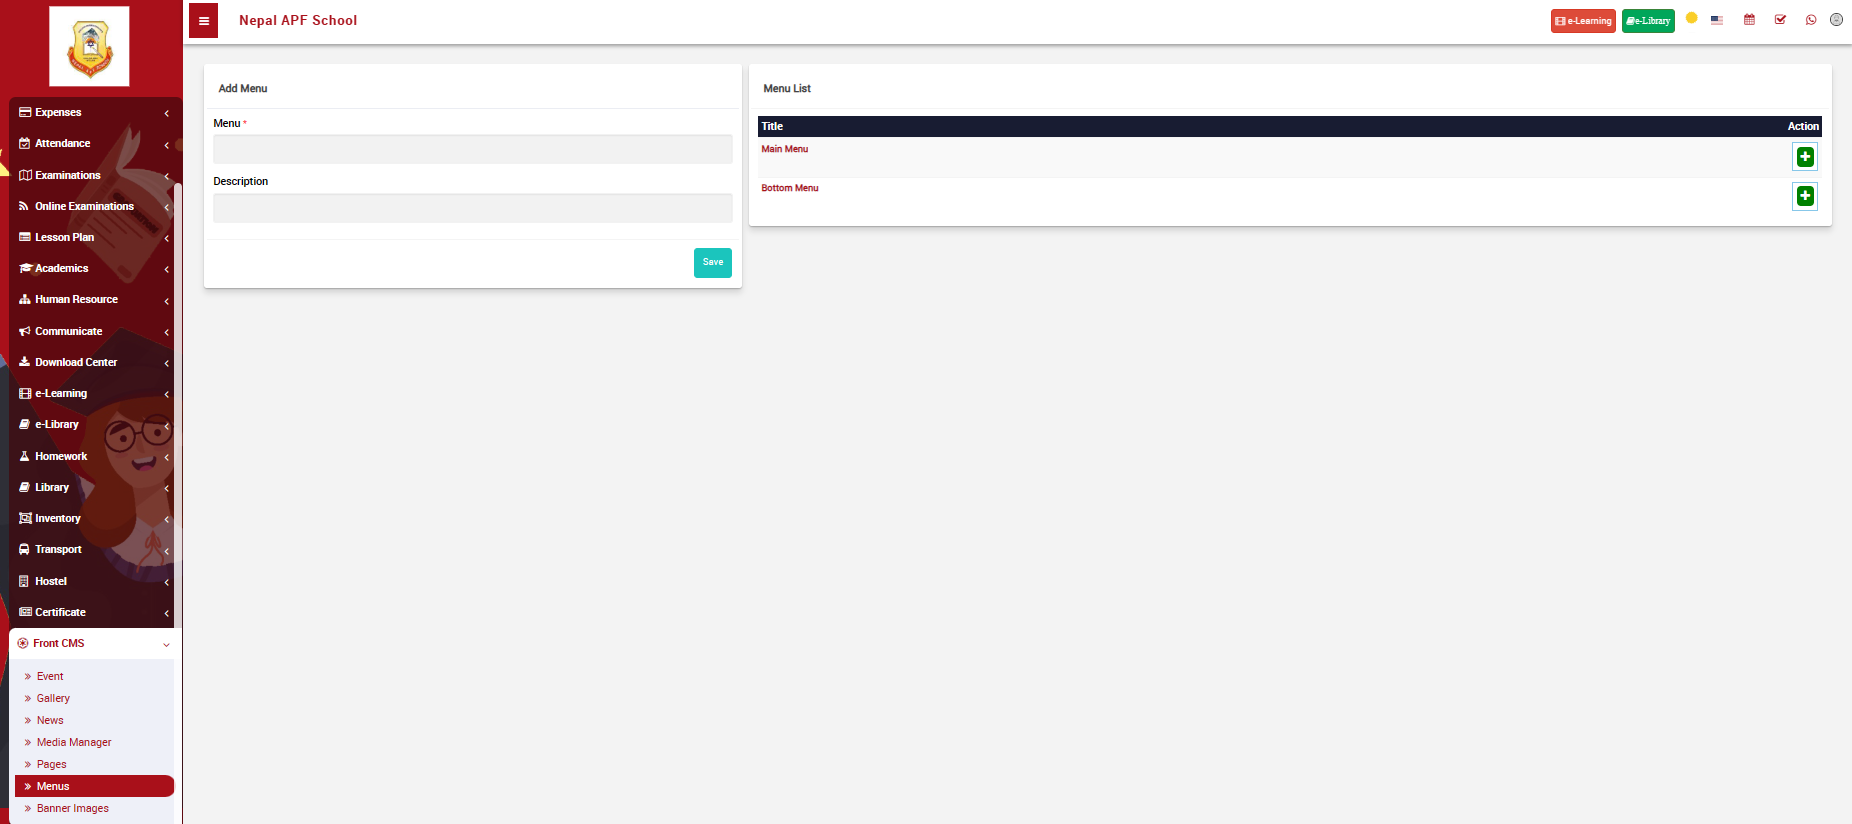 Image
Image
-
On the left side of the oage, you can see a form where you can define the menu name and description.
-
Once you create a menu, it'll appear on a list on the right side of the page as shown in the picture.
-
Next to the menu you have defined, there is a '+' action button which will direct you to a page where you can define the menu items as shown in the image below.
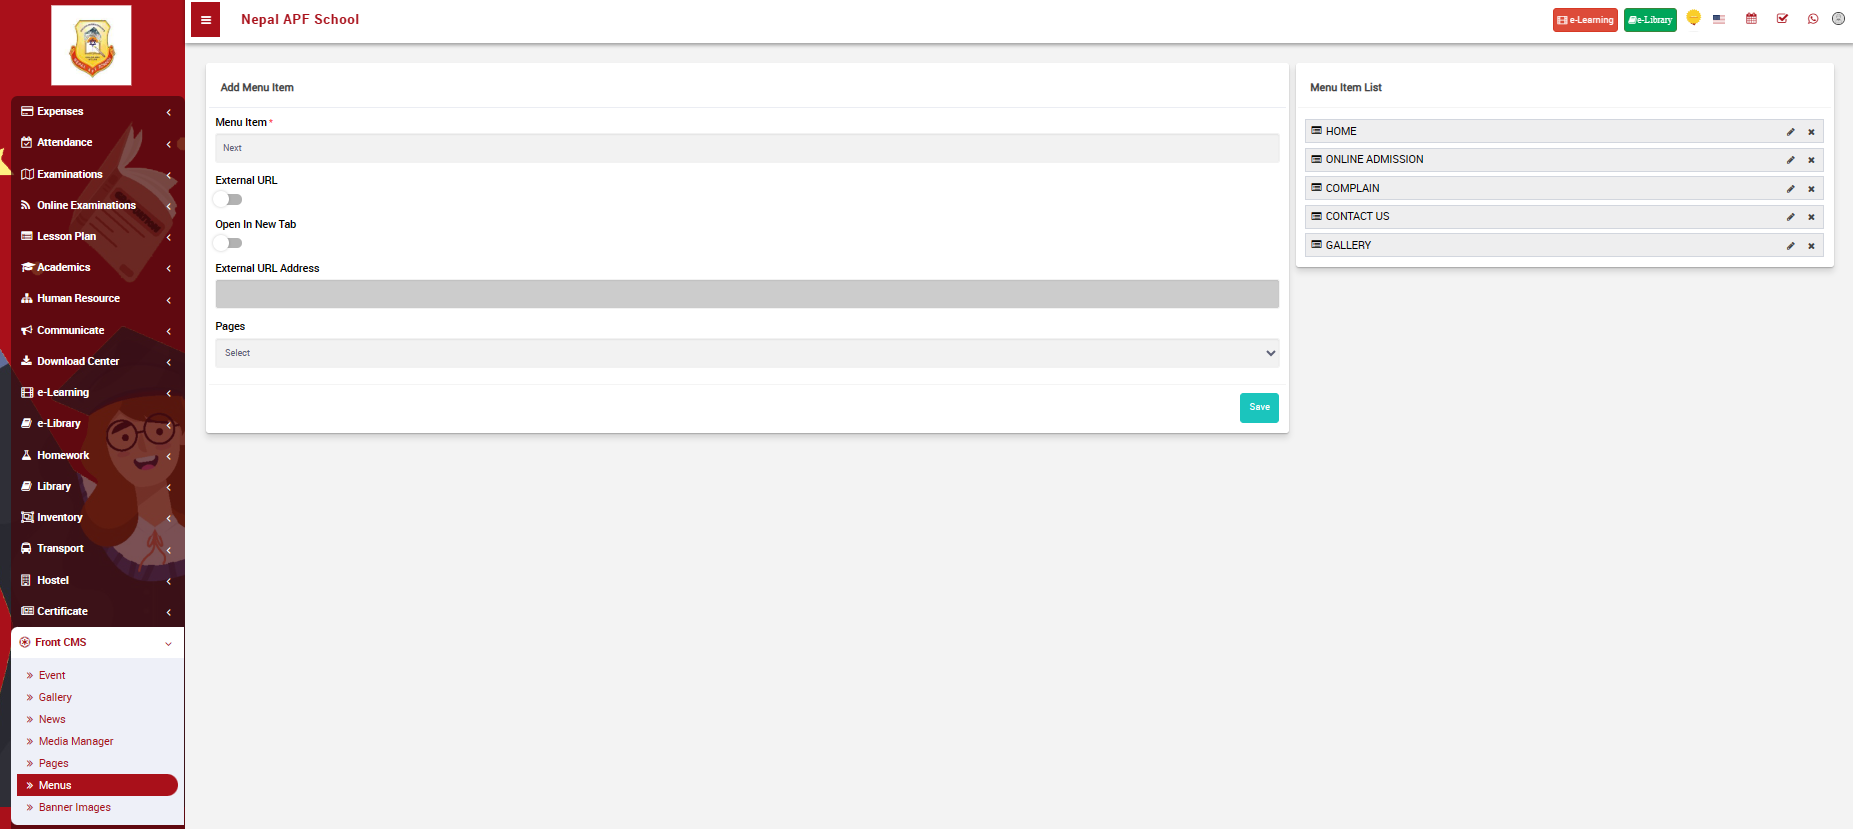 Image
Image
Banner Images
You can upload the banner image of your school for your CMS here.
When you click on Banner Images under Fromt CMS, the following page should appear:
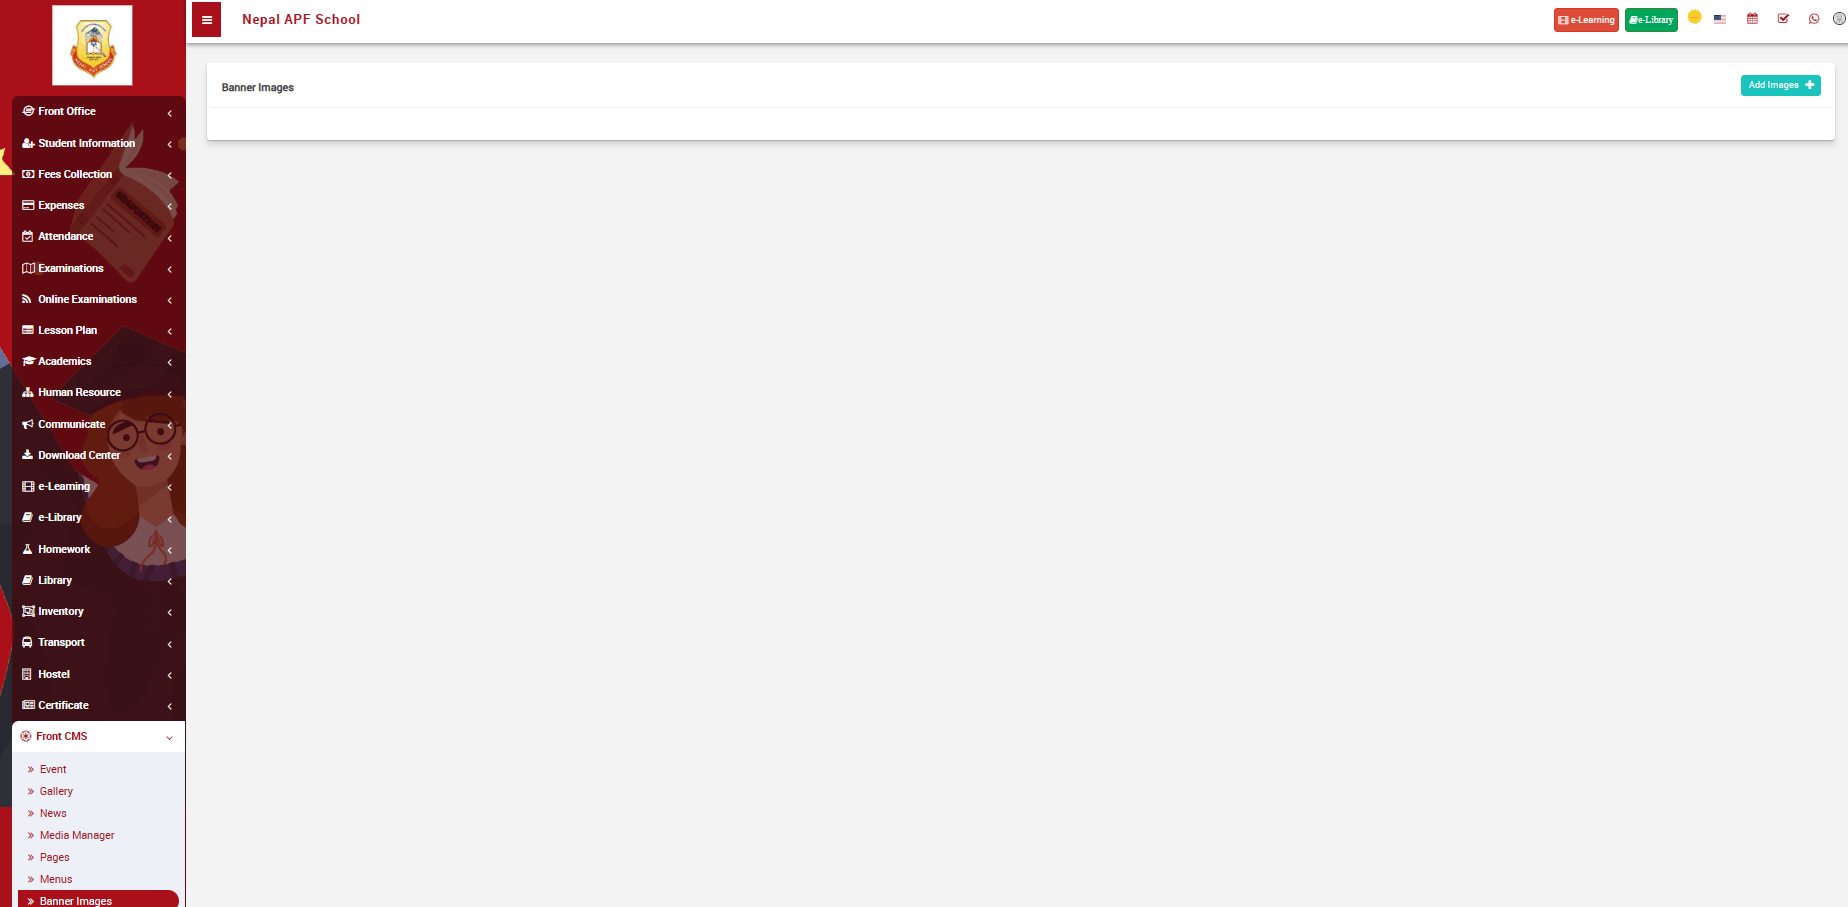 Image
Image
-
On the page, click on Add Images to go to select banner page
-
The images that you uploaded in the media manager will appear from which you can select you banner image.
Alumni
Manage Alumni
To manage school alumni, got to Manage Alumni under Alumni. The following page should appear.
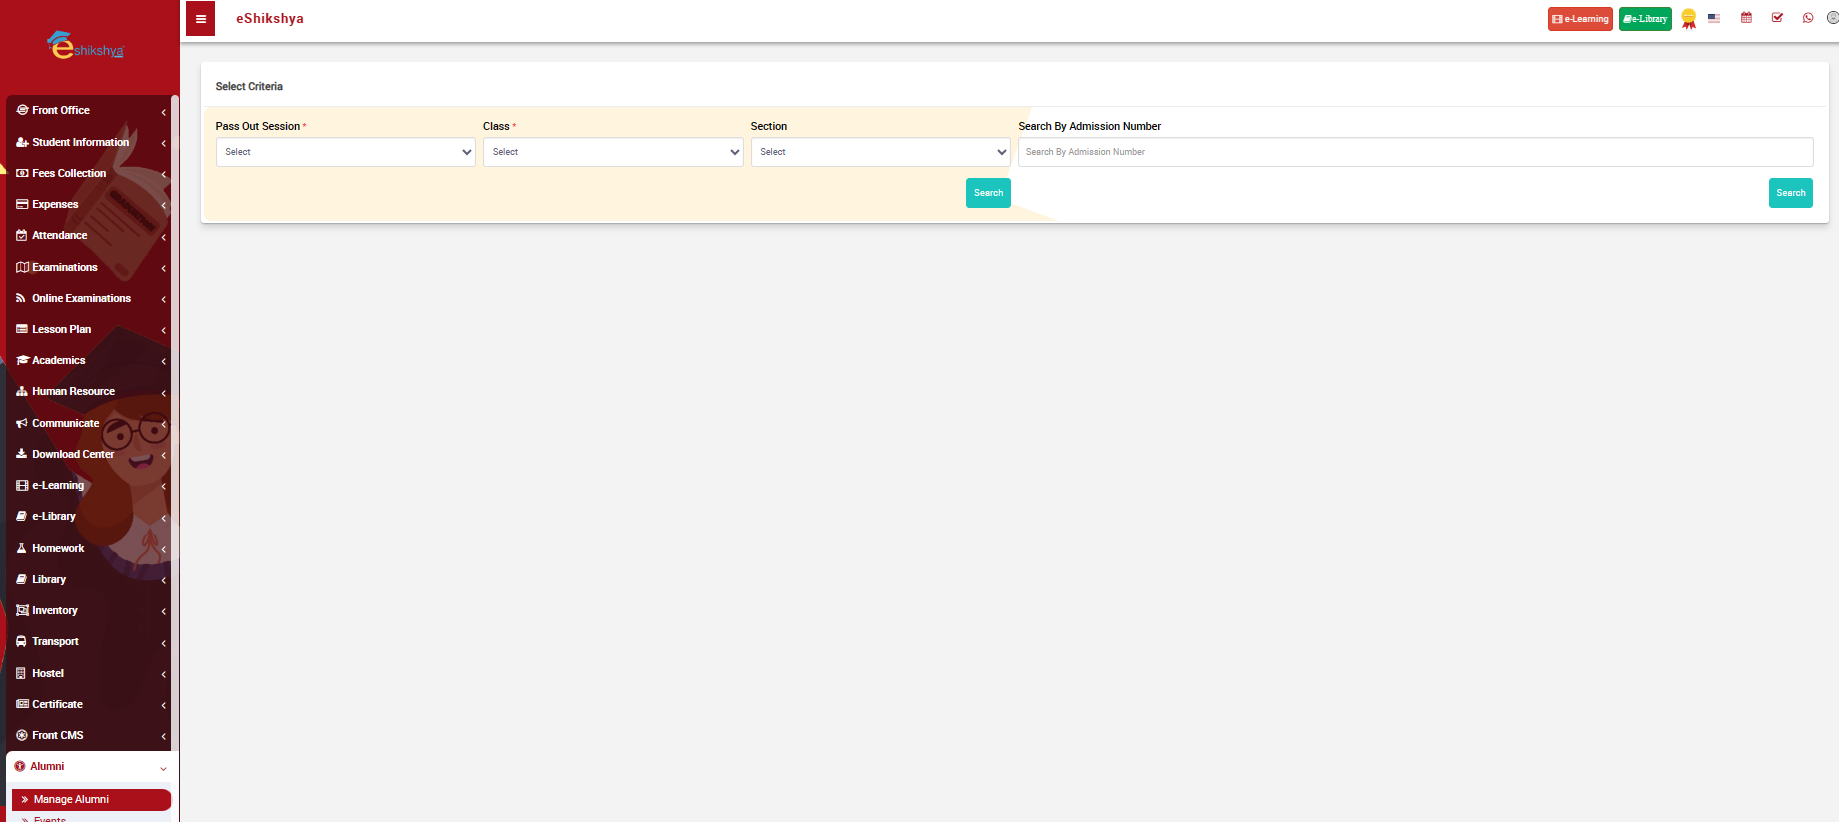 Image
Image
-
You see a filter to select criteria. The filter includes, Pass put year, Class, Section and search. Or if you know the student admission number, You can choose to search via student admission number.
-
For example, In the image below, I have searched students of grade 2 for 2080-2081 session.
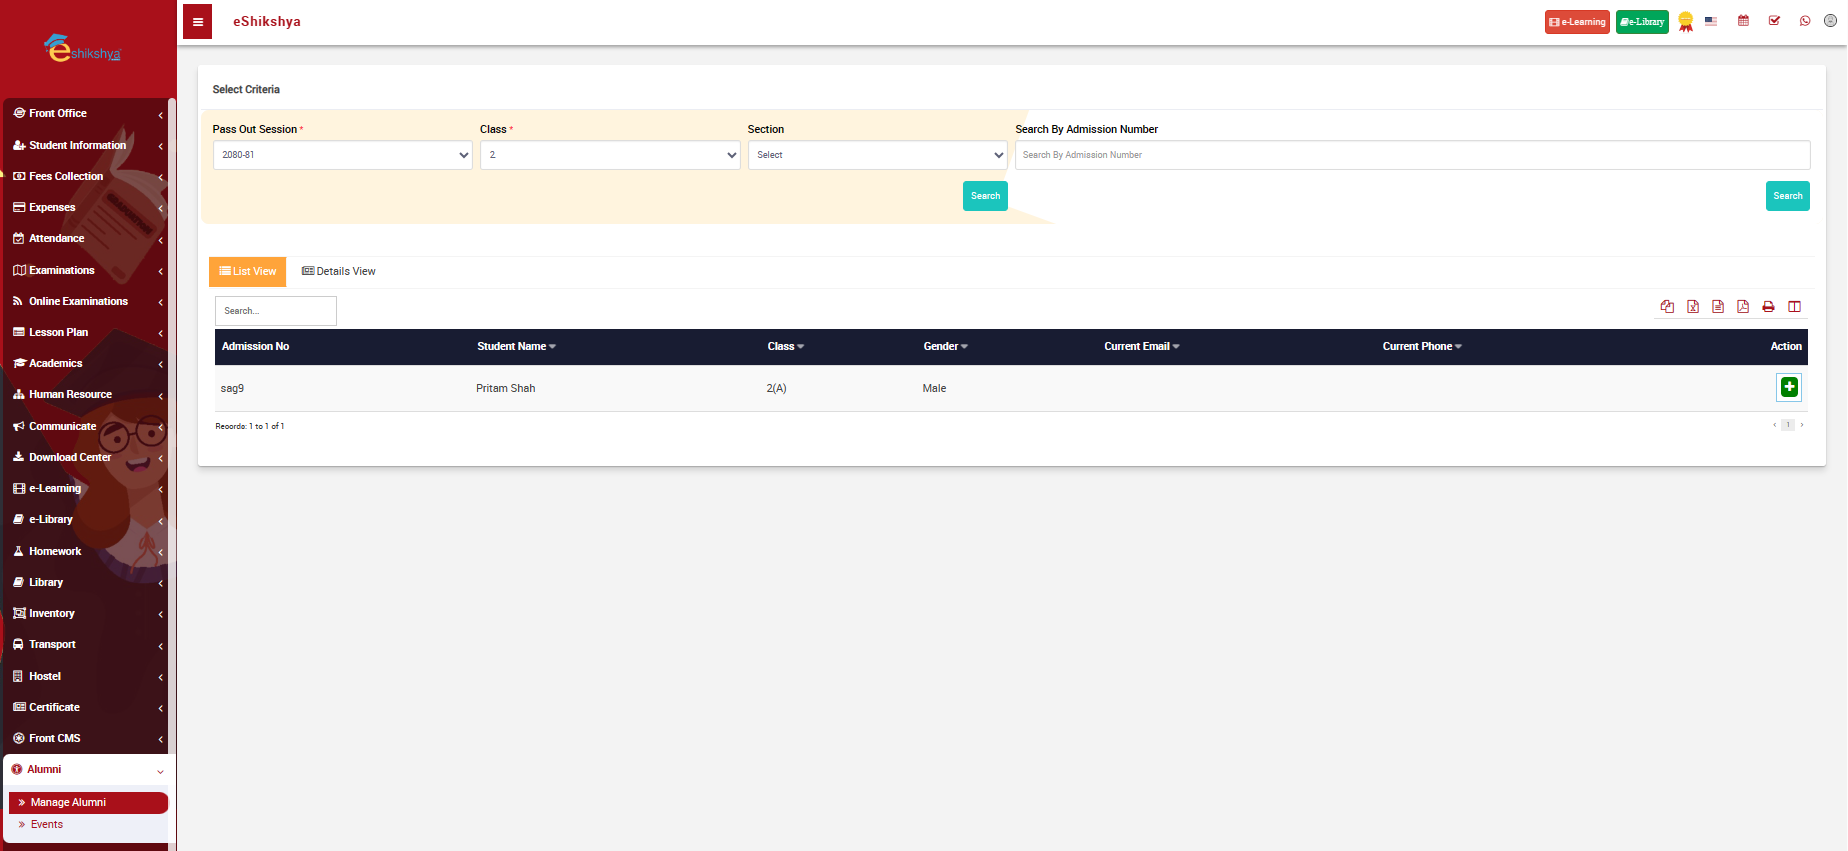 Image
Image
-
Beside the name of the student, there is a Action '+' button. Click on that button to Add Alumni. A forn shown in the image below should appear.
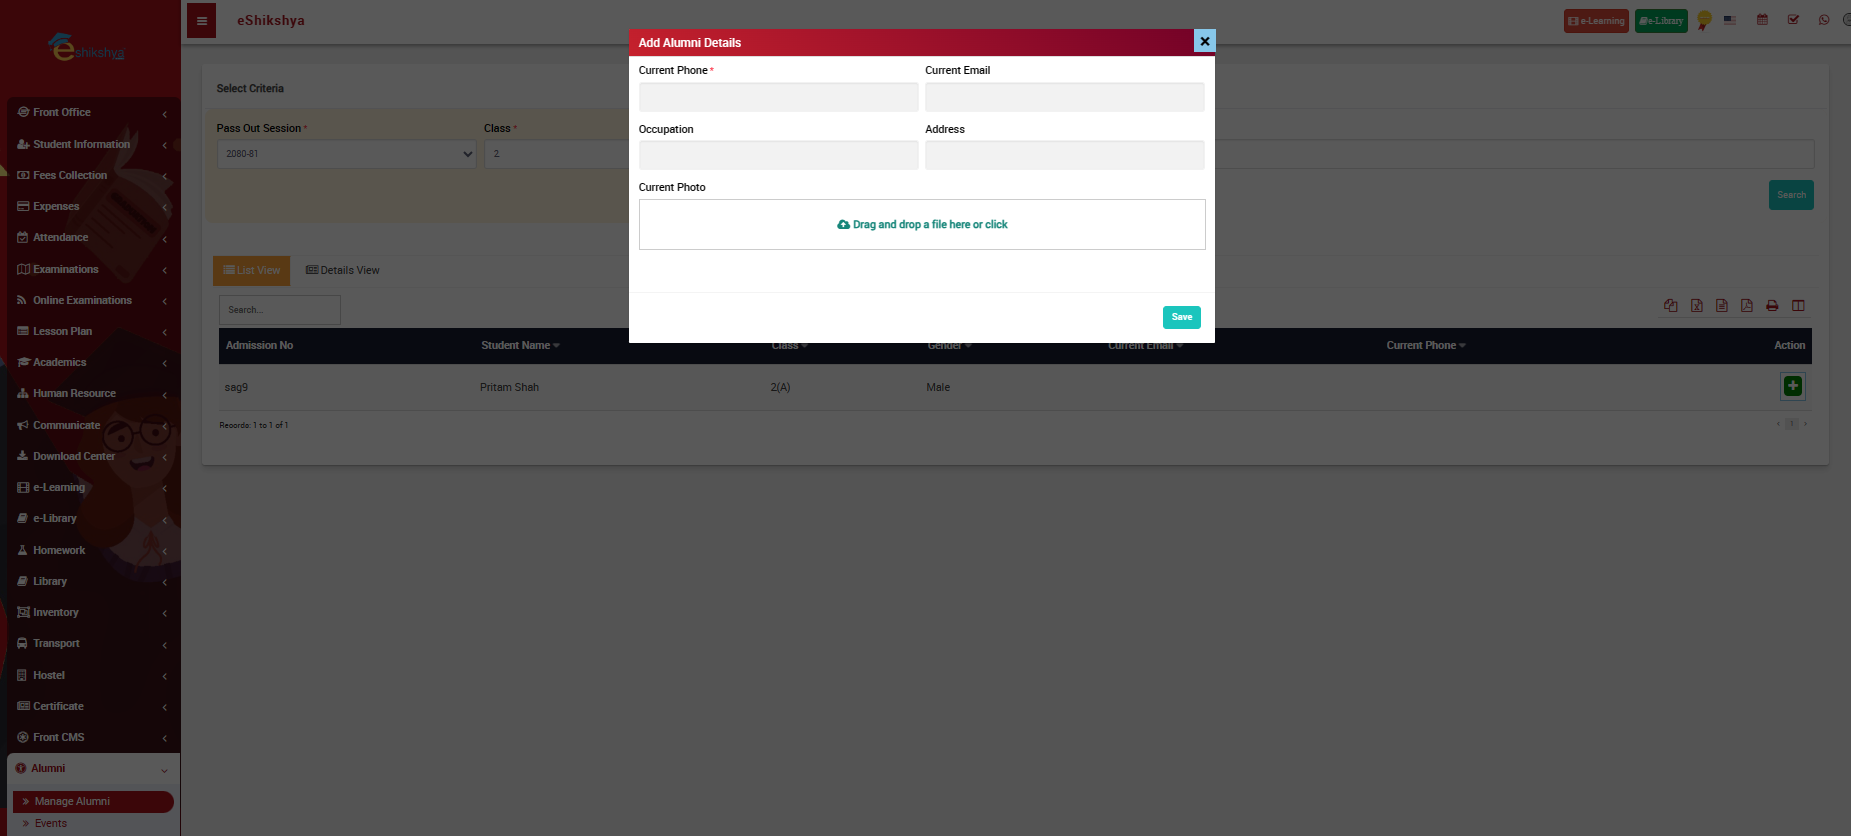 Image
Image -
Fill in the Alumni details like current phone, email, occupation, address, photo and click on save.
Events
To manage school events, go to events under Alumni. The following page should appear.
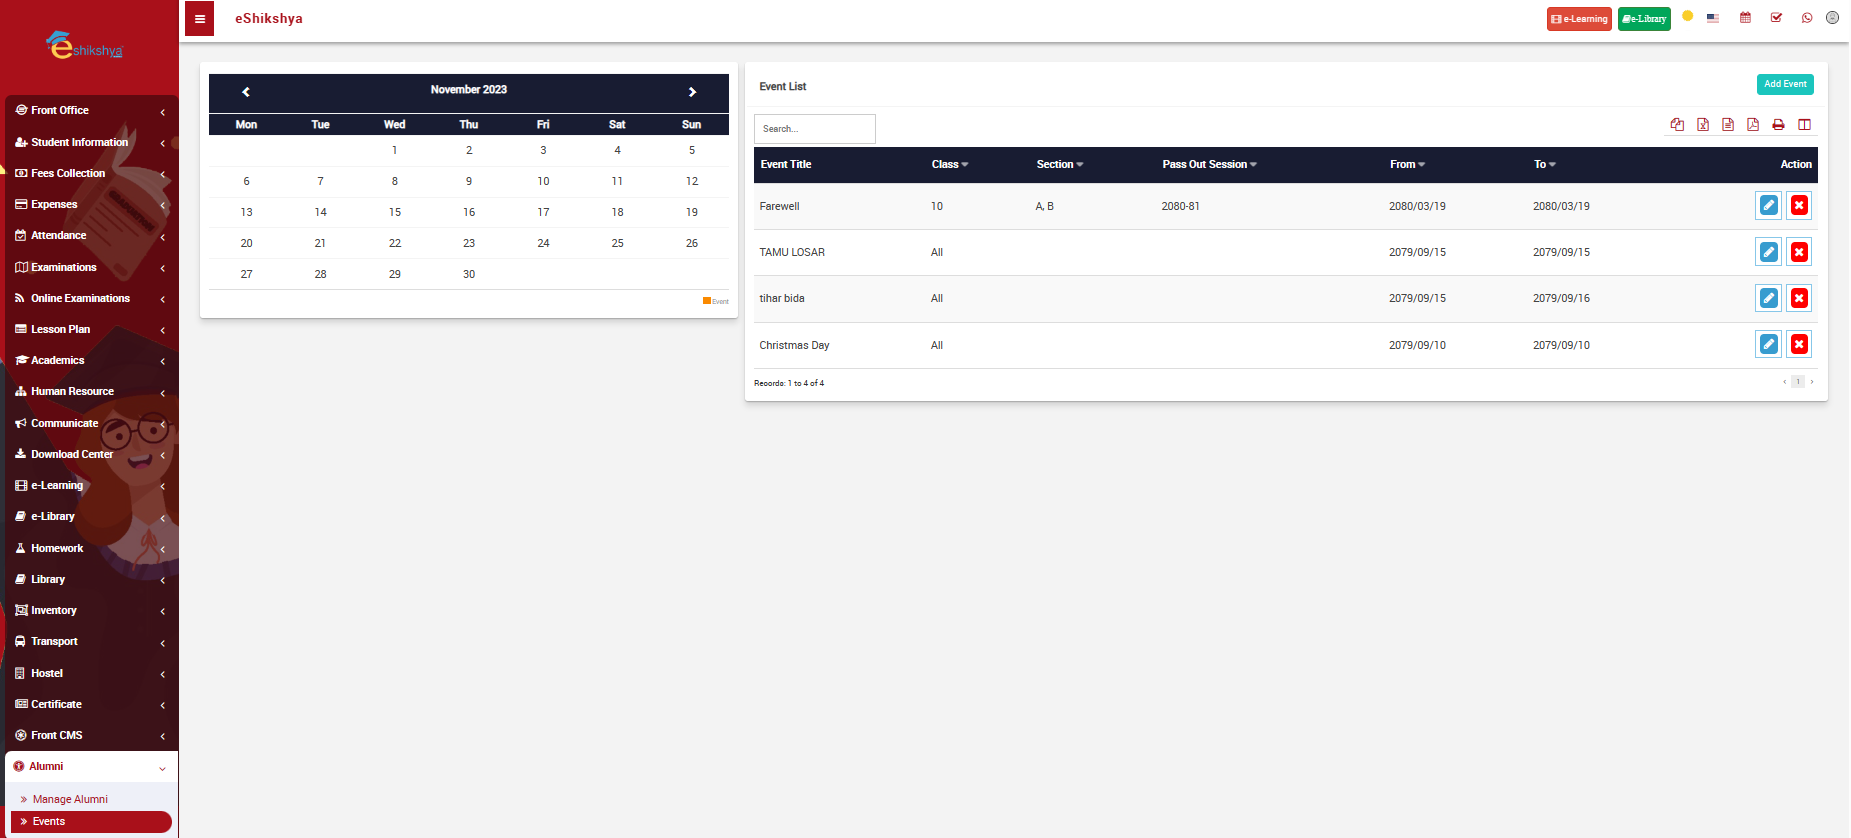 Image
Image
- On the left side of the page right side of the page you can see the calendar.
- On the right side of the page you can see an add event button. Click on it, the following page should appear.
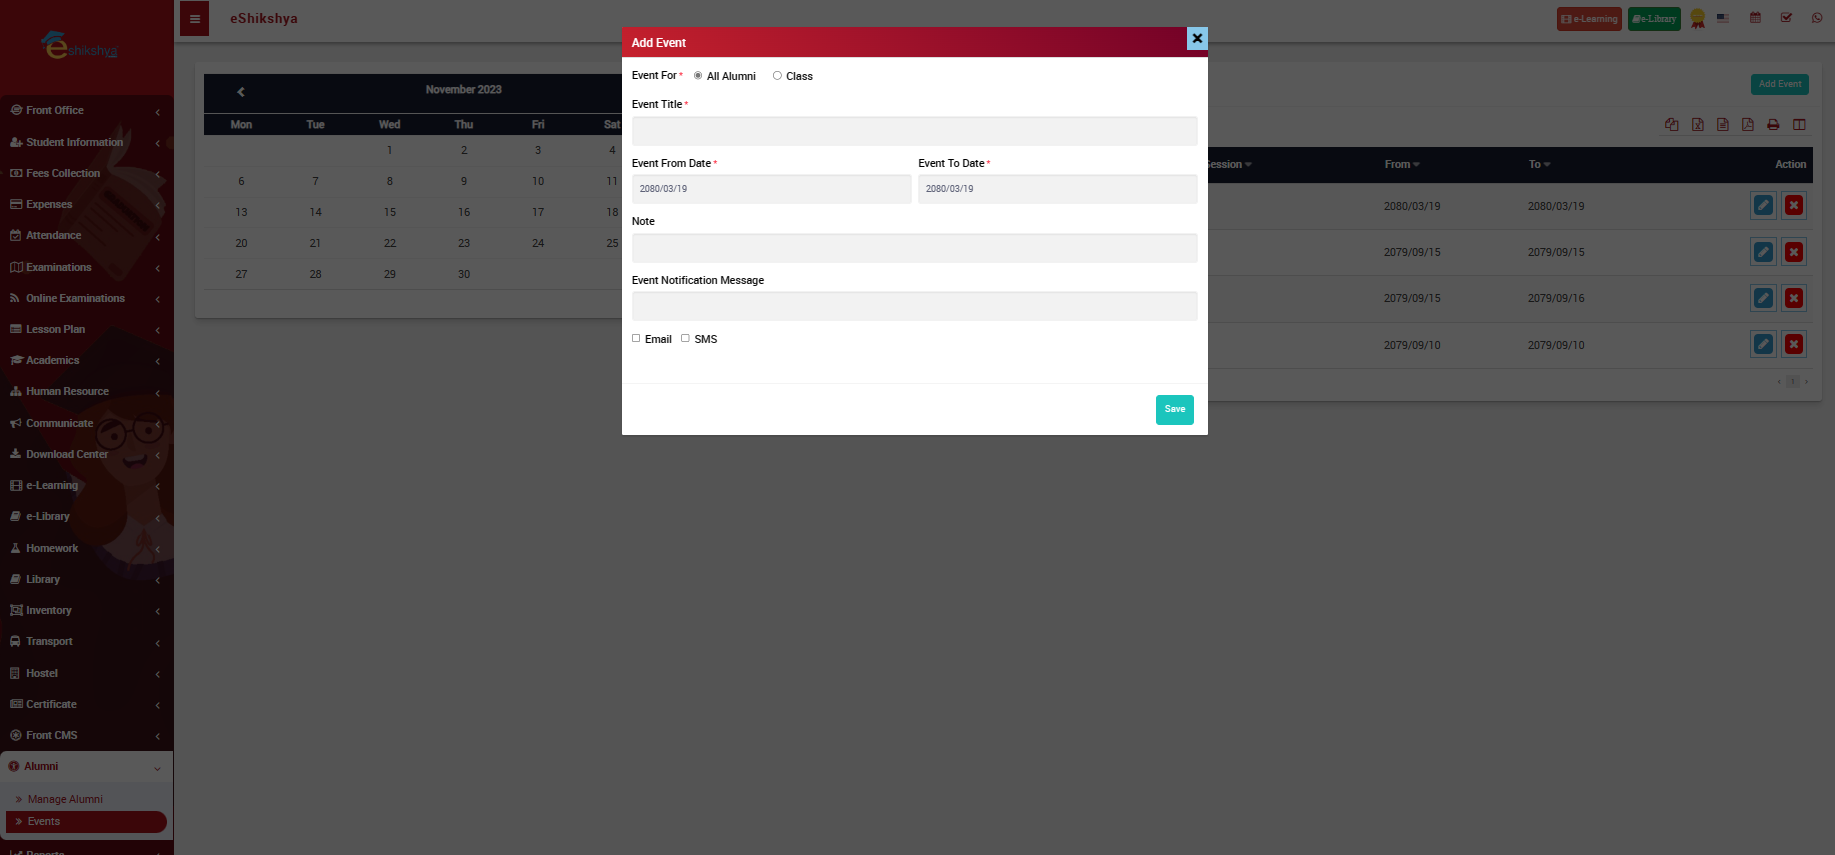 Image
Image
-
On the form, there you will first see an option to choose who the event is for: Alumni or class
-
You are required to enter the Event name, dates, notification message, you can choose if you want to send the message notification through email or SMS and click on save.
Reports
Student Information
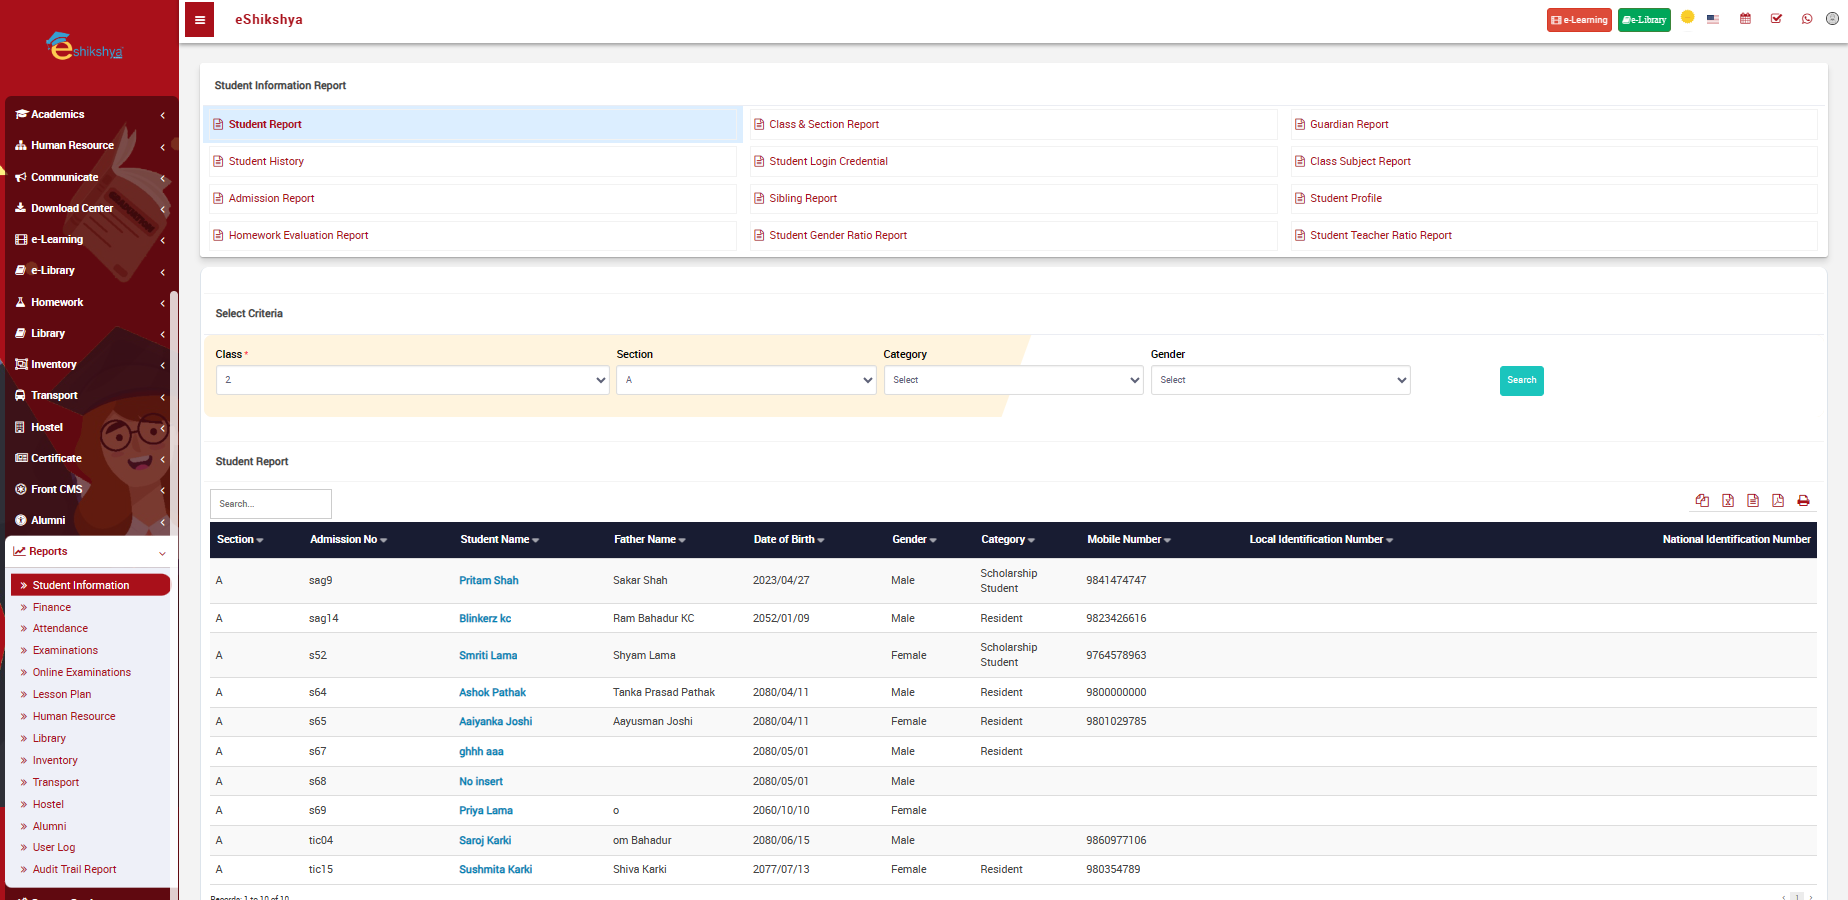
To generate reports on student go to Student information under Reports. The following page should appear.
 Image
Image
In the given image, the top of the page, you can see options to choose from various student report type. Such as:
Student Information Report:
Provides a comprehensive overview of individual student details, including personal information, contact details, and academic history.
Student Report:
Offers a summary of a student's academic performance, including grades, attendance, and other relevant details for a specific time period.
Class & Section Report:
Presents information about the overall performance, attendance, and demographic details of students within a specific class and section.
Guardian Report:
Summarizes information about the parents or guardians of students, including contact details, emergency information, and involvement in school activities.
Student History:
Provides a historical overview of a student's academic journey, including past grades, attendance records, and any disciplinary actions.
Student Login Credential:
Generates and manages login credentials for students, allowing them access to the school's online portal or learning management system.
Class Subject Report:
Offers insights into the performance of students in specific subjects within a class, helping teachers identify areas that may need additional attention.
Admission Report:
Summarizes data related to student admissions, including the number of new students, admission trends, and demographic information.
Sibling Report:
Provides information about students who have siblings attending the same school, facilitating family-based analysis and communication.
Student Profile:
Offers a detailed profile of an individual student, including academic achievements, extracurricular activities, and any special considerations.
Homework Evaluation Report:
Summarizes the performance of students in completing and submitting homework assignments, helping teachers assess overall class engagement.
Student Gender Ratio Report:
Analyzes the distribution of male and female students across classes or the entire school, providing insights into gender diversity.
Student Teacher Ratio Report:
Calculates the ratio of students to teachers in different classes or sections, helping assess the effectiveness of teacher-student interactions.
Finance
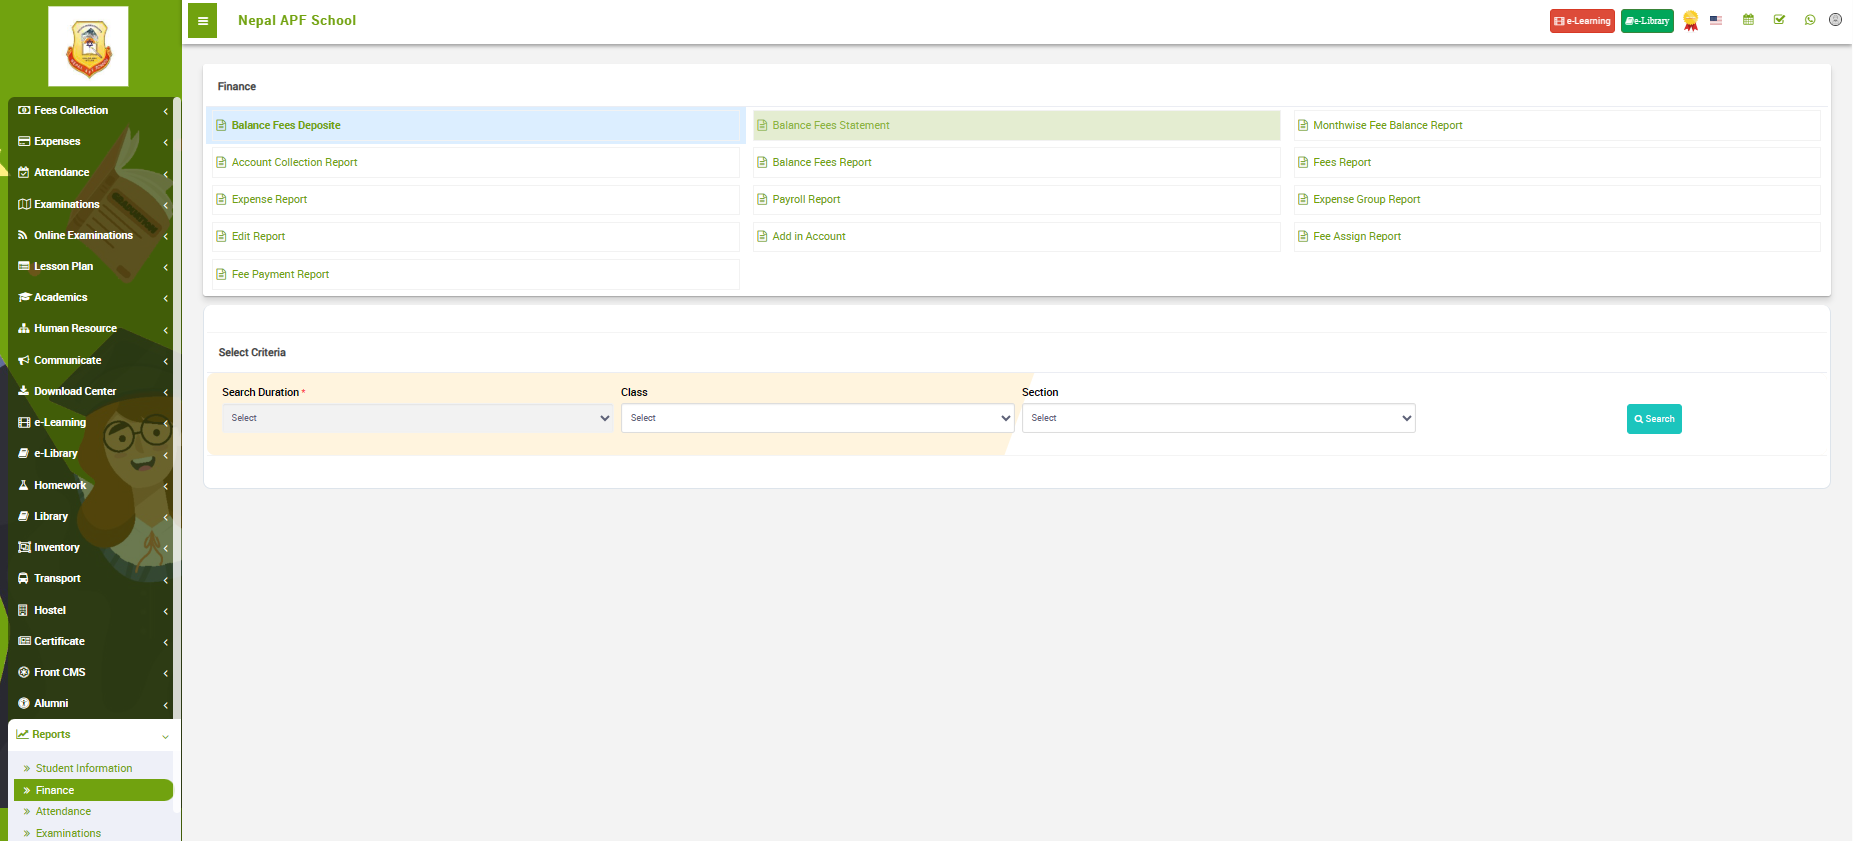
To generate Financial reports go to Finance under Reports. The following page should appear.
 Image
Image
In the given image, the top of the page, you can see options to choose from various Finance report type. Such as:
Balance Fees Deposit:
This report provides a summary of fees deposited by students, indicating the remaining balance after each payment. It helps in tracking individual student payments and ensuring that the accounts are up-to-date.
Balance Fees Statement:
The Balance Fees Statement offers a detailed overview of the financial status of students in terms of pending fees. It includes information about the total fees, payments made, and the outstanding balance for each student.
Monthwise Fee Balance Report:
This report categorizes fee balances on a monthly basis, allowing administrators to analyze trends in fee payments and identify patterns over time. It aids in financial planning and forecasting.
Account Collection Report:
The Account Collection Report summarizes the total amount collected within a specified time period. It provides insights into the overall financial health of the institution and helps in monitoring revenue streams.
Balance Fees Report:
The Balance Fees Report gives an aggregate view of all outstanding fees across students or classes. It serves as a tool for financial planning and helps in prioritizing fee collection efforts.
Fees Report:
This report provides a comprehensive overview of all fees collected, including details such as the type of fees (tuition, transportation, etc.), the amount collected, and any pending payments.
Expense Report:
The Expense Report outlines the financial expenditures incurred by the school. It categorizes expenses, providing insights into where funds are allocated and helping in budget management.
Payroll Report:
The Payroll Report details the salary and compensation information for staff and faculty members. It includes individual pay details, deductions, and overall payroll expenses.
Expense Group Report:
This report categorizes expenses into groups (e.g., utilities, maintenance, salaries) for a more detailed analysis. It helps in understanding spending patterns and optimizing budget allocations.
Edit Report:
The Edit Report tracks any changes or modifications made to financial records, ensuring transparency and accountability in the system.
Add in Account:
This report provides information on additions made to financial accounts, offering insights into new revenue streams or funding sources.
Fee Assign Report:
The Fee Assign Report details the assignment of fees to students, including the type of fees assigned and any special considerations.
Fee Payment Report:
This report offers a comprehensive overview of all fee payments made by students. It includes details such as the date of payment, mode of payment, and the amount paid.
Attendance
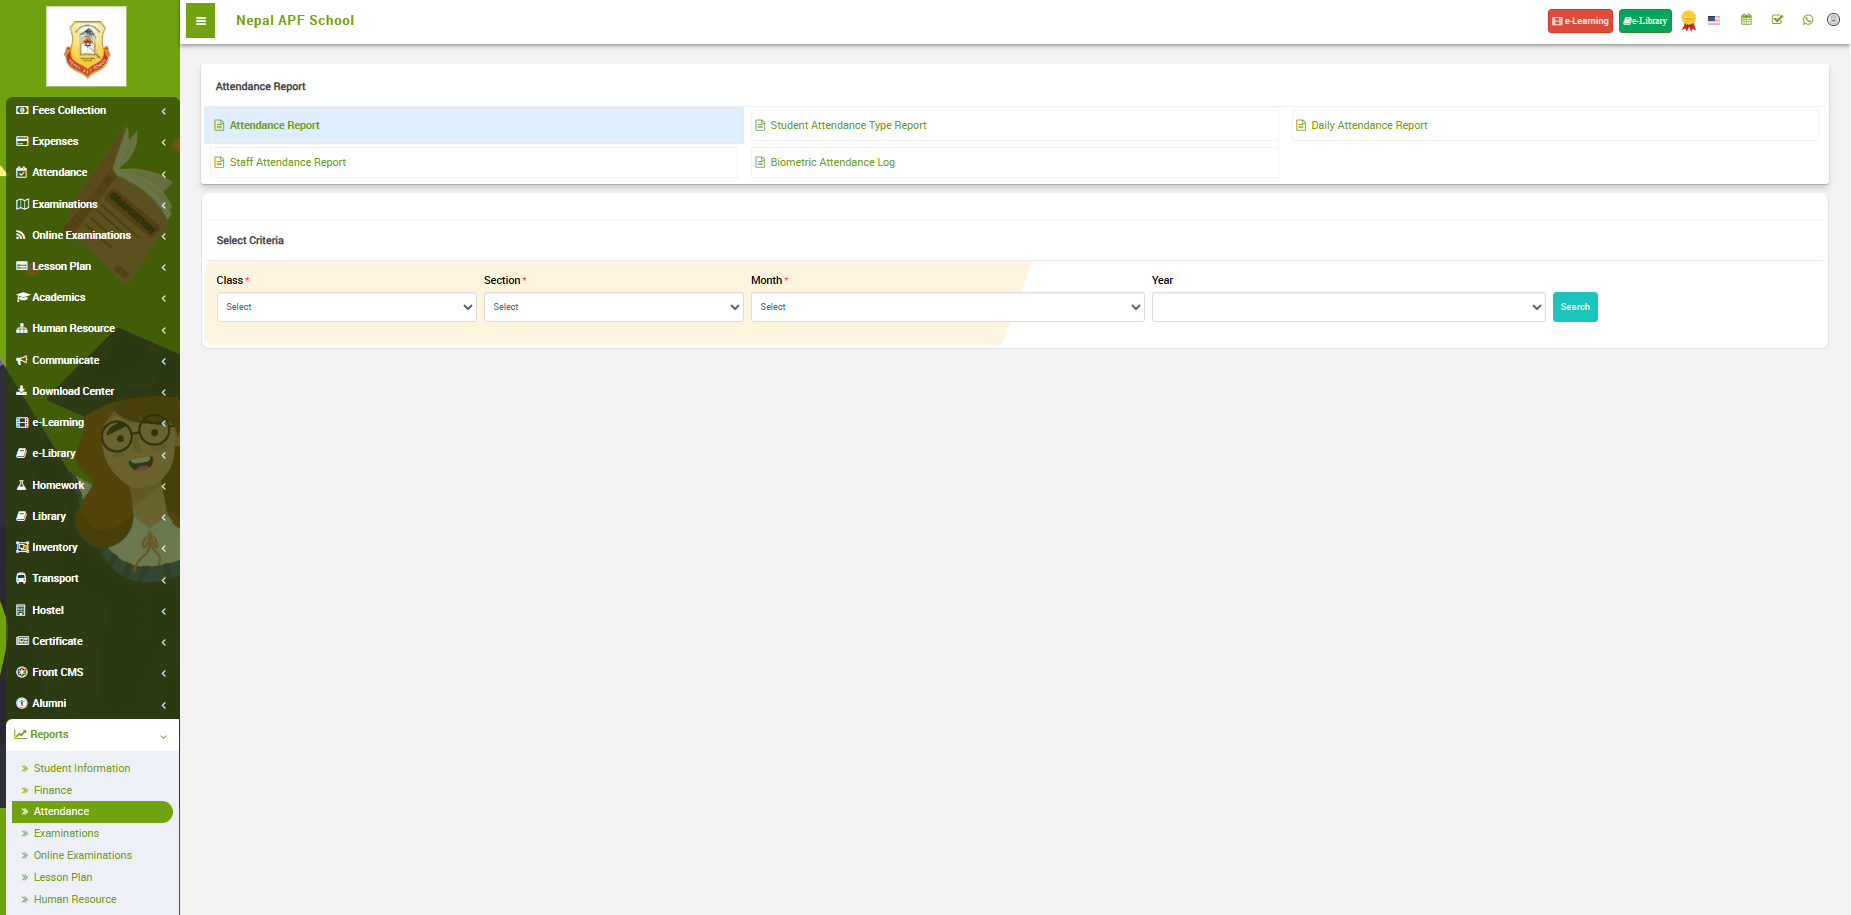
To generate Attendance reports go to Attendance under Reports. The following page should appear.
 Image
Image
In the given image, the top of the page, you can see options to choose from various Attendance report type. Such as:
Attendance Report:
The Attendance Report provides an overall summary of attendance data, typically for a specified time period. It includes metrics such as total attendance, absentees, and present students across classes or the entire school.
Student Attendance Type Report:
This report categorizes student attendance based on different types, such as excused absences, unexcused absences, late arrivals, or early departures. It helps in understanding the reasons behind attendance variations and identifying trends.
Daily Attendance Report:
The Daily Attendance Report offers a detailed view of attendance on a day-to-day basis. It includes information on the attendance status of each student for each day, helping in monitoring attendance patterns over time.
Staff Attendance Report:
The Staff Attendance Report focuses on the attendance of teachers and other staff members. It provides insights into the punctuality and regularity of the staff, facilitating efficient workforce management.
Biometric Attendance Log:
The Biometric Attendance Log records attendance data collected through biometric authentication methods, such as fingerprint or facial recognition. It offers a secure and accurate means of tracking attendance for both students and staff.
Examinations
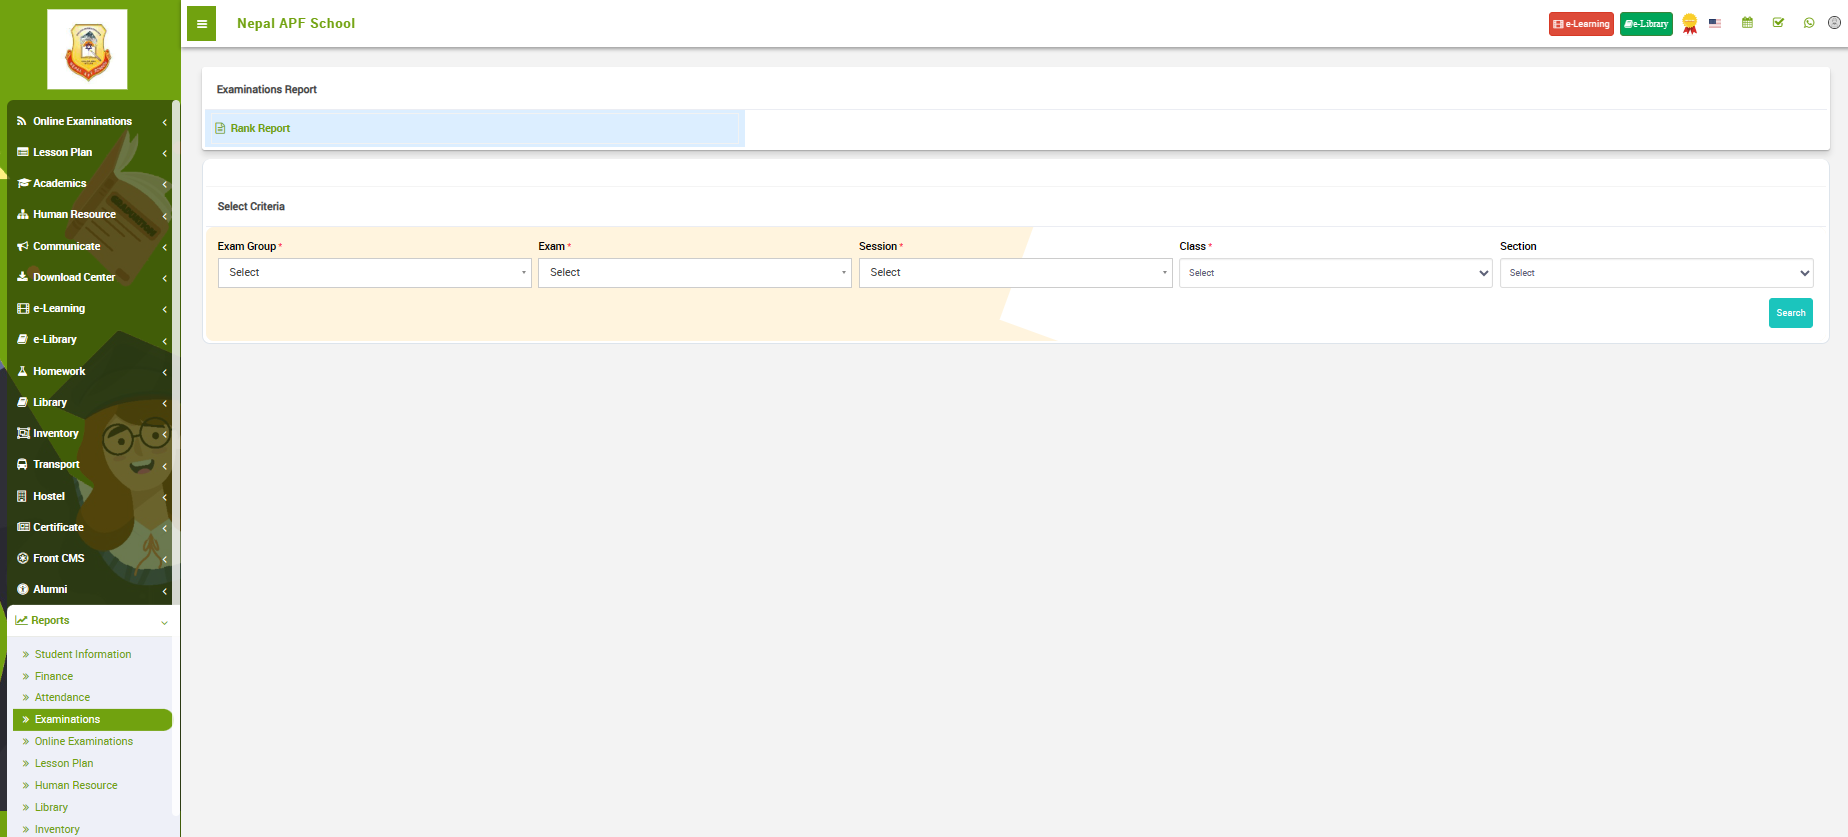
To generate Examination report go to Attendance under Reports. The following page should appear.
 Image
Image
In the given image, the top of the page, you can see options to choose Rank report.
Choose Exam group, exam, session, class, section and click on search to generate Rank report for the selected group.
Online Examinations
To generate Online Examination reports go to Online Examinations under Reports. The following page should appear.
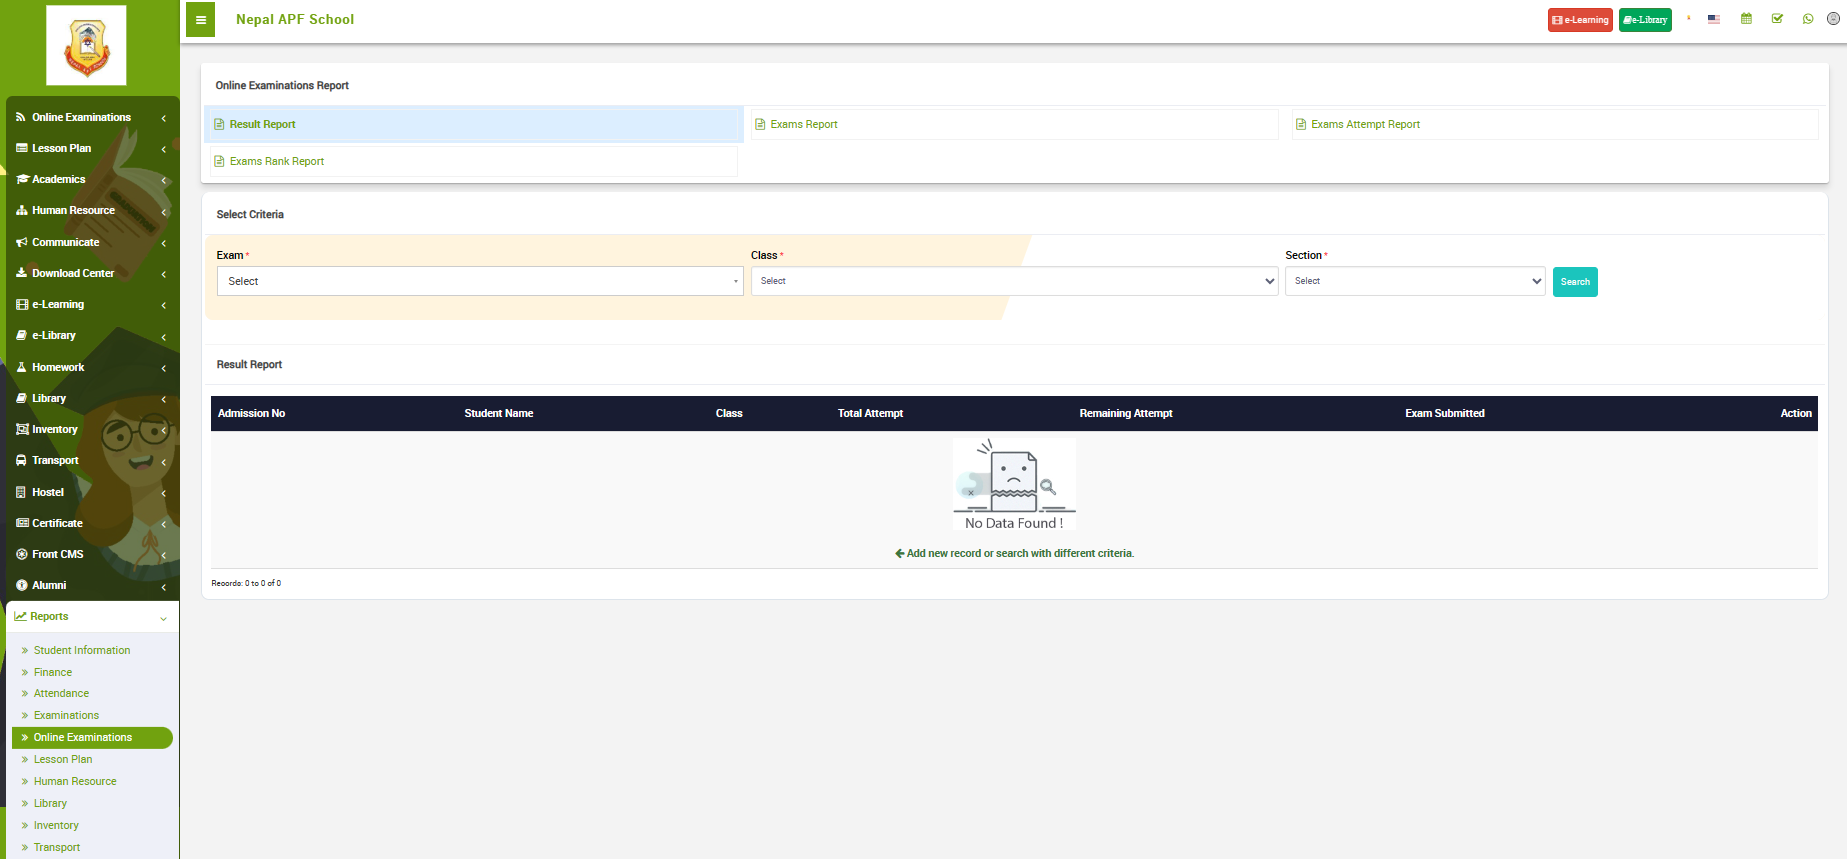 Image
Image
In the given image, the top of the page, you can see options to choose from various Online Examination report type. Such as:
Result Report:
The Result Report provides a comprehensive overview of the performance of students in online examinations. It includes individual results, grades, and any additional performance metrics. This report is essential for students, parents, and educators to assess academic achievements.
Exams Report:
The Exams Report offers insights into the overall performance of students across multiple exams. It may include aggregated data, such as average scores, pass rates, and distribution of grades, providing a broader perspective on the academic performance of the entire student body.
Exams Attempt Report:
The Exams Attempt Report details the number of attempts made by each student in online exams. This report is useful for identifying students who may need additional support or intervention, as multiple attempts may indicate challenges in understanding the exam material.
Exams Rank Report:
The Exams Rank Report ranks students based on their performance in online exams. It provides a hierarchical view of student achievements, helping to identify high-performing students and those who may require additional attention or support.
Lesson Plan
To generate Lesson reports go to Lesson Plan under Reports. The following page should appear.
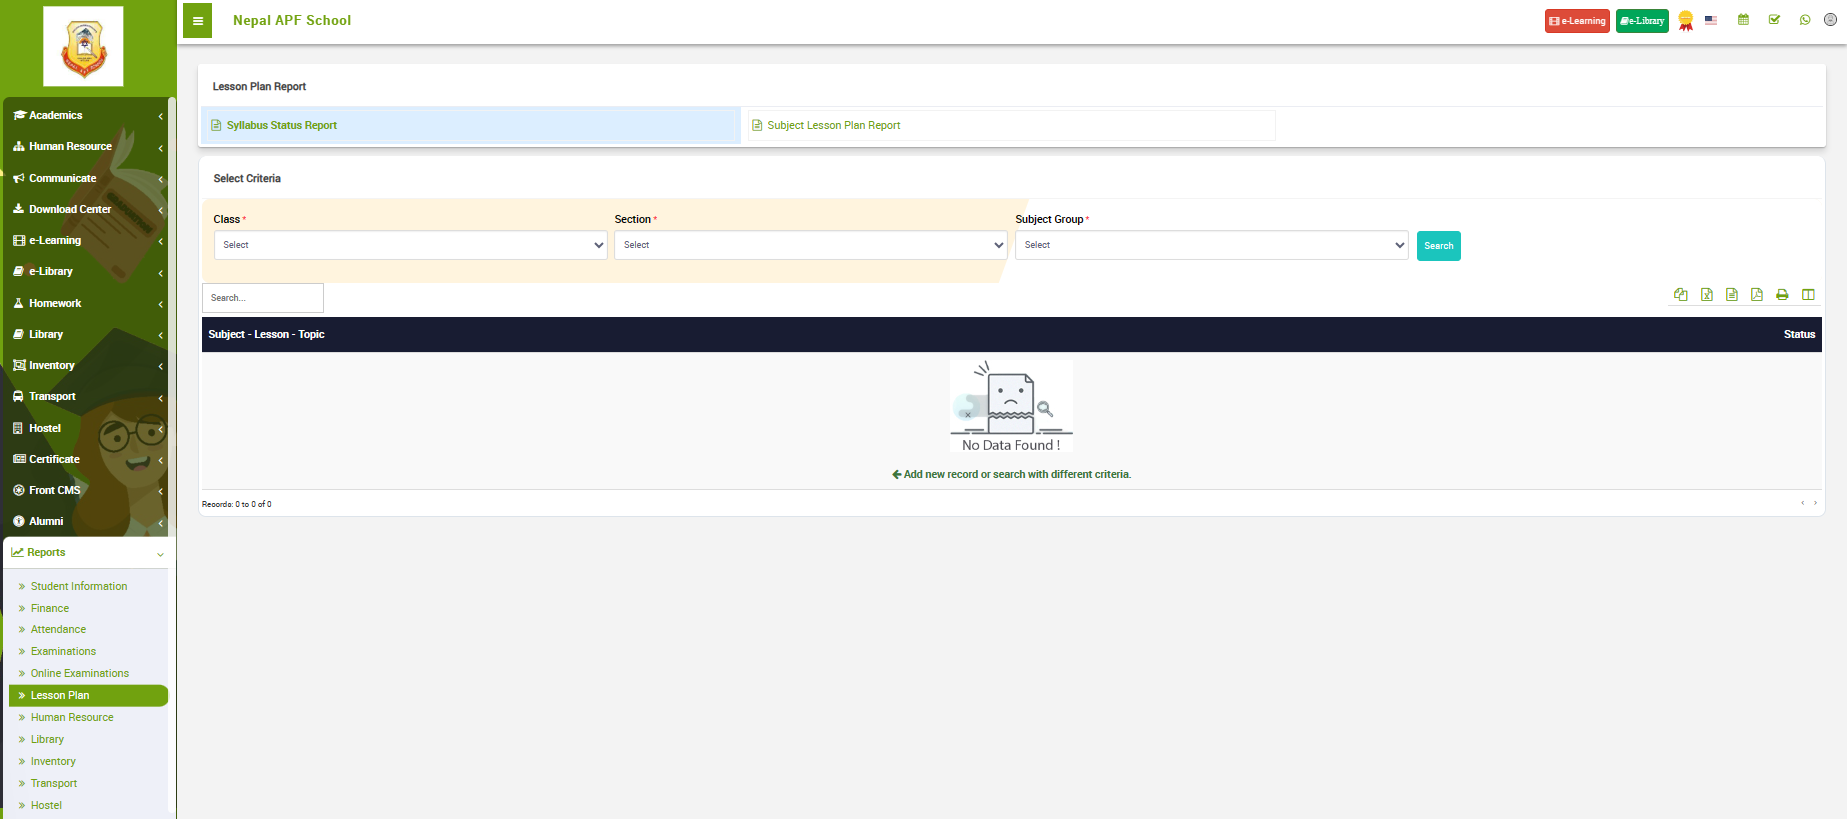 Image
Image
In the given image, the top of the page, you can see options to choose from various Lesson Plan report type. Such as:
Syllabus Status Report:
The Syllabus Status Report provides an overview of the progress made in covering the curriculum or syllabus for a specific subject or class. It includes details on the topics or chapters that have been covered, those that are in progress, and any that are yet to be taught. This report is valuable for educators and administrators to monitor the alignment of teaching with the curriculum timeline.
Subject Lesson Plan Report:
The Subject Lesson Plan Report focuses on the detailed plans for teaching a specific subject. It includes information about the topics to be covered, the teaching methods to be employed, learning objectives, and any resources required. This report aids educators in organizing and structuring their teaching approach, ensuring comprehensive coverage of the subject matter.
Human Resource
To generate Human resource reports go to Human Resources under Reports. The following page should appear.
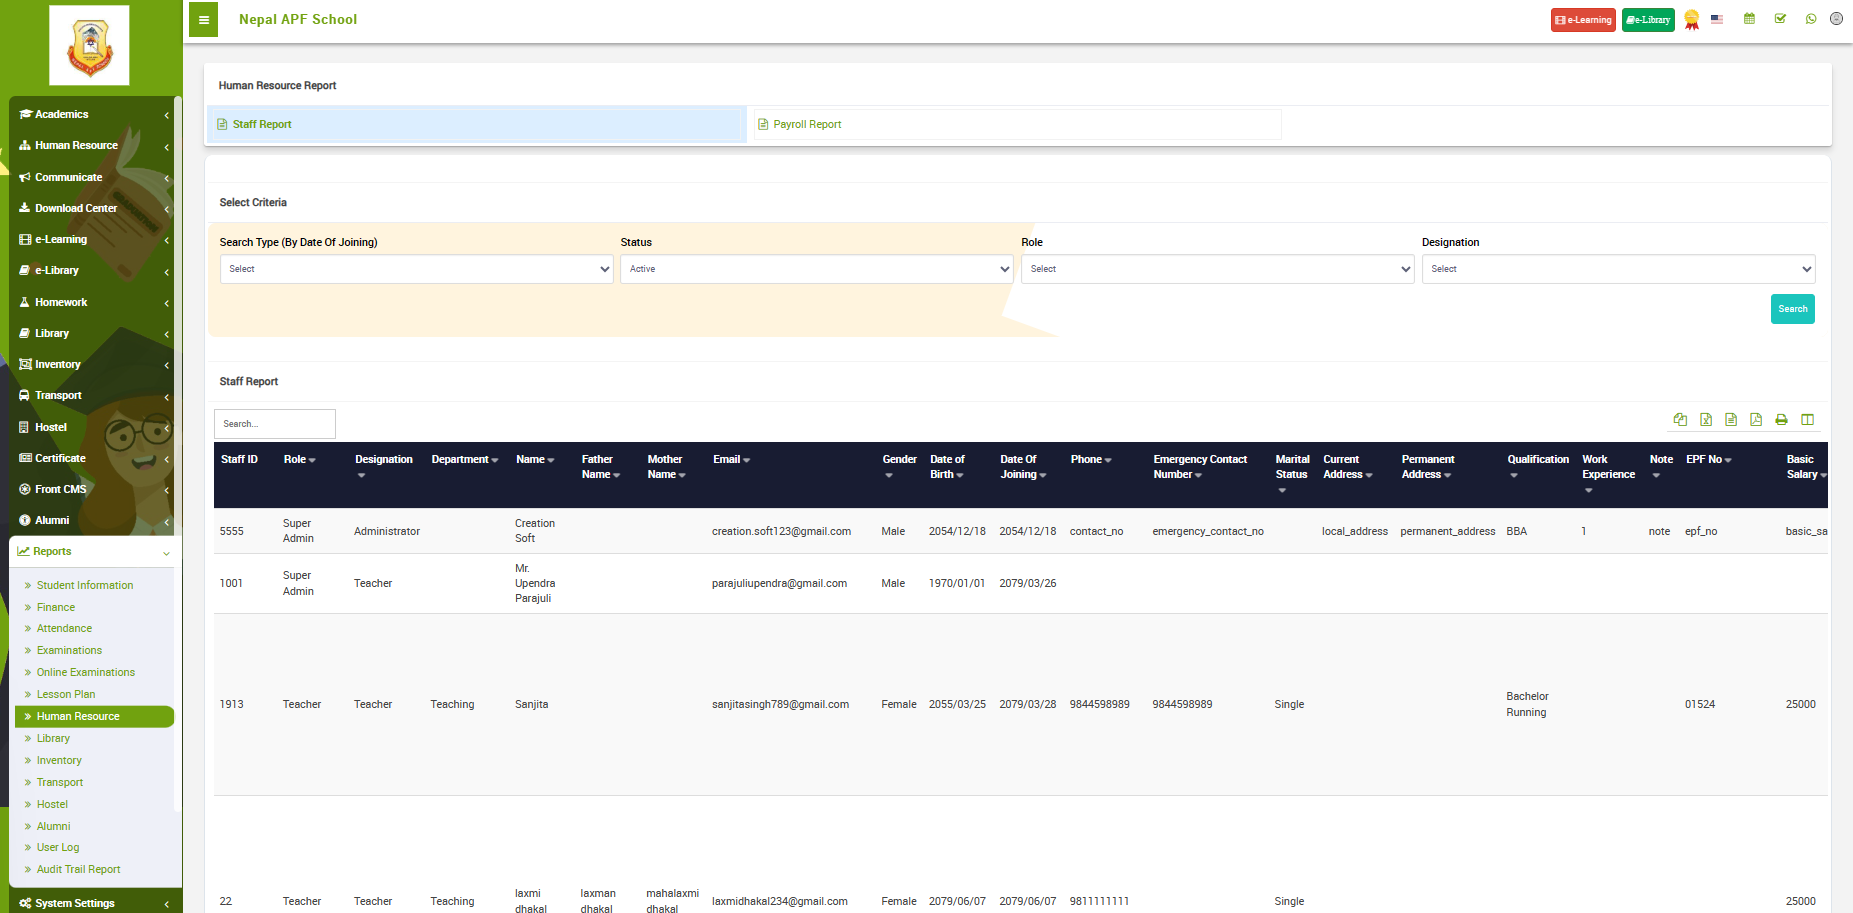 Image
Image
In the given image, the top of the page, you can see options to choose from various Human Resources report type. Such as:
Staff Report:
The Staff Report provides detailed information about the personnel working within the educational institution. It typically includes details such as employee names, positions, contact information, qualifications, and any other relevant personnel details. This report helps in managing and tracking the staff roster, facilitating effective human resource management.
Payroll Report:
The Payroll Report summarizes financial information related to staff salaries and compensation. It includes details such as individual staff salaries, deductions, bonuses, and other financial components. This report is crucial for financial planning, budgeting, and ensuring accurate and timely disbursement of salaries to staff members.
Library
To generate Library reports go to Human Resources under Reports. The following page should appear.
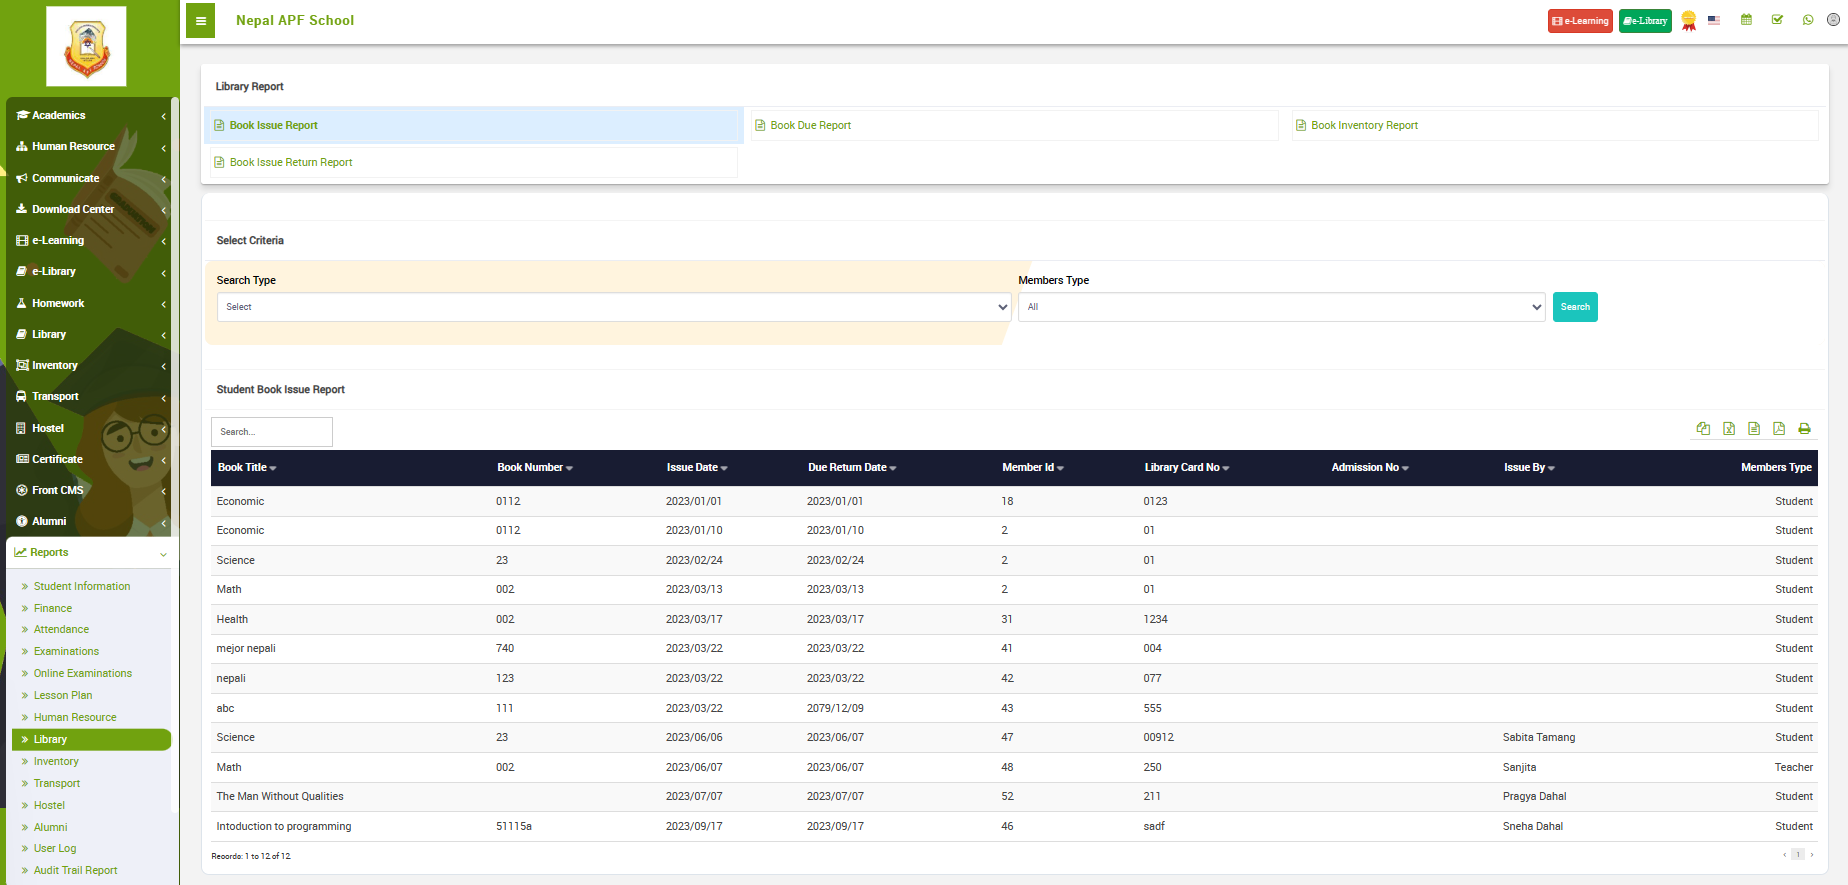 Image
Image
In the given image, the top of the page, you can see options to choose from various Library report type. Such as:
Book Issue Report:
The Book Issue Report provides information about the books that have been issued to students, teachers, or other library users during a specific time period. It typically includes details such as the book title, borrower's information, date of issue, and due date.
Book Due Report:
The Book Due Report alerts the library staff about books that are due for return. It includes information on books that have not been returned by the specified due date, helping in tracking overdue items and facilitating the management of library resources.
Book Inventory Report:
The Book Inventory Report offers a comprehensive overview of the library's collection. It includes details about each book in the inventory, such as title, author, publication date, and the current status (available, checked out, etc.). This report aids in cataloging, organizing, and managing the library's book collection.
Book Issue Return Report:
The Book Issue Return Report provides information about books that have been returned to the library after being borrowed. It includes details such as the book title, borrower's information, date of return, and any associated fines or penalties.
Inventory
To generate Inventory reports go to Inventory under Reports. The following page should appear.
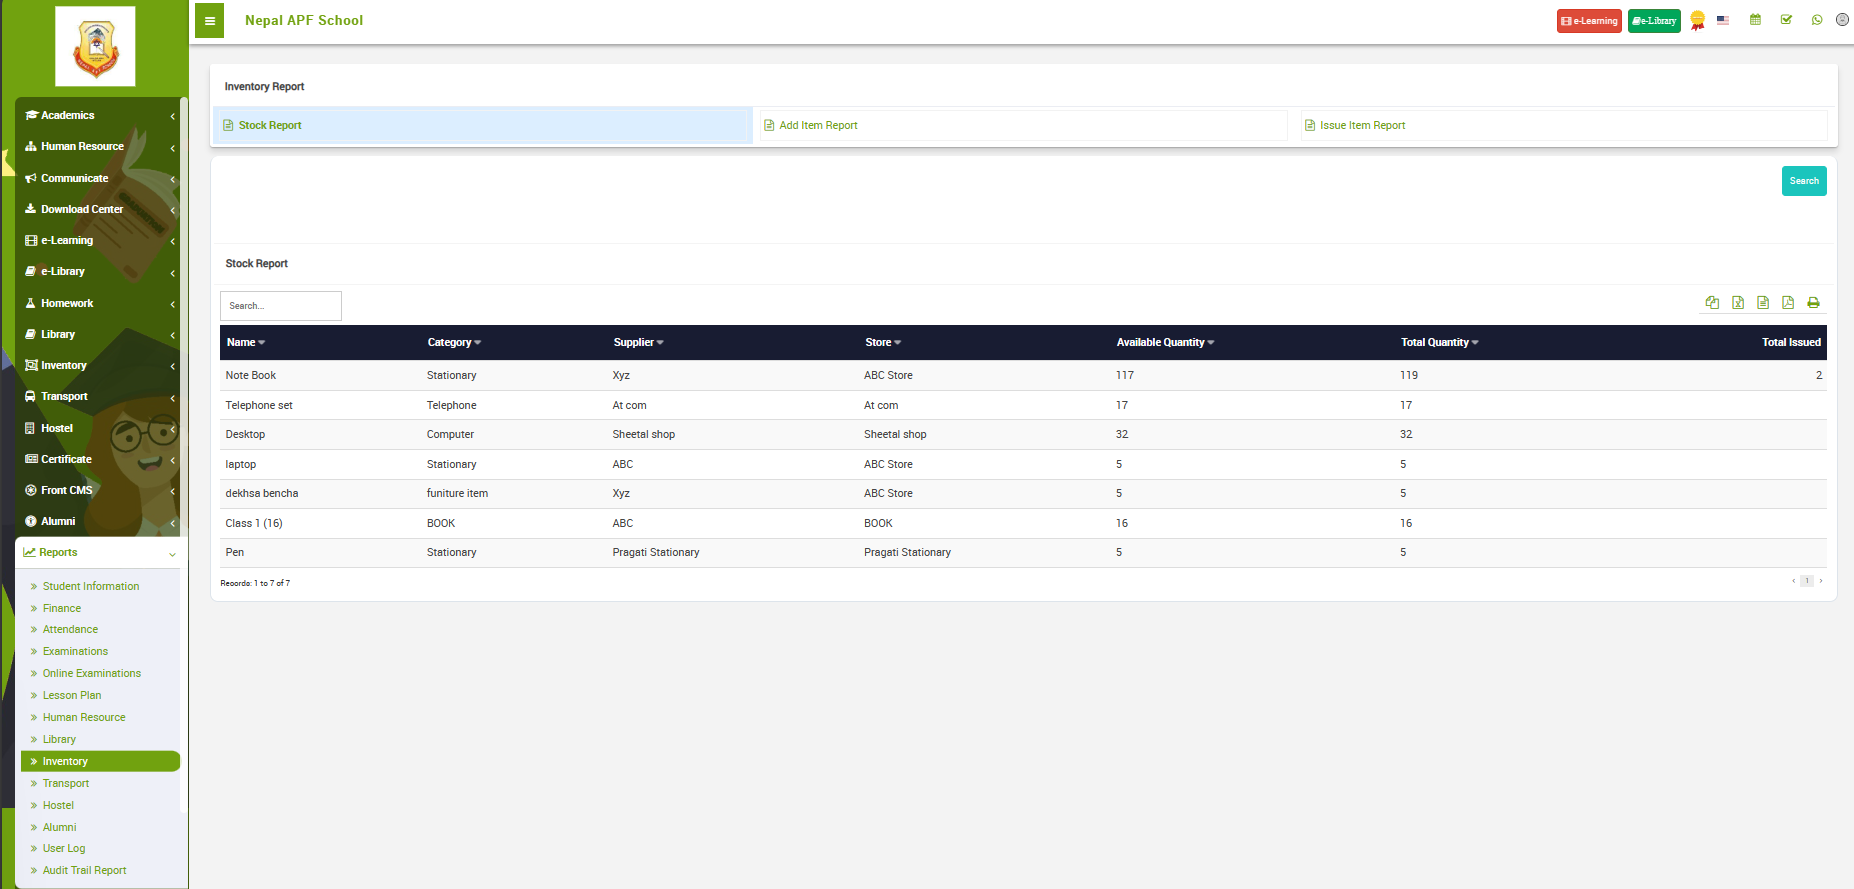 Image
Image
In the given image, the top of the page, you can see options to choose from various Inventory report type. Such as:
Stock Report:
The Stock Report provides a snapshot of the current inventory levels of items within the school. It includes details such as the quantity of each item in stock, its location, and any additional information relevant to the inventory management system. This report is essential for maintaining adequate stock levels, reordering supplies, and preventing stockouts.
Add Item Report:
The Add Item Report documents the addition of new items to the inventory. It includes information such as the item name, quantity added, date of addition, and any relevant details about the new items. This report helps in tracking changes to the inventory and maintaining an accurate record of all additions.
Issue Item Report:
The Issue Item Report provides details about items that have been issued or distributed from the inventory. It includes information such as the item name, quantity issued, recipient details, date of issue, and any associated documentation. This report is crucial for monitoring item usage and tracking the flow of inventory within the school.
Transport
To generate Transport reports go to Transport under Reports. The following page should appear.
 Image
Image
In the given image, the top of the page, you can see a filter to select criteria of who you want to generate the report for.
Hostel
To generate Hostel reports go to Hostel under Reports. The following page should appear.
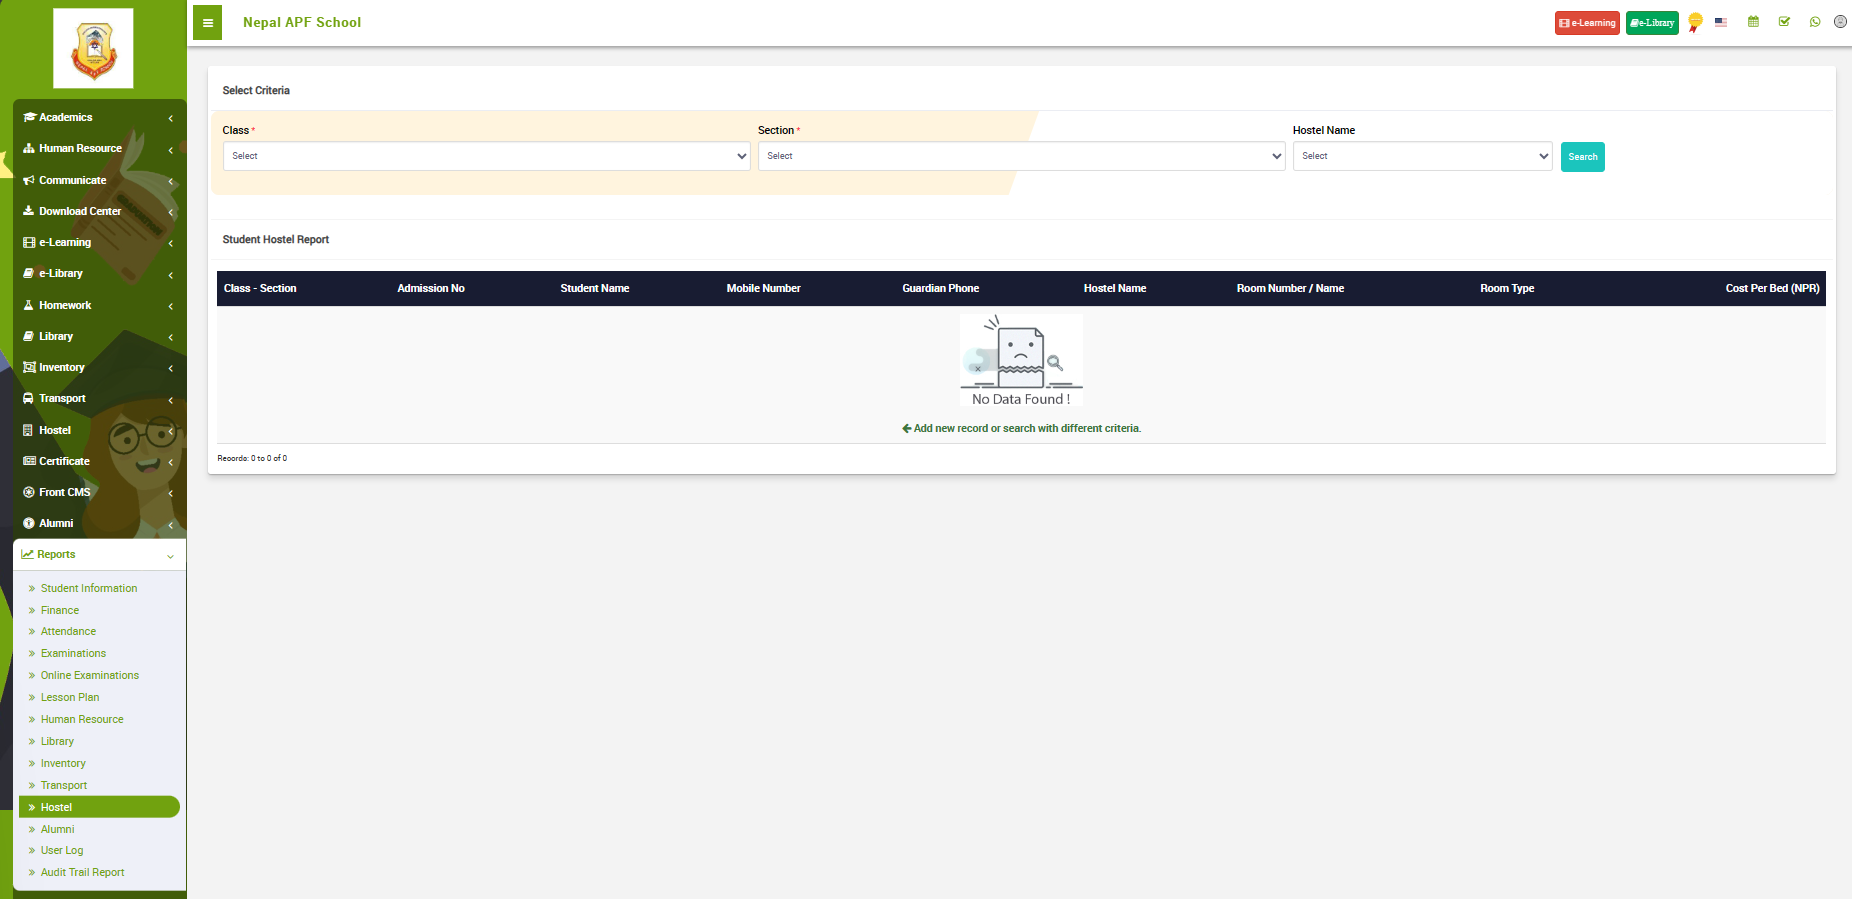 Image
Image
In the given image, the top of the page, you can see a filter to select criteria of who you want to generate the report for.
Alumni
To generate reports on Alumni go to Alumni under Reports. The following page should appear.
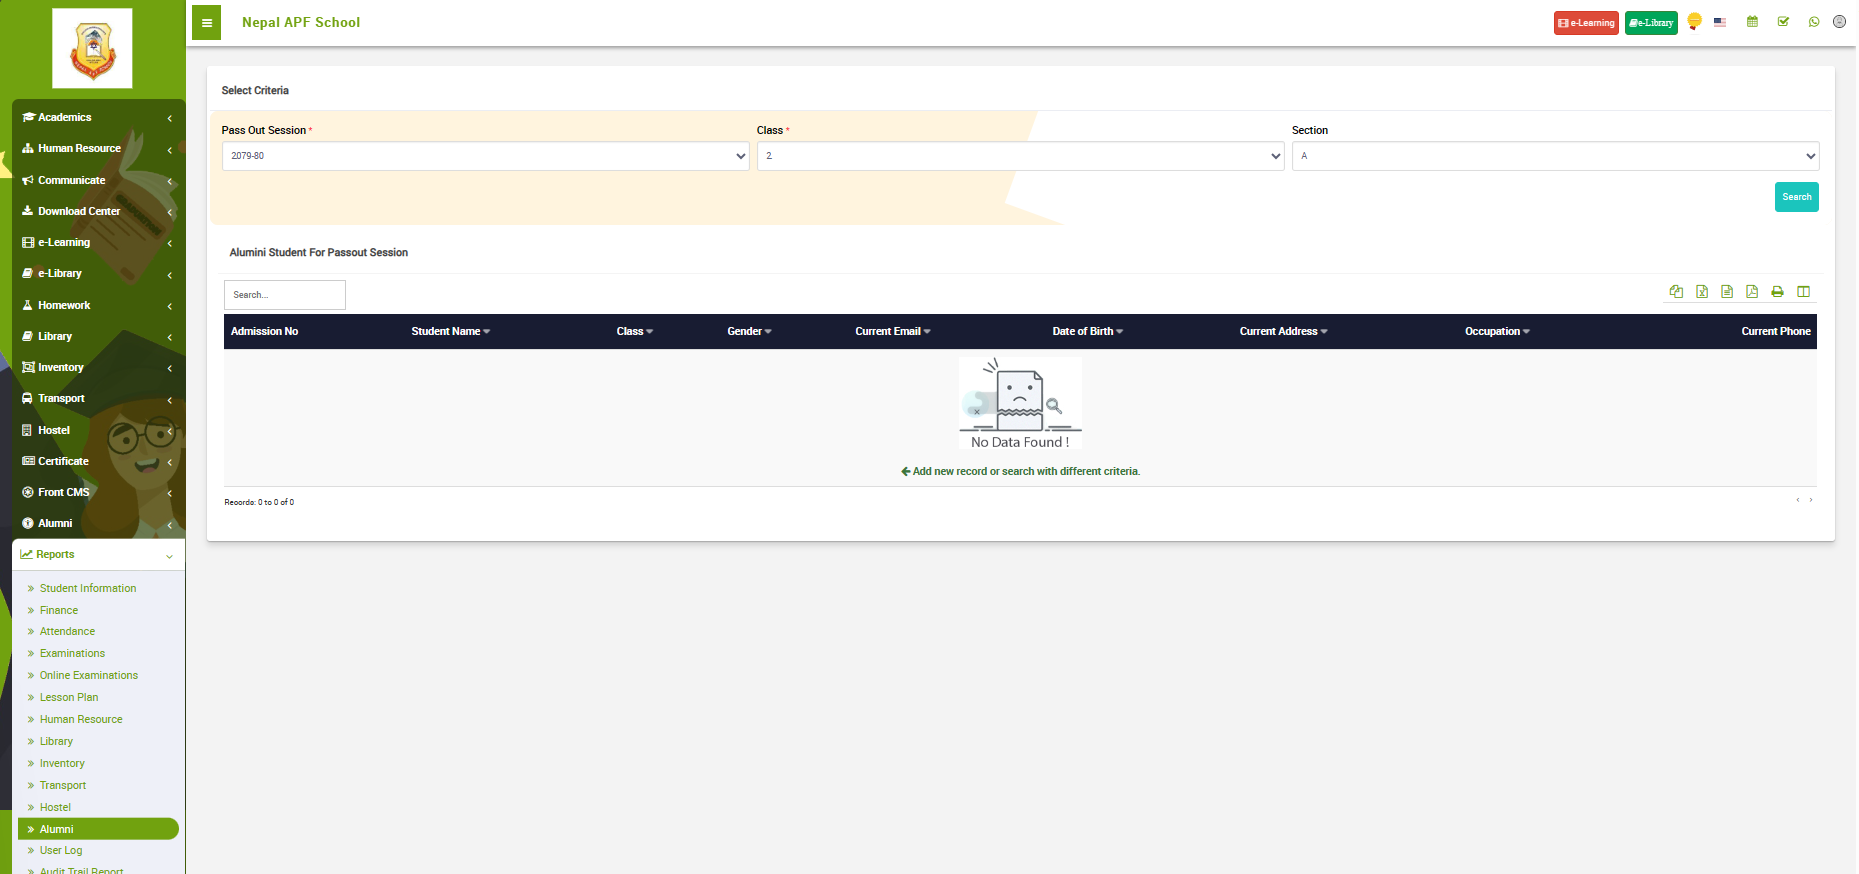 Image
Image
In the given image, the top of the page, you can see a filter to select criteria of who you want to generate the report for.
User Log
To generate User log report i.e. reports on All user, Staff, Students, Parent, go to User Log under Reports. The following page should appear.
 Image
Image
In the given image, you can see the report, Message, users, IP Address, Action, Platform, Agent, Date/Time. On the top right of the report there are icons that let you to copy the report, export to excel, pdf or print the report.
Audit Trail Report
To generate Audit report, go to Audit trail Report under Reports. The following page should appear.
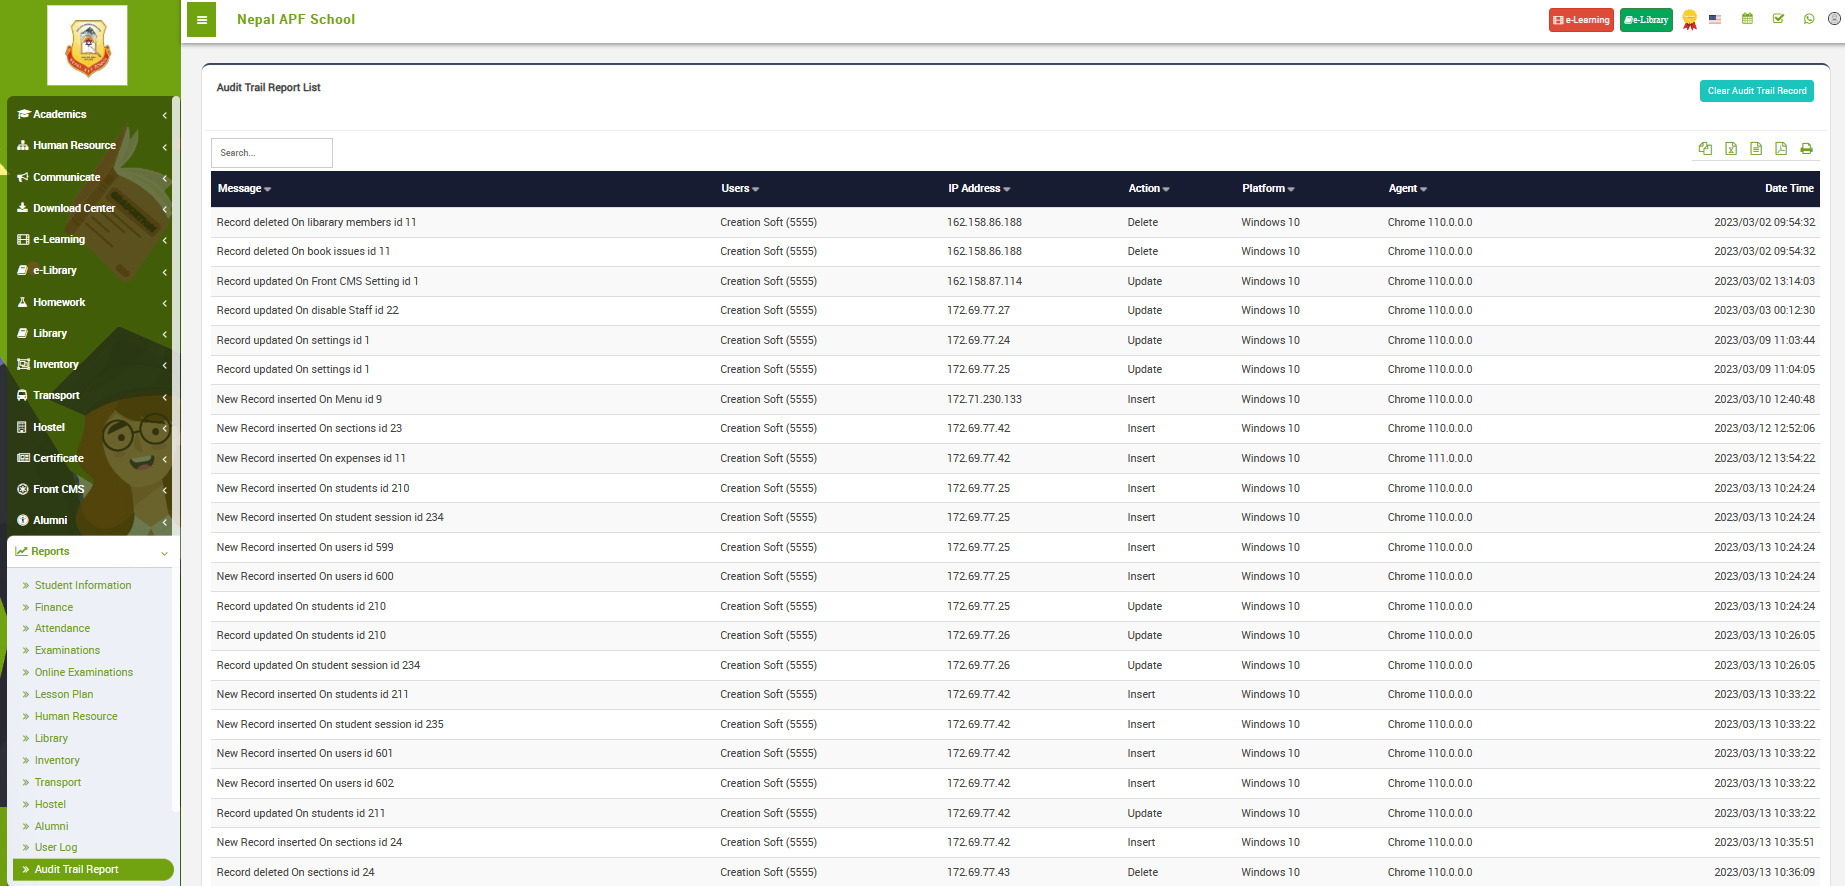 Image
Image
In the given image, you can see the report, Message, users, IP Address, Action, Platform, Agent, Date/Time. On the top right of the report there are icons that let you to copy the report, export to excel, pdf or print the report.
##Account
###Category
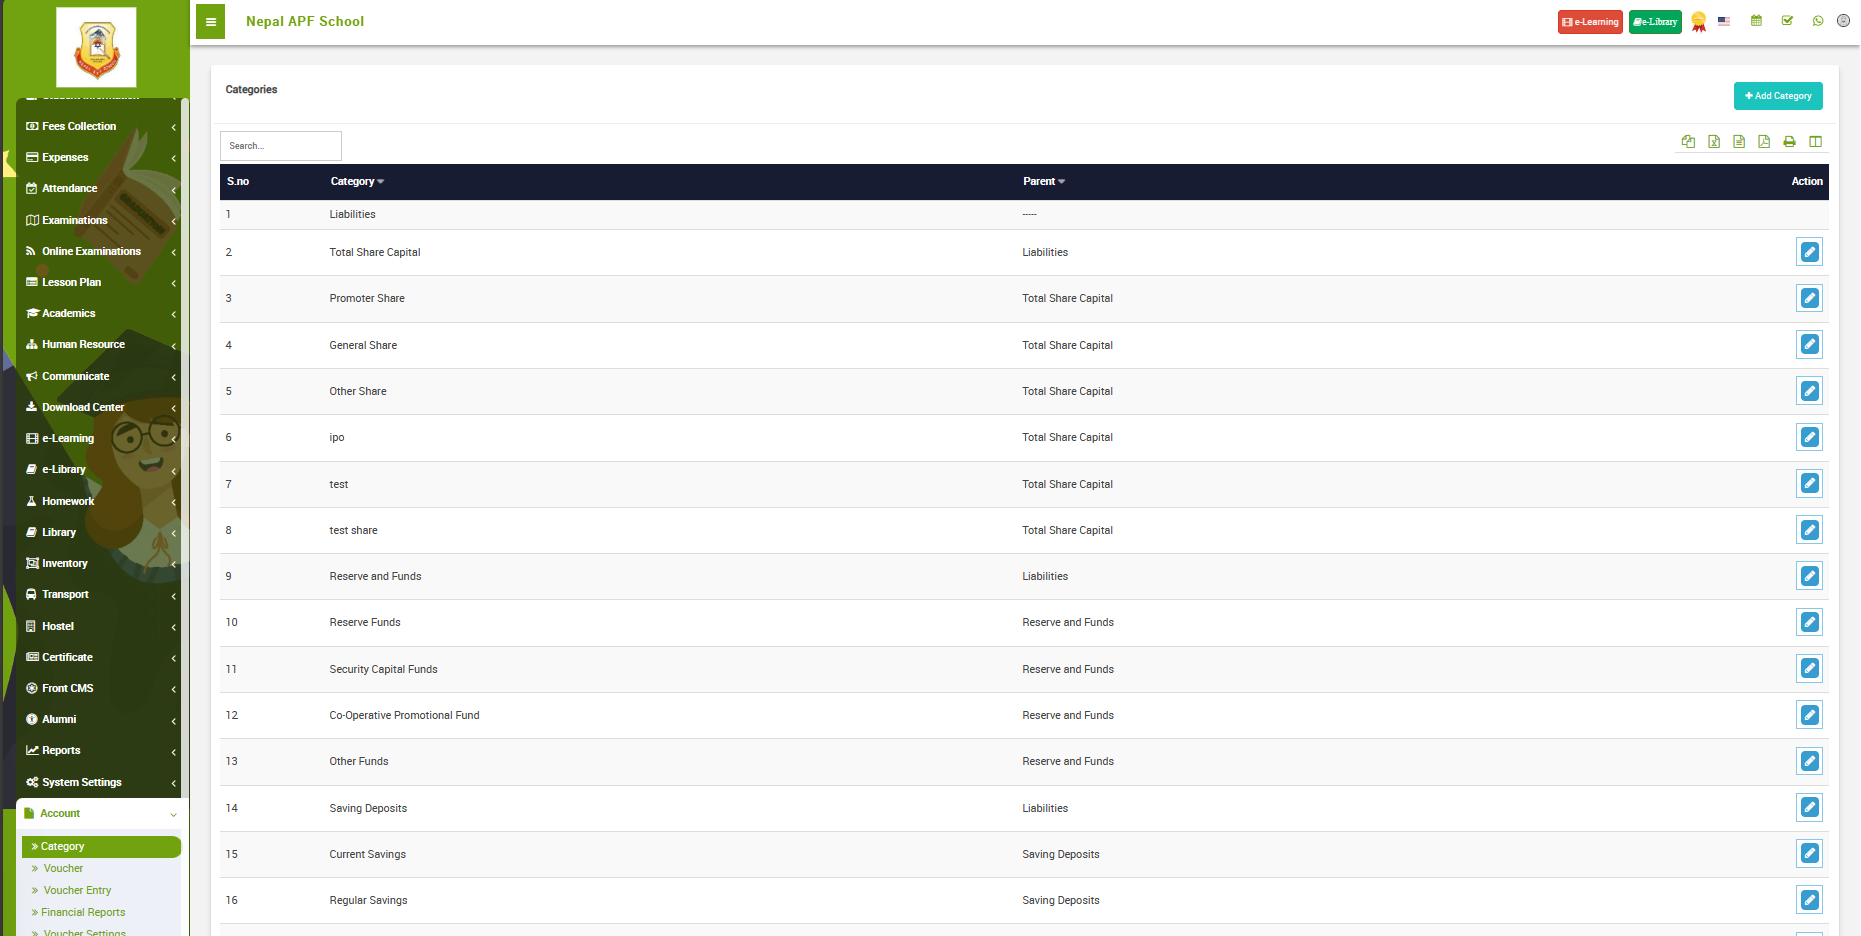
To define categories, go to Category under Account. The following image should appear:
 Image
Image
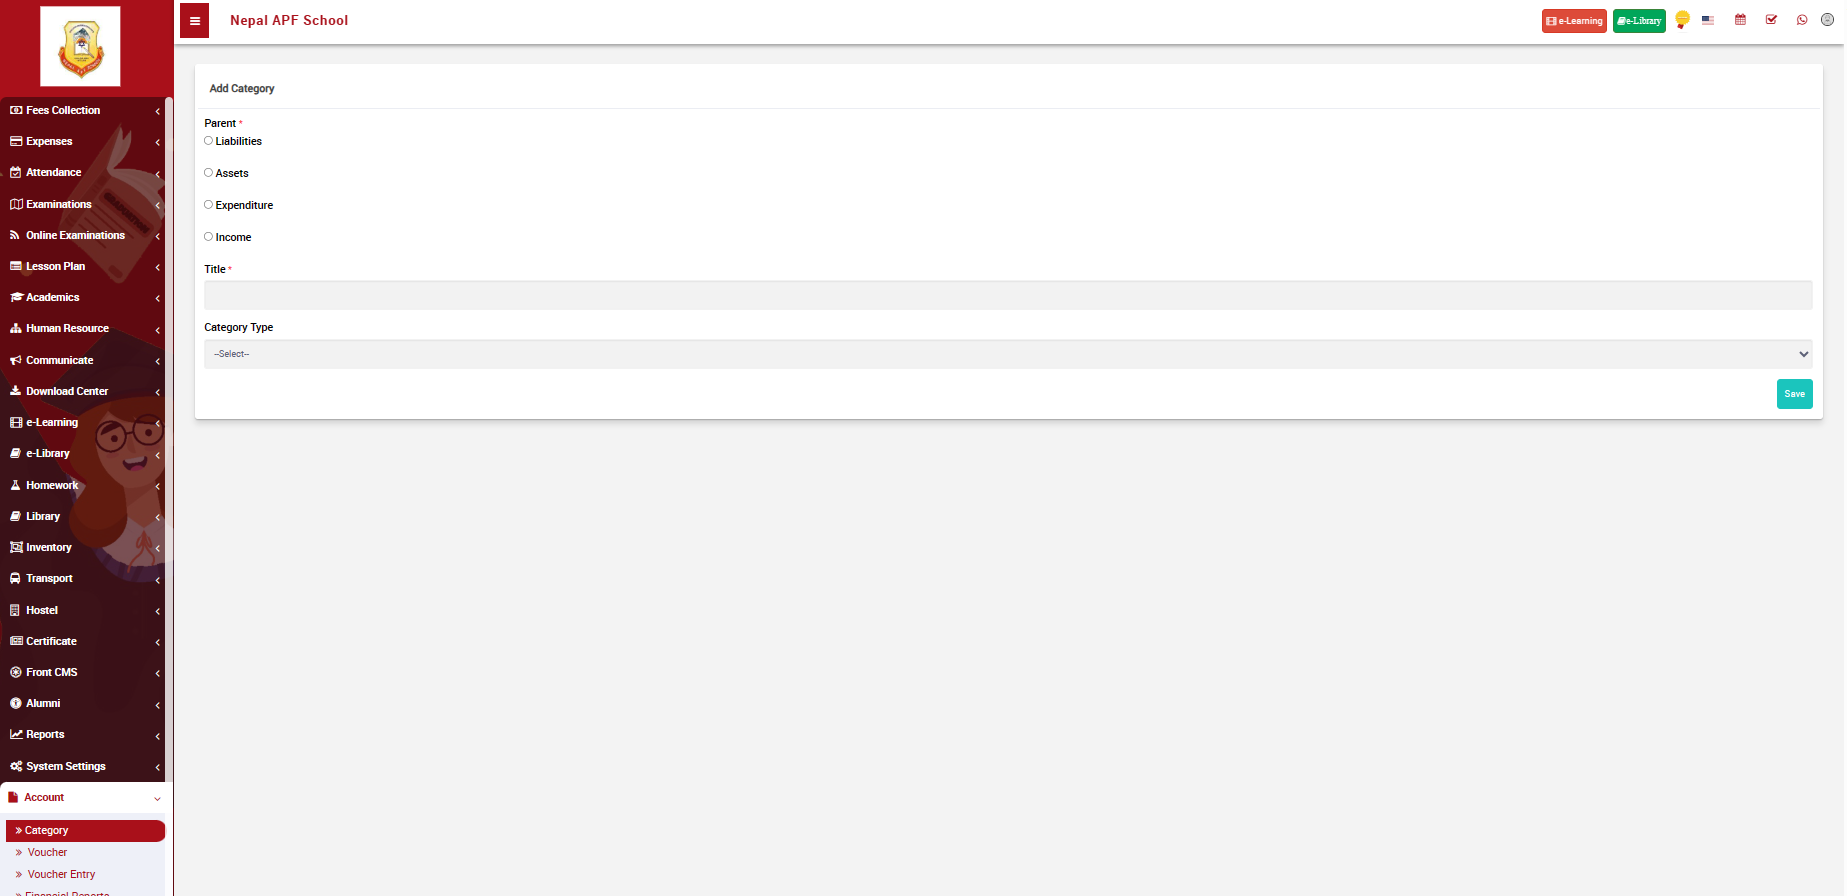
Pre defined categories are shown in the list. If you want to define a new category, click on +Add Category button. You will be redirected to the following page:
 Image
Image
- Select the parent category and define ta category name is the title.
Voucher
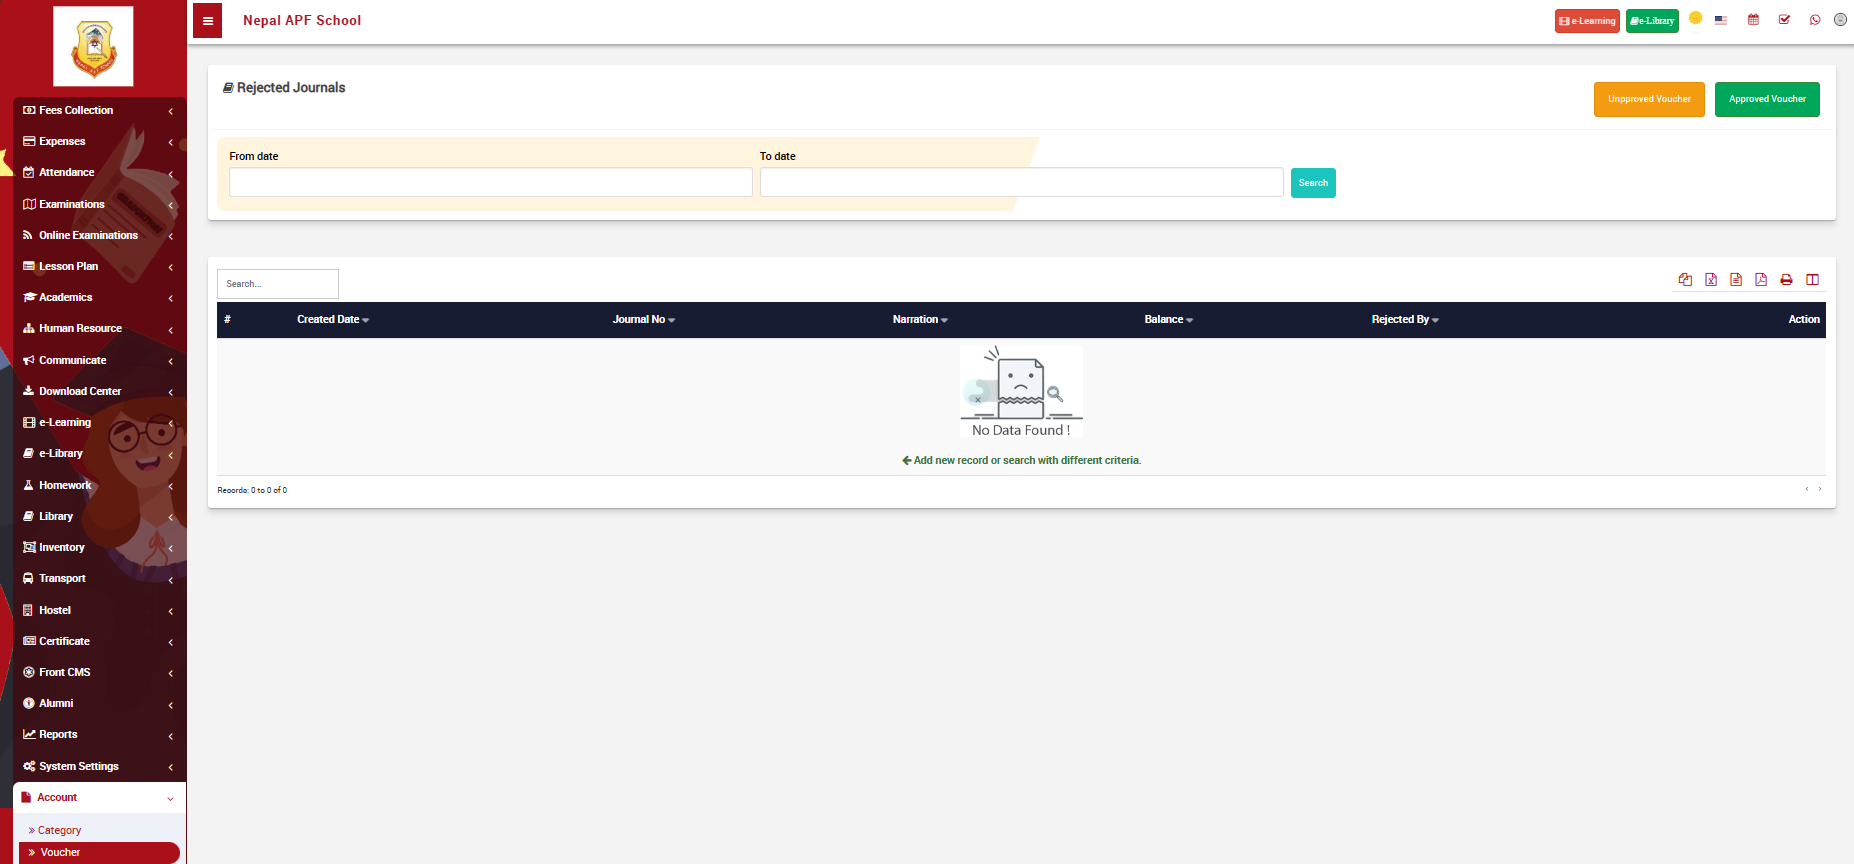
To manage vouchers, go to Voucher under Account. The following page should appear:
 Image
Image
-
On the top of the page, you see a filter to enter from date and to date to search rejected journals.
-
There are two options "Unapproved Voucher" and "Approved voucher"
-
Once you select the type of voucher you want to generate, it should appear on the list below.
Voucher Entry
The "Add Journal Entry" function in an accounting system is a crucial feature for recording financial transactions.
-
Narration: Provide a brief description or explanation of the journal entry. This aids in understanding the purpose or context of the transaction.
-
Entry Date: Specify the "Entry Date" to indicate when the financial transaction took place. This date is crucial for maintaining an accurate financial record and for chronological organization.
-
Ledger: Select the appropriate "Ledger" or account category involved in the transaction. This could include assets, liabilities, equity, income, or expenses.
-
Balance: The "Balance" column displays the current balance of the selected ledger. It is automatically calculated based on previous transactions associated with that ledger.
-
Debit and Credit: Users input the amounts under "Debit" or "Credit" based on the nature of the transaction. Debit increases asset and expense accounts, while credit increases liability, equity, and income accounts.
-
Remarks: The "Remarks" column allows users to add any additional notes or details related to the specific entry, providing further context or explanation.
-
Action: The "Action" column may include options such as "Edit" or "Delete," allowing users to modify or remove entries as needed.
-
Remark Total: The "Remark Total" provides a cumulative total of remarks, summarizing any additional details provided for the journal entry.
-
Total: The "Total" section displays the net effect of the journal entry, showing the overall impact on the financial accounts. The total of debit amounts should equal the total of credit amounts for the entry to be balanced.
After filling the fields, click on save.
Financial Reports
Financial reports serves a distinct purpose in providing insights into various aspects of financial status and performance You can generate the following types of financial reports:
- Trial Balance:
A Trial Balance is a financial report that provides a summary of the balances of all ledger accounts at a specific point in time. It lists the debit and credit balances, helping to verify that the accounting equation (Assets = Liabilities + Equity) is balanced.
- General Ledger:
The General Ledger is a comprehensive report that includes all accounts and their respective transactions. It serves as the primary accounting record, offering a detailed overview of financial activity for each account in a specified period.
- Profit & Loss (Income Statement):
The Profit & Loss (P&L) statement is a financial report that shows the revenues, expenses, and resulting profit or loss over a specific period. It provides insights into the operational performance of a business.
- Balance Sheet:
A Balance Sheet is a snapshot of a company's financial position at a specific moment, presenting assets, liabilities, and equity. It illustrates the company's financial health and its ability to meet its obligations.
- Day Book:
The Day Book, also known as the Journal, is a chronological record of all financial transactions. It includes details such as date, description, accounts involved, and the amount of each transaction. It is a primary source for posting entries to ledgers.